One day as I was looking over the produce section of the grocery and I found a 16-oz bag of riced cauliflower for 99 cents. Soup immediately came to mind but chowder sounded better. Truth be told, a reduced price bag of riced cauliflower doesn’t look that great – a little aged around the edges. But the perfect ingredient for chowder. The only indulgence here is bacon and cheese. Remember, you’re giving up starchy, carbohydrate-laden potatoes called for in traditional chowders.
I’ve always been a big cauliflower fan. Fresh and cut up for a crudité, it’s crunchy and filling. Riced, it’s also a good fresh ingredient in salads. My mother made it often because she usually found huge heads on sale at the grocery. She never incorporated cauliflower into other recipes, though. We ate it steamed with a healthy portion of Velvetta cream sauce. We all loved it and Mom was happy to see her picky children gobble it up.
Cauliflower is enjoying current culinary stardom. Look at the “VegNews” article titled “9 Unbelievably Awesome Uses for Cauliflower.” There’s the fashionable cauliflower crust pizza which everyone I’m around is raving about. Heck, they even use cauliflower in mac ‘n cheese and chocolate cake. And why not? Cauliflower is low-fat, loaded with fiber, high in antioxidants, and a fabulous low-carb alternative for grains and legumes. Take a look at this recipe from Caio, Caio, Bambina: Cauliflower Cake with Pecorino and Basil.
Having said all that . . .
(1-2) Heat a dutch oven over medium heat. Add 1 Tablespoon olive oil. Cut 3-4 strips of bacon into lardons and brown. All those brown bits at the bottom will add amazing flavor to your chowder. Remove bacon onto a paper-towel-lined plate to drain and set aside. (3) Drain off some of the bacon fat. Return to stove and add 1 large onion, diced. (4) Cook until the onion is softened.
1) Add 4 cups of low-sodium chicken stock.
(2) Add 1/4 cup of brown rice. Stir to combine. Cover with a lid, reduce heat to simmer. Continue to cook for 30 minutes or until the rice is cooked through.
(3) Add 2-4 oz of processed cheese, like Velveeta, cut into chunks.
(4) Stir until all cheese is melted. Add more chicken stock or water if the chowder is too thick. Check for seasoning. Garnish with shredded cheddar cheese, sour cream, chopped chives, and reserved bacon bits. I served mine with fresh, hot corn muffins and honey.
If you try this recipe, would you post a photo on my Instagram page? At Mimi’s Table. Thanks!
Yield: 6 servings
Cauliflower Cheese Bacon Chowder
A bag of riced cauliflower is transformed into a delicious, healthy bowl of steamy chowder without the potatoes. Treat yourself to a bowl garnished with shredded cheese, a dollop of sour cream, and crispy bacon bits.
Prep Time20 minutes
Cook Time30 minutes
Total Time50 minutes
Ingredients
3-4 strips bacon, cut into lardons
1 Tablespoon olive oil
1 - 160z bag of riced cauliflower
1 large onion, diced
2 carrots, shredded
4 cups low-sodium chicken broth
1/4 - 1/2 cup brown rice
2-4 oz processed cheese, like Velveeta, cut into chunks
1/2 cup half 'n half or heavy cream, optional
Shredded cheddar cheese, low-fat sour cream, chopped fresh chives, crispy bacon - all for garnish
Instructions
Over medium heat, add one Tablespoon olive oil to a heavy-bottom pot or dutch oven. Add the bacon lardons. Stir occasionally and cook until the bacon has rendered its fat and is brown and crispy. Remove bacon to a plate lined with a paper towel to drain. Remove all but 1 Tablespoon bacon drippings.
Add chopped onions. Stir and cook until onions are softened. Add cauliflower. Stir and continue to cook for 5 minutes. Add shredded carrot. Stir and cook for 5 minutes.
Add chicken stock and brown rice. Stir until combined. Reduce heat to medium-low. Cover the pot and simmer for 30 minutes or until the rice is cooked through.
Remove lid. Add processed cheese chunks and half 'n half, if using. Stir until cheese is melted and the chowder is heated through.
Ladle into bowls. Garnish with shredded cheese, sour cream, chopped chives, and crispy bacon.
Notes
This recipe is almost like baked potato soup without using potatoes. Serve with hot corn muffins.
Cinco de Mayo is just around the corner and I wanted to share this fabulous recipe for Cheesy Enchiladas in Mole. This is Jeff Mauro’s recipe, Ultimate Cheesy Enchiladas, from the Food Network with just a couple of changes. The sauce is not a true Mexican mole, like mole rojo, but it comes pretty close. I’d use this sauce in a heartbeat for any mole dish. The ingredients are easy to put together. I reconstituted powdered mole in this recipe: Turkey Enchiladas in Mole. But this sauce is so easy to make and comes together so quickly that I decided homemade was the way to go.
I decided to char a couple of mild long green chiles, like the ones used for Chile Rellenos, peeled off the skin, removed the seeds, and chopped them into a medium dice. I like the combination of cheese and chiles – who doesn’t like queso dip, right?- and thought chiles would add another layer of flavor.
Let’s talk about cheese.
Obviously, cheese is an important part of this dish. I decided to use Oaxaca cheese because I love it. Oaxaca is a mild-flavored, buttery cheese that melts like a dream. You can find Oaxaca cheese in any Mexican grocery and it is becoming common in most grocery stores, too. I find Oaxaca is cheaper at Mexican stores. Mauro also suggested Chihuahua which would be a good one, too. He added Monterey Jack and cheddar to his filling so the enchiladas are filled with lots of cheesy goodness. I’d recommend that you avoid substituting mozzarella for Oaxaca. Mozzarella melts beautifully, too, but lacks the richness of Oaxaca. Just sayin’.
Add oil to a pot over medium heat. Add flour and whisk together to make a roux. Add ancho chile powder, chipotle chile powder, cocoa, Mexican oregano, garlic powder, and cumin. Whisk together until the mixture begins to thicken and the spices are fragrant – 5 minutes tops. Add chicken stock, whisk until smooth, and cook until the sauce is slightly thickened. Add vinegar and check seasonings. Take off the cooktop and set aside. See, the mole comes together in no time at all.
Now it’s time to soften the tortillas. This step is quick and makes it easier to fill and roll the tortillas into enchiladas. Pour 1/2 cup oil over medium heat. Drop the tortillas one at a time into the hot oil. After 5 seconds, using tongs, flip the tortilla over to cook on the other side – 5 seconds. Remove the cooked tortilla to a baking sheet lined with paper toweling. I like to keep the tortillas separated using paper toweling between the layers. That way they drain well and don’t stick together.
In a large bowl, mix together the cheeses – Oaxaca, Monterey Jack, and sharp cheddar. Add the diced green chiles if using. Stir until everything is combined. Set aside.
Ladle some of your lovely sauce to the bottom of a 9″x13″ pan.
Let’s Roll!
Preheat oven to 375°F. I use a quarter-sheet pan to roll whatever enchiladas I decide to make. Doing so keeps the process neat. This method is especially handy if you’re using flour tortillas dipped into a sauce to soften before rolling. Place 1/4 cup of the cheese filling on top of the tortilla. Roll into a nice tight little bundle and add the enchilada, seam side down, into the baking dish.
Fill your baking dish in two rows of six enchiladas per row.
You’ll have leftover cheese filling. That’s what you want.
Pour the remaining mole sauce over the top of the enchiladas. Bake for 20 minutes or until they’re hot and bubbly. Sprinkle remaining cheese mixture over the enchiladas. Continue to bake for 10 minutes or until the cheese is melted.
Remove from the oven to a cooling rack. Let your enchiladas rest for 10 minutes before serving.
Yield: 6 servings
Cheesy Enchiladas in Mole
Cinco de Mayo is just around the corner. Those who love Mexican food should try this delicious recipe stuffed with cheesy goodness to celebrate the holiday. The sauce is not a true Mexican mole, like mole rojo, but it comes pretty close. I'd use this sauce in a heartbeat for any mole dish. The ingredients are easy to put together.
Prep Time30 minutes
Cook Time30 minutes
Additional Time10 minutes
Total Time1 hour10 minutes
Ingredients
3/4 cup vegetable oil
3 Tablespoons all-purpose flour
2 Tablespoons ancho chile powder
1 Tablespoon chipotle chile powder
2 teaspoons Mexican oregano
2 teaspoons cocoa powder
1 teaspoon ground cumin
2 cups low-sodium chicken stock
1 Tablespoon apple cider vinegar
12 corn tortillas
16 oz. Oaxaca or Chihuahua cheese, shredded
4 oz. sharp Cheddar cheese, shredded
4 oz. Monterey Jack cheese, shredded
2 long green chiles, roasted, peeled, and cut into medium dice OR 1 can diced green chiles
Instructions
Make the mole sauce.
In a medium-sized pot, heat 1/4 cup vegetable oil over medium heat. Add flour and whisk together to form a roux. Add ancho chile, chipotle chile, cocoa, oregano, garlic powder, and cumin. Continue to whisk for 2-4 minutes until the spices become fragrant. Add chicken stock. Continue to whisk and cook until smooth and the mixture begins to slightly thicken - 2-3 minutes. Add vinegar. Stir and check for seasoning adding salt and pepper to taste if needed. Set aside.
Make the filling.
If you're using fresh chiles, roast them over an open flame or in a dry skillet over medium-high heat until the skin is blistered. Remove chiles and place in a plastic bag. Close and allow the chiles to steam for 10 minutes. Take the chiles out and with a sharp knife peel off the skin. Cut open the chile. Remove the stem and seeds. Chop chile into medium dice. OR add a can of diced green chiles. Add chiles to cheese and toss to distribute ingredients. Set aside.
Soften the tortillas.
In a 10-12" skillet, heat 1/2 cup vegetable oil over medium heat. When the oil is hot, quickly fry each tortilla no more than 5 seconds per side. The object here is to soften the tortillas so they're easy to roll. Remove cooked tortillas to a sheet pan lined with paper towels using extra paper towels between layers.
Assemble the enchiladas.
Heat oven to 375F degrees. In a 13"x9" baking pan, ladle 1/2 cup of the mole sauce in the bottom of the pan. Tilt the pan to coat evenly. Set aside.
Using a plate or sheet pan, add 1/4 cup cheese mixture to one tortilla. Roll into a tight enchilada and place seam side down in the baking pan. Repeat for the remainder forming 2 rows of six enchiladas.
Pour remaining mole sauce evenly over the top. Bake for 15 minutes until the enchiladas are heated and the sauce is bubbly. Add remaining cheese filling and return to oven for 10 minutes until the cheese is melted and bubbly.
Remove to a cooling rack and rest for 10 minutes before serving.
Notes
Use any garnish you enjoy with Mexican food. I like shredded lettuce and diced tomatoes. Sour cream would be good or pickled jalapenos and fresh cilantro.
Jeff Mauro at Food Network is the author of this recipe.
I am a noodle fanatic. I love all types. And if you take a look around my blog, you’ll find several noodle recipes. I prefer noodles to rice with Asian dishes. There’s something so satisfying about every saucy bite. Richard bought me a pasta attachment for my mixer a couple of years ago. I made homemade egg noodles for soup and beef & noodles in no time flat. Before that, I had a Marcato pasta maker and I’d hand crank them out or make sheets of pasta for ravioli. There’s nothing like homemade noodles. And there are so many shapes of dried pasta available at the store, too. I’ve been known to loiter in the pasta aisle at the grocery just to look and see what’s new. It’s my favorite grocery aisle.
One noodle I’ve not served before were Asian rice noodles. No, I did not make them – some things are worth paying for. I’ve made dishes with udon, eaten my fair share of lo mein, and everyone’s had ramen at some point in life. But rice noodles didn’t appeal to me for some reason. They looked wimpy. They’re translucent. They looked brittle and fragile. I just wasn’t sure if rice noodles would have the same toothy bite as pasta and egg noodles. Well, I was wrong. They do. As an added bonus, rice noodles are gluten-free.
One day I was perusing one of my favorite food blogs Half Baked Harvest. Tieghan posted her recipe for Saucy Garlic Butter Shrimp with Coconut Milk and Rice Noodles. I was smitten. There was something about her rice noodles swimming in a garlicky, coconut milk, butter sauce surrounded by perfectly cooked shrimp that pushed me over the edge. I had to try rice noodles.
Before I dived into Tieghan’s recipe, I wanted to cook something simple with rice noodles first just to get the hang of preparing them and to test the texture. I hopped over to my favorite Asian market where they have the best noodle aisles. Not just one aisle, but two. Yeah, I was there for a while.
A simple pad thai recipe was the way to go for my experiment. I found this great bag of pad thai noodles that were the perfect width – not too wide and not too skinny. And I found a quick and easy chicken pad thai recipe over at Tasty – One-Pot Pad Thai. Believe it or not, I have a good supply of Asian cooking ingredients in my pantry. Really, the noodles were the only ingredient I needed to buy.
Let’s talk a minute about cooking rice noodles.
The package instructions were worthless for someone who’s taking the rice noodle maiden voyage. Something like “cook in boiling water until done.” Hmmm.
And I wasn’t quite sure about Tasty’s boiling instructions. Again, “cook noodles in boiling water following package directions.” Hmmm.
I finally landed on very simple instructions on the Internet. “Put noodles in a large bowl. Pour boiling water over the noodles. Stir until they’re done.” Hmmm – but that’s the way I went. I figured I could check for noodle doneness without overcooking, which the instructions said would ruin any pad thai dish. The process took about 8 minutes for the width of my noodles, just a little short of al dente.
One-Pot Chicken Pad Thai is categorized as “gluten-free.” Soy sauce is made with fermented wheat. Be sure to use tamari or soy labeled as “gluten-free in this recipe if you have a gluten allergy or sensitivity
Any stir fry dish comes together quickly. Once you begin the cooking process, plan to be committed until the dish is finished. I don’t think the cooking part took more than 20 minutes. I get all my slicing and dicing and make the pad thai noodle sauce in advance of going to the stove.
First, boil four quarts of water. Place dry noodles in a large bowl. Pour the boiling water over the noodles and stir around with tongs to make sure the noodles are submerged. Every once in a while, stir the noodles to make sure they aren’t sticking together. After 6 minutes, start checking for doneness. Finished noodles for pad thai should be slightly short of al dente. Drain the noodles in a colander, rinse with cold tap water to stop the cooking, and run your fingers through the noodles to make sure it’s all cooled down nicely. Shake the colander to remove as much water as you can. Pour one Tablespoon toasted sesame oil over the noodles. And using tongs, toss them until they’re coated with oil so they don’t stick together. Set aside.
PREP:
Cut one large chicken breast in half horizontally, slice into strips and dice into 1″ cubes. Set aside.
Crack two eggs into a small bowl and lightly whisk. Set aside.
Slice 1/3 cup of shallots or one large shallot into thin rounds. Set aside. (In a pinch, I’d sub red or sweet yellow onion.)
Seed one medium fresh red chile. Cut into thin slivers. Set aside.
Slice 3-4 green onions into 1″ pieces. Set aside.
Rough chop 1/2 cup fresh cilantro. Set aside.
In a 2-cup measure mix 3 Tablespoons each fish sauce, rice vinegar, gluten-free soy sauce or tamari, brown sugar, lime juice, sriracha. Mix and set aside.
OK – you’re ready – let’s go! Time to tell your people to wash their hands, set the table, and get a beverage. Your saucy hot pad thai will be ready in minutes. In my beloved family, that process takes at least 20 minutes – just enough time to pull everything together.
Heat a 12″ skillet over medium-high heat. Brush with 1/2 Tablespoon toasted sesame oil. Add lightly beaten eggs to the skillet. Scramble until very lightly browned. Remove to a bowl. Return skillet to the cooktop.
One large chicken breast will make four servings. I sliced the breast in half and cubed it into 1″ pieces. Over medium-high heat, brush the skillet with 1/2 Tablespoon toasted sesame seed oil. Add the chicken cubes, stir, and saute until there’s no more pink in the middle. Remove cooked chicken to a bowl with the cooked eggs. Return skillet to the cooktop.
Right now your skillet is pretty hot. You can see the beautiful brown bits of flavor leftover from browning the chicken. Reduce heat to medium. Add the shallots and peppers. Quickly saute for 1-2 minutes. Add to bowl with chicken and egg. Set aside.
Here’s what your lovely reserve bowl should look like after all that quick stir-frying. Time to move on to the star of the show.
Add cooked rice noodles to skillet. Remember – your noodles are coated with toasted sesame oil – don’t worry immediately about sticking to the bottom of your pan. Using tongs, toss noodles in the skillet.
Return the chicken, veggies, and scrambled egg to the skillet. Continue to toss with tongs until all is incorporated.
Pour sauce into the skillet and toss to coat
Add cilantro, green onions, crushed peanuts, and bean sprouts. Toss to combine. Divide onto individual plates or bowls and garnish with crushed peanuts, green onions, and cilantro. Enjoy!
One-Pot Chicken Pad Thai
One-Pot Chicken Pad Thai is an easy and quick stir fry recipe with favorite Asian flavors and a nice sauce with a bite of heat. Crushed peanuts add a nice crunch.
Prep Time15 minutes
Cook Time20 minutes
Total Time35 minutes
Ingredients
4 SERVINGS
8 oz pad thai rice noodles
2 eggs, lightly beaten
1 large chicken breast, cut into 1" chunks
1/3 cup or 1 large shallot, thinly sliced into rounds
1 red chili, stem and seeds removed and cut into slivers
1-15oz can bean sprouts, drained OR 2 cups fresh bean sprouts
1/2 cup peanuts, crushed
3-4 green onions, cut into 1" pieces
1/3 cup fresh cilantro, roughly chopped
For the Sauce
3 Tablespoons each fish sauce, rice vinegar, gluten-free soy sauce or tamari, brown sugar, lime juice, sriracha
Instructions
Prepare rice noodles Place uncooked noodles in a large bowl. Pour 3-4 quarts of boiling water over the noodles. Toss lightly with tongs to make sure noodles are submerged. Let steep for 6 minutes, tossing occasionally to keep noodles from sticking together. Check for doneness - noodles should be just short of al dente - maybe 1-2 minutes more. Drain in a colander. Rinse noodles with cold water to stop cooking and shake to remove excess water. Return to bowl and add 1 Tablespoon toasted sesame oil. Toss until noodles are coated. Set aside.
Over medium-high heat, brush the inside of a 12" skillet with 1/2 Tablespoon toasted sesame oil. Add beaten eggs. Scramble until set. Remove to a bowl. Set aside.
Brush the skillet again with 1/2 Tablespoon toasted sesame oil. Add peppers and shallots. Stir fry for 1 minute. Remove to bowl with eggs. Set aside.
Brush the skillet with 1/2 Tablespoon toasted sesame oil. Add chicken and stir fry until the meat is no longer pink in the middle. Remove to bowl with eggs, peppers, and shallots. Set aside.
Reduce heat to medium. Add noodles and toss just to warm.
Add reserved chicken, eggs, peppers, and shallots. Toss to combine.
Add sauce. Toss to coat.
Add bean sprouts, crushed peanuts, green onions, and cilantro. Toss to combine.
Divide into individual servings. Garnish with extra crushed peanuts, green onions, and cilantro.
Notes
One-Pot Chicken Pad Thai is categorized as "gluten-free." If you have gluten allergy or sensitivity, please be sure to use "gluten-free" soy sauce or tamari.
My mother, Shirley, was a pie master. She could mix up crust for a double-crust pie in a matter of seconds. It was always the same recipe: 2 cups all-purpose flour mixed with 1 teaspoon salt and 2 tablespoons granulated sugar (sugar if she was making a sweet pie); 2/3 cup Crisco; and 3-4 tablespoons ice-cold water. Her’s was always perfect. Perfectly flavored, perfectly crimped, and perfectly browned. Mom didn’t make savory pies often, but this recipe was one of our favorites.
Three reasons why you should bake up this delicious ground beef pot pie and keep it in your recipe box:
This isn’t a store-bought frozen one heated up in the oven. It’s one you make and bake with all the love I know you put into every dish.
Shirley’s Ground Beef Pot Pie is quick and soooo easy to prepare and is inexpensive to make.
Everyone LOVES pot pies!
What makes this pot pie so easy?
Except for the browned ground beef, you can make this entirely with pre-made ingredients.
All pot pies need a crust. I like to buy pre-made pie crusts from the grocery because I lack my mother’s skill. I store them in the freezer until I want to make any sort of pie. Of course, you can make your own crust – good for you! But having pre-made ones at the ready is a real time-saver. I find boxes of double pre-made pie crusts in the grocery refrigerator section for $1.79 – that’s a pretty economical time-saver and perfect for savory or sweet pie applications. Or you might try building the crust out of phyllo sheets like this Chicken Pot Pie in Phyllo Crust.
For this pot pie recipe, I cubed fresh carrots and potatoes and completed the filling with frozen peas. But you can substitute frozen carrots and peas – you know the combo bags sold in grocery store freezer sections. And cubed frozen hash brown potatoes – another staple in my freezer. And for a real simple prep, you can use frozen chopped onions for those days you just don’t feel like chopping an onion. I periodically have those days.
I am not a big fan of canned vegetables. Frozen is the way to go for me if I’m not using fresh veggies.
Frozen vegetables taste fresher and maintain a crunch, although not as perfect as fresh vegetables but better than canned. I know canned vegetables are less expensive than frozen. Please consider this – when you drain off the canning fluid from canned vegetables, what are you left with? A 15oz can of vegetables yields less than a 12oz package of frozen vegetables. And then there’s the added salt in canned vegetables that I try to avoid at all costs for health reasons.
Add one Tablespoon olive oil in a 12″ skillet over medium-high heat. Brown 1½ – 2 pounds of ground beef or ground turkey. Once the meat is browned, drain off the fat in a colander and set aside.
Return the skillet to the cooktop. Add one tablespoon olive oil and heat over medium-high heat. Add chopped onion and diced carrots, stir, and quickly saute until the onions become translucent.
Add diced potatoes and minced garlic. Stir and cook for one minute. Add 3/4 cup of beef stock. Stir scraping up the brown bits at the bottom of the skillet.
Turn the heat down to medium-low. Put a lid on the skillet and steam the vegetables for 10 minutes.
While the veggies are steaming, it’s time to get the pie crust ready. If you’re using packaged, it’s just a matter of bringing the crusts to room temperature. Even though pre-made crusts are 9″ in diameter, I like to roll mine out to make them a bit larger and thinner. If you’ve decided to make your own crust, you should follow your recipe and refrigerate for 30 minutes before rolling. I’d make the crust before starting the recipe so your crust has time to rest.
Fit pie crust into a 9″ deep-dish pie pan. Return to the cooktop, remove the lid from the skillet, and add the cooked ground beef and frozen peas. Stir until combined and spoon the ground beef filling into the crust. Roll out a crust for the top and put it on top of the filling.
Next, crimp the edges to seal both crust layers and cut slits over the top crust. Mix one egg with one tablespoon water and whisk with a fork to make an egg wash. Brush the egg wash over the top of the pie. At this point, you can sprinkle the top of your pie with flaky salt and/or coarsely ground black pepper.
Pop your pot pie into a pre-heated 425°F oven. Bake for 30 minutes or until the crust is flaky and nicely browned. Remove to a cooling rack and allow to rest for 10 minutes before serving.
While the pie is resting, you can whip together a quick and simple brown gravy to ladle over the hot pot pie slices.
In the same skillet you used to prepare the vegetables and over medium heat melt 2 tablespoons butter. Add 2 tablespoons all-purpose flour. Whisk until combined which forms a roux.
Add 2 cups of warmed beef broth. Whisk until combined.
Continue to cook and lightly whisk for a few minutes until the sauce begins to thicken. Check the seasoning – add salt and pepper if needed. You may want to add dried herbs to the sauce to kick the flavor up a notch.
And there you have it! A nice green salad or a bowl of fresh fruit would go well with your extremely flaky and delicious beef pot pie.
Please Note: There is no binder in the meat pie filling. Part of this is because adding more liquid to the filling can make the bottom crust soggy. I like the ground beef pot pie to be dryer with a flaky crust. That’s why I suggested making a side beef gravy. However, you might add one cup of shredded cheese just before spooning the filling into the pie crust. You can even make the pot pie Southwestern by adding a can of drained chopped chilies and shredded Monterey Jack cheese to the filling, too, served with a lovely salsa with shredded lettuce, sour cream and/or guacamole. It’s really up to you.
Yield: 6
Shirley's Ground Beef Pot Pie
My mother, Shirley, was a pie master. She could mix up crust for a double-crust pie in a matter of seconds. It was always the same recipe: 2 cups all-purpose flour mixed with 1 teaspoon salt and 2 tablespoons granulated sugar (sugar if she was making a sweet pie); 2/3 cup Crisco; and 3-4 tablespoons ice-cold water. Her's was always perfect. Perfectly flavored, perfectly crimped, and perfectly browned. Mom didn't make savory pies often, but this recipe was one of our favorites.
Prep Time20 minutes
Cook Time30 minutes
Total Time50 minutes
Ingredients
1 1/2 - 2 pounds ground beef (80-20 or leaner) OR ground turkey
1 medium onion, diced OR 1/2 bag frozen chopped onions
2 large russet potatoes, diced OR 2 cups frozen diced hash brown potatoes
3 carrots, diced
1 cup frozen peas
OR 1-12oz bag of frozen peas and carrots
2 cloves garlic, minced
3/4 cup low sodium beef broth
Olive oil
Salt & Pepper
Crust for one 9" double-crust pie
1 egg
1 Tablespoon water
Instructions
Preheat oven to 425F degrees.
In 12" skillet, brown ground meat until pinkness is gone. Drain ground meat in a colander and set aside.
Return skillet to the cooktop. Over medium-high heat, add 1 Tablespoon olive oil. Add onions and carrots. Stir and saute until onions are translucent.
Add potatoes and garlic. Stir and cook for 1-2 minutes.
Add broth to skillet. Reduce heat to medium-low. Cover with a lid. Steam vegetables for 10 minutes.
Remove lid and add frozen peas and cooked ground meat. Stir to combine Turn off heat and set skillet aside.
Fit a 9" deep-dish pie pan with one pie crust. Spoon in the meat filling.
Place the second pie crust over the top. Crimp the edges to seal both crusts. Using a sharp knife, cut slits into the crust.
Make egg wash with one egg and 1 Tablespoon water. Brush the top crust with egg wash.
Bake for 30 minutes or until the pie is nicely golden brown.
Remove pie to a cooling rack and let rest for 10 minutes before serving.
Notes
You can make a simple beef sauce to serve. In the same skillet used to cook the vegetables over medium heat, melt 2 Tablespoons butter. Add 2 Tablespoons all-purpose flour. Mix to form a roux. Add 2 cups warmed beef broth. Stir and continue to cook until the sauce begins to thicken. Check for seasoning - add salt and/or pepper if needed. You can also add dried herbs to the sauce to kick up the flavor.
Please see additional notes in the body of my post for other suggestions.
Richard and I love chicken wings. I mean, who doesn’t? Hot, crispy, juicy and slathered in your favorite hot sauce or dipped in any variety of dressings and sauces on-the-side, chicken wings are the perfect finger food. And Mimi’s Fried Chicken Wings deliver just that!
I’ve had the good fortune over the last few shopping trips finding chicken pieces of all types at great prices. Since the COVID-19 pandemic, delis at my local grocery store have had to purge the chicken parts they normally use for deli fried and barbecued chicken. As the story goes, they’ve not sold nearly as many ready-to-eat meals as they did before the virus struck. The result – I got a large 5-pound package of chicken wing drummies and flats for the unheard price of 59 cents/pound! And there were several packages available. I resisted the urge to buy 2-3 packages. My freezer, both of them, are already filled with other packages of chicken I purchased earlier at unheard of prices. And I did not want to deny others this great deal. During the lockdown days of the coronavirus, wings are a fabulous and novel treat for families to enjoy and Mimi’s Fried Chicken Wings are easy to make.
I’m going to digress a bit. For a moment, step into the “Wayback Machine.” In the good old days, chicken wings weren’t the big culinary deal they are now. If we didn’t fry them with Sunday’s chicken, we’d freeze them to make stock. You could find chicken wings at the grocery for 19-29 cents/pound. Then along came Hooters in 1983 and the national wing frenzy was born. Why? Because wings are delicious and, at that time, cheap. Wings were eaten long before then in Buffalo, NY, a frugal community that knows good food and a good bargain and boasts to be “The Chicken Wing Capital of the World.” Who would have believed wings would become so coveted and come to cost more than boneless, skinless chicken breasts or whole chickens for that matter? Not me. So finding wings at a great price made my heart leap!
A Word About Deep Frying
I’ve learned a couple of things about deep frying food over the years.
Make sure you use a large heavy skillet, like a cast-iron skillet or an enameled cast-iron skillet. Your skillet should be large enough to submerge food into the hot oil so the food can swim around – don’t overcrowd the pan. I’ve got this great 12″ Cuisinart skillet that I use for lots and lots of food prep, including deep frying. It’s perfect for the job.
Use an oil with a high smoke point like peanut or canola oil. I prefer peanut oil. My mother used Crisco exclusively and I did for many years, too – then switched to peanut oil because of its high smoke point.
Make sure whatever you decide to fry is patted dry before putting it in buttermilk, as in this recipe, or any other pre-fry prep like breading. There’s so much liquid in a tray or bag full of thawed chicken parts. So I line a half-sheet pan with paper towels, put the food on the toweling, and put another layer of paper towels on top and gently pat it all dry. I do this for fish, shrimp, and pork, too.
Invest in a good thermometer. You can use a candy thermometer, but I find they’re too tall. It sticks out of a skillet like the Statue of Liberty. I found this CIA one, I don’t know where many years ago. It clips onto the edge of the pan and is easy to read. It reads to only 400° but for most deep frying, you won’t need to go higher than that.
Put the wings into a deep bowl and pour over 1½ cups of buttermilk. Let stand for at least 30 minutes and not more than 8 hours in the refrigerator. When you’re ready to fry, bring the wings out and allow them to come to room temperature.
Pour 3″ of oil into your skillet. Skillets come in lots of different sizes so rather than give a liquid measure amount, you’ll want to pour until you reach a 3″ depth of oil. Clip your thermometer to the lip of the skillet and over medium-high heat, warm the oil to 350°. I don’t like to rush this step. It takes some time for the oil to come to temperature. I like to give it 20 minutes or so.
Essential to any breaded deep fry cooking is a pair of plastic gloves. They help your hands from getting gummy from removing wet wings into the flour dredge. I leave my gloves on for the whole frying process washing my gloved hands after I’ve dropped each batch into the oil. My manicure stays perfect.
In a separate bowl, make a dredge with flour, salt, pepper, paprika, garlic powder, onion powder, cayenne pepper, and baking powder.
There’s no need to drain buttermilk from the wings. Simply take one piece of chicken, dredge it in flour mixture, and drop in the skillet. I start with a small batch to keep the oil temp from dropping too much. Keep your eye on the temperature to try to maintain a steady 350° by adjusting the heat as needed. I wouldn’t put in more than 6-8 pieces per batch.
Fry the wings on one side for 3-4 minutes. Turn and continue to fry for another 3-4 minutes. They should be golden brown.
Remove to a half-sheet pan fitted with a rack and keep them warm in a 250°F oven until ready to serve.
If you want to serve your wings tossed in sauce, get a large, preferably stainless steel bowl because they’re lightweight. Pour sauce into the pan and toss the wings until they’re coated.
Here’s the sound of heaven in the deep fry world.
And here’s the finished product! This recipe is so simple – no muss, no fuss. Extremely crispy, golden brown, and delicious.
This is the way we’ve always eaten our wings. I figure the carrots and celery are the healthy part of this meal. Who can resist bleu cheese dressing with extra bleu cheese! Richard got out Frank’s Hot Sauce to dunk his along with the dressing.
Remember, the deep fry technique can be used with any fried food – chicken, fish, shrimp or breaded green beans, carrots, onion rings – go for it!
Yield: 6-8
Mimi's Fried Chicken Wings
We love chicken wings. I mean, who doesn't? Hot, crispy, juicy and slathered in your favorite hot sauce or dipped in any variety of dressings and sauces on-the-side, chicken wings are the perfect finger food. And Mimi's Fried Chicken Wings deliver all that you'd expect.
Prep Time30 minutes
Cook Time45 minutes
Total Time1 hour15 minutes
Ingredients
5 pounds of chicken wings cut into drumettes and flats
1 1/2 cups buttermilk
[u]For The Flour Dredge[/u]
2 cups all-purpose flour
3 teaspoons Kosher salt
1 teaspoon black pepper
1/2 teaspoon paprika
1/2 teaspoon cayenne pepper
1/2 teaspoon garlic powder, not garlic salt
1/2 teaspoon onion powder, not onion salt
1/2 teaspoon baking powder
Peanut or Canola Oil for frying
Instructions
Place wings and buttermilk in a large bowl. Stir to coat all pieces. Set aside in the refrigerator for at least 30 minutes or up to 8 hours.
In another bowl, mix flour, salt, pepper, paprika, garlic and onion powders, cayenne, and baking powder. Mix until combined. Set aside.
When ready to deep fry, pour oil into a heavy skillet to the depth of 3". Heat oil over medium-high heat. Using a thermometer, heat oil to 350F degrees.
One piece at a time, lift a wing part out of the buttermilk and dredge in the flour mixture. Shake off excess flour and immediately drop chicken in hot oil.
Fry wings for 3-4 minutes. Turn to brown the other side for another 3-4 minutes. Cook 6-8 wings in one batch.
Remove cooked wings to a sheet pan fitted with a rack. Keep warm in a 250F degree oven while finishing the remainder.
Notes
5 pounds of chicken wings is a lot but great for a party. Half the recipe if you wish. Cooked wings can be tossed with your favorite sauce at service OR serve wings with dipping sauces on the side - bleu cheese or ranch dressing, hot sauce or whatever you prefer.
It’s still not time to begin planting here in central Indiana. Our official frost-free date is May 15. For the last month adhering to the COVID-19 stay-in-place orders, I’ve had plenty of time to search garden/nursery websites to select exactly what I’d like to plant this year. I’ve found some amazing things!
This is a picture of the front of my house, actually my condo, in 2015. I removed a small blooming crabapple from the left corner soon after I moved in. So you can see, I have lots of room for brand new beautiful flowers. I’m leaning toward using lots of perennials to keep down on flower bed maintenance, and plants that can take full sun and are drought tolerant.
You can barely see the very large peony just to the left of the sidewalk. It was a large mound covered with great big blooms. I love peonies, but their bloom time is so short and the stems and blooms bowed to the ground after a heavy spring rain. I hated to do it, but I removed it last fall. The happy part of the story is that I put the roots in a large planter, it survived the winter, and it’s beginning to sprout stems! Hooray!
Please watch this video about planting a cottage-style garden. Laura LeBoutillier is the owner of a video gardening blog, Garden Answer. She and her husband live in eastern Oregon on a huge homestead. Recently they purchased acreage next to their property that they will transform into a cutting flower garden. To say this girl has boundless energy and ambition would be an understatement. She’s always planting and always bringing new ideas. I’ve found Laura’s videos so friendly and helpful. She’s such an inspiration.
One day I was looking around her blog and found this video on planting a cottage-style garden. I was in love. Below is her video: “Tips on Planting a Cottage Garden.”
I like the idea of a cottage garden because it’s not supposed to be highly structured. That lends well to my tendency to fall in love with lots of different kinds of plants. I don’t need to plant an entire border of one plant. I can mix the border with a variety of annuals and perennials. Yep, this is going to work.
I don’t intend to use all of the plants that Laura did in her lovely garden. Like the allium – not sure about that one yet. But others really appealed to me. I’ve always loved the color combination of peach and lavender. To me, it’s soft, feminine, and pleasing. So, that’s the color palette I’m aspiring to. Here’s where I’m starting.
This is the third season for my Bobo® hydrangeas that I planted under my living room window. I’m loving hydrangeas and this variety is spectacular. You can see (above) they’re leafing out very nicely. Bobo® hydrangeas are dwarf shrubs but they have full-sized panicles that cover the branches from the ground to the top. They tolerate full sun, and have strong, sturdy branches that won’t flop over with wind and rain. They grow 36″ tall and spread 48″. I’m expecting good things for my Bobo’s this season. (Proven Winners)
Here’s another show stopper “The Lady Gardener” shrub rose from David Austin. I’ve always wanted David Austin roses. When I saw these in Laura’s cottage garden, I decided I couldn’t wait any longer. This particular rose has a strong fragrance, large full blooms, and is highly disease resistant. In addition, they’re a soft apricot color and a vigorous repeat bloomer. I’m planting these on the side of my bed along the sidewalk. They grow 4′ tall and 4′ wide. I ordered 3 bare root roses and they’ll fill in the sidewalk bed very nicely.
Illuminati Tower™ from Proven Winners is a dwarf mock orange with a narrow and upright habit. The smell from mock orange blooms is unforgettable but a normal mock orange bush would not fit into my garden. This one won’t take up too much space either – perfect for my garden. It grows 36″ high and has a 18-24″ spread. I have some sort of perennial blue salvia in the bed that blooms in summer. I’m planting Illuminati Tower™ among the salvia. That way there will be color from spring through the summer in that spot in the corner of my bed near the front door.
These are selections for lavender color interest. First is Cat’s Pajamas nepeta. Cat’s Pajamas gets only 12″ tall but spreads 18-20″. It’s a great choice for the border of my bed in a couple of places. It’s a prolific bloomer, but I may have to cut them back when it’s past its peak to encourage reblooming. It’s a small sacrifice for such a pretty plant.
My second lavender choice is Sweet Romance Lavender. Who doesn’t love the smell of lavender? To me, it’s such a clean and pleasing smell. So, I’m going to alternate Sweet Romance with Cat’s Pajamas to complete my border. Sweet Romance grows 12-18″ tall with an equal spread. It’s heat and drought tolerant. I can’t wait!
My final selection of perennials is this Siloam Peony Display daylily. It only grows 18″ tall, but it’s such a beautiful flower with peach-colored blooms – more like a peony than a daylily, according to the description. And it is a repeat bloomer if you remove the spent flower stalks before the plant begins to produce seed pods. This plant is so pretty!
I think that’s enough for now. I will bring some annuals into the cottage garden bed to fill in blank spaces until the perennials mature.
What are your plans for your flower beds this year? I’d love to hear about your inspiring garden news!
I watched Ree Drummond, aka “The Pioneer Woman,” make this recipe “Steakhouse Pasta” on the Food Network Channel. Quite literally, my mouth was watering. I strayed from Ree’s recipe a wee bit based on ingredients I had on hand.
Rather than skirt steak, I had a package of chuck steak in the fridge waiting to be transformed. The steaks were only $3.69/pound at the grocery and Richard loves chuck steaks although I rarely buy them. In the “Wayback Days”, my dad used to buy chuck steak not for a family meal, but for his cherished buddy, Harry, his dog. Harry was spoiled and happy.
I also added some fresh mushrooms and used frozen chopped spinach instead of fresh. Ree’s recipe calls for crumbled blue cheese. I opted for freshly grated Parmesan and cream cheese. The Pioneer Woman was shooting for a steakhouse-like pasta dish, thus the blue cheese, spinach, and horseradish – all steakhouse classics. And she uses pappardelle, which is a wide pasta – wider than fettuccine. I had linguine on hand so that’s what I used.
I must say that this was an easy and delicious dish. Plenty of creamy, cheesy sauce punched with a flavorful variety of veggies for the pasta. And the grilled steak that goes with it is perfect, even if it was chuck steak which turned out to be flavorful and tender. No wonder Harry was so happy!
Let’s Make Some, Shall We?
First thing, fill a large pot with water, cover, and bring to a boil. This is for the pasta. Be sure to save 1-2 cups of the pasta water after cooking to use for the sauce. Prepare the pasta while you’re cooking the sauce. If you’re using frozen spinach, thaw it in the microwave for 45 seconds, drain it, and squeeze it dry using paper towels.
Here are all my lovely assembled ingredients for the sauce except the heavy cream and half-n-half. I had a partial container of cherry tomatoes in the fridge, so I halved them and threw them in with the canned tomatoes. I quartered baby portobello mushrooms – I use portobellos because I think they have more flavor than white buttons. Notice there are no onions used in this sauce. However, I wouldn’t judge you if you threw in 1/2 a diced or sliced onion.
I love horseradish and its addition gives the sauce a nice kick without an overpowering flavor. The horseradish I use is from St. Elmo’s Steak House, an Indianapolis institution. St. Elmo’s is famous for their shrimp cocktail served with a memorable eye-watering, sinus-clearing, breath-stopping cocktail sauce. Their sauce is HEAVY with freshly grated horseradish they prepare every day. It’s legendary. St. Elmo’s sells their cocktail sauce and horseradish commercially and it’s now easy to find in grocery stores. Theirs is the only horseradish I use. There’s little horseradish in this recipe – don’t be afraid. If you hate horseradish, leave it out.
Next, in a 12″ heavy-bottomed skillet over medium heat add one Tablespoon olive oil and the mushrooms. Stir the mushrooms around for 5 minutes or so until they begin to soften and brown. I don’t use lots of oil when I brown mushrooms. I like to heat them up so they release their liquid and the liquid reduces a bit. I think it adds a little umami to a dish. Mushrooms are perfect to add subtle flavor.
Add the minced garlic to the mushrooms and stir for one minute or less until the garlic becomes fragrant.
See how the mushrooms cooked down and left flavorful browned bits at the bottom of the skillet? Lovely. Add the halved cherry tomatoes, if using. Stir and cook until the tomatoes just begin to wilt. Then stir in 1/2 cup of white wine or chicken stock. Bring to a gentle simmer and continue to cook until the liquid is reduced by half. Quick – 2-3 minutes.
Add canned petite diced tomatoes with their liquid along with 1/2 Tablespoon dried basil, 1/2 teaspoon granulated sugar, and 1/4 teaspoon crushed red pepper. Bring to a gentle simmer and continue to cook for 10 minutes or so stirring every once in a while.
While the sauce is cooking, it’s time to get the steak ready for the grill. My chuck steak was thin enough, 1/2″, that I cooked it quickly on our gas grill, but you can easily use a grill pan or large skillet on top of the stove. Sprinkle the meat with a little salt and pepper on both sides. When your grill or skillet is hot, sear the meat for 3-4 minutes on both sides for medium-rare. When done, remove from heat to a plate and loosely cover with foil until you’re ready to serve.
Here’s the finished beautiful sauce and how to make it:
Reduce the heat to low under the tomato and mushroom mixture.
Add 1/2 cup of heavy cream and 1/2 cup of half-n-half. If you don’t have heavy cream, use all half-n-half. Stir until it’s all incorporated.
Stir in 2-3 oz of cream cheese. Stir until the cheese has melted into the mixture.
Add 1 Tablespoon horseradish, if using. Stir.
Add 3/4 cup of freshly grated Parmesan cheese. Stir until it’s all incorporated.
Add 3 cups of fresh spinach OR run a knife through the thawed and dried frozen spinach to break up the clumps. Stir until incorporated
I had 1/4 cup or so of roasted pine nuts hanging around on the kitchen counter, so they went into the sauce, too.
Add the cooked, drained pasta. Using tongs, toss everything together until the pasta is well coated. You may have to add some of the pasta cooking water to help loosen the pasta – I find doing so actually makes the pasta sauce creamier. I topped my finished pasta with shredded mozzarella cheese – why not?
Slice your steak into strips and serve on top of the pasta or serve into individual pasta bowls with steak on the side like I did here and top with more freshly grated Parmesean at service.
And there you have it! This dish is filled with flavor from all the vegetables and cheese, and so satisfying.
Thanks, Ree, for your inspiration! This recipe is going on my regular menu rotation!
Yield: 6
Steak with Creamy, Cheesy Pasta, Tomatoes & Mushrooms
This dish is inspired by The Pioneer Woman's Steakhouse Pasta. It's filled with flavor from all the vegetables and a creamy, cheesy sauce perfect for pasta. Delicious and so satisfying!
Prep Time15 minutes
Cook Time30 minutes
Total Time45 minutes
Ingredients
1 1/2 pounds dried pasta, I used linguine but pappardelle or fettuccine works, too
1 Tablespoon olive oil
8oz baby portobello mushrooms, quartered
3 cloves garlic, minced
1 cup cherry tomatoes, halved, optional
1 15oz can petite diced tomatoes
1/2 cup dry white wine or chicken stock
1/2 teaspoon granulated sugar
1/4 teaspoon crushed red pepper flakes
1/2 Tablespoon dried basil
1/2 cup heavy cream
1/2 cup half-n-half
2-3 oz cream cheese at room temperature and cut into chunks
3/4 cup freshly grated Parmesan cheese + more for serving
1 Tablespoon prepared horseradish
1 box frozen spinach, thawed, drained and squeezed dry with paper towels and chopped again to break up clumps OR 3 cups fresh spinach
1-2 cups reserved pasta cooking water
1 pound chuck steak OR skirt steak, flank steak - any thin steak that will grill quickly
Instructions
Fill a large pot with water, cover with a lid, and bring to a boil. While waiting for the water to boil, make the pasta sauce.
Heat a 12" heavy-bottomed skillet over medium heat. Add 1 Tablespoon olive oil. Add mushrooms and saute for 5 minutes or so until the mushrooms begin to brown and release their liquid.
Add minced garlic, stir, and saute for 1 minute or less until the garlic becomes fragrant.
Add white wine, stir scraping the brown bits on the bottom of the skillet and gently simmer until the liquid is reduced by half.
Add cherry tomatoes, if using, stir and cook until the tomatoes are just softened.
Add petite diced tomatoes and dried basil, stir. Gently simmer, uncovered, for 10 minutes.
Get steak ready for the grill. Sprinkle lightly with salt and pepper on both sides. Grill for 3-4 minutes on each side for medium-rare. Or use a grill pan or large skillet on the stovetop. Remove to a plate and cover loosely with foil. Allow to rest until service.
Cook pasta according to package directions. Reserve 1-2 cups of pasta cooking water. Drain cooked pasta. Set aside.
Reduce heat under tomato sauce to low. Add heavy cream, half-n-half, and horseradish. Stir until warmed.
Add cream cheese and stir until melted.
Add Parmesan and stir.
Add spinach and stir. If using fresh spinach, cook until it begins to wilt.
Add the cooked, drained pasta. Using tongs, lift the pasta until coated with sauce. You may need to use the reserved pasta water to thin the sauce so it coats evenly.
Cut steak into 1/2" strips and serve on top or along side the pasta.
Notes
Feel free to substitute 1/2 cup grated fontina cheese for cream cheese. You may use 1 cup half-n-half in place of 1/2 heavy cream and 1/2 cup of half-n-half.
This is such an easy, quick and economical meal! In 30 minutes, you’ll have dinner on the table – no kidding. Mimi’s One-Skillet Chicken, Rice, Broccoli, and Cheesy Casserole is flavorful and satisfying. All the cooking is done in one skillet – as you would expect from the title. Ha!
I like this recipe for a couple of reasons. You don’t need to use any canned cream soups. As the rice and chicken cook, the liquid becomes creamy from the starch in the rice. The chicken and rice cook together in the skillet, so there’s no need to cook the rice separately. You could add a handful of toasted, slivered almonds or toasted pine nuts. Or how about some browned sliced mushrooms – that would be delicious, too.
Once the onions and chicken are browned, you’ll add the uncooked rice to the skillet and saute until the grains become translucent. Then add chicken stock. The brown bits in the bottom of the skillet dissolve in the liquid and give the cooked rice such an appealing light brown color.
The picture above doesn’t have the melted, cheesy topping. I wanted you to see how beautifully green the broccoli turned out. That’s because you add it halfway through the chicken/rice cooking process, so it steams perfectly and is tender-crisp. I used fresh broccoli, but you could substitute frozen if that’s what you have on hand.
Yep, nice and cheesy, too! Now I’m hungry! Time to reheat leftovers for lunch. Another perk.
Yield: 4-6
Mimi's One-Skillet Chicken, Rice, Broccoli, and Cheesy Casserole
This is such an easy, quick and economical meal! In 30 minutes, you'll have dinner on the table - no kidding. Mimi's One-Skillet Chicken, Rice, Broccoli, and Cheesy Casserole is flavorful and satisfying. All the cooking is done in one skillet
Prep Time10 minutes
Cook Time30 minutes
Total Time40 minutes
Ingredients
1 pound boneless, skinless chicken breast, cut into 1" cubes
3 Tablespoons olive oil, divided
1 medium onion, diced
2 cloves garlic, minced
1 cup long-grained rice
2 1/2 cups chicken stock
2 1/2 cups fresh broccoli florets
2 cups shredded cheese, cheddar or Monterey Jack or a combination of the two
Instructions
Heat 2 Tablespoons olive oil in a 12" skillet over medium-high heat.
Add the onion and quickly saute until translucent. Push the cooked onions to one side of the skillet. Put the minced garlic on top of the onions.
Add chicken to skillet. Saute until the chicken is browned - 5-7 minutes.
Push the cooked chicken to one side of the skillet. Add 1 Tablespoon olive oil and rice. Stir and saute rice until the grains become translucent.
Add chicken stock. Lower heat to a simmer. Stir until ingredients are evenly distributed and the brown bits at the bottom of the skillet are dissolved in the liquid. Put a lid on the skillet and cook for 12 minutes.
Remove lid and distribute broccoli florets evenly over the top. Put the lid back on and cook for another 8 minutes.
Remove skillet from heat. Stir in 1/2 cup of cheese. Sprinkle the remaining cheese over the top. Replace lid and allow to sit for 1-2 minutes or until the cheese is melted.
Notes
Optional Additions: handful of toasted, slivered almonds or handful of toasted pinenuts, sliced and browned mushrooms.
I love any main dish that incorporates beef and tomatoes. There’s just something so magical about the melding of flavors that shouts out “comfort food” to me. Like Best Spaghetti and Awesome Meatballs. Or Chuck Roast with Peppers, Tomatoes and Cheese Grits. My mother used to make a rump roast in an oven bag with only a can of cream of tomato soup, dried basil, salt, and pepper. The gravy was fabulous used to assemble roast beef manhattans and mashed potatoes. Old Fashioned Cube Steak with Tomato Gravy is an old-timey dish inspired by Mom’s roast beef recipe minus the soup. I’m also paying homage to my Midwestern roots where hearty meals are a staple.
I don’t remember when I started to use cube steak. Maybe because I cooked a lot of breaded cubed pork tenderloin over the years. The beef version looked similar so, I think I simply decided to give this meat cut a try.
Cube steak is cut from the beef top round or top sirloin – not normally tender cuts of meat. So butchers run the pieces through an electric meat tenderizer a couple of times that gives the finished steak patty a distinctly dimpled look. The resulting “cubes” running over the surface of the meat patty is how cube steak got its name. Of course, you could “cube” your own steaks using a meat mallet and a strong arm – a great way to relieve situational frustration. I prefer to let the butcher work his magic. Cubing tenderizes and flattens the meat, so it cooks quicker than a chuck roast. Cube steak is pretty lean, so it doesn’t benefit from marbling that would make the cooked steak as tender as real steaks – don’t expect “melt-in-your-mouth” tender. As beef goes, it’s relatively inexpensive. And cube steak is essential for chicken fried steak and cream gravy – YUM!
Let’s see how Old Fashioned Cube Steak and Tomato Gravy comes together, shall we?
First, dry off the meat patties with a paper towel. Sprinkle with salt and pepper, and lightly sprinkle the patties with flour. The flour helps to form a nice crusty exterior as the meat browns.
In a heavy 12″ skillet, heat 2 tablespoons of olive oil over medium-high heat. Once the oil is hot, add the meat patties and brown on both sides. Be sure not to crowd the pan – cook the meat in batches so the patties brown and don’t steam.
This is a picture from another cube steak meal. I like how the browned steak looks in this one. Definitely the desired goal. The meat should not be cooked through – simply nicely golden brown.
As the cube steaks are browned, I put them aside in the inverted pan lid. Meat juices will accumulate and you’ll want to add those back into the pan. Read on . . .
OK – now you have all kinds of tiny brown bits packed full of flavor in your skillet. Reduce the heat to medium and add one large sliced onion and one large sliced yellow, red, or green pepper along with 2-3 cloves of minced garlic. Season with a bit of salt and pepper and 1/4 teaspoon crushed red pepper. Saute the vegetables for 5 minutes, stirring occasionally to make sure they don’t stick and burn.
Add one 15oz can of stewed tomatoes and their juices. Add one beef bouillon cube and one cup of water OR one cup of reduced-sodium beef stock to the pan. And one teaspoon dried basil. Stir to distribute everything. Allow to simmer for 5-10 minutes or until the tomatoes soften.
Return the browned cube steaks to the pan with the tomatoes and vegetables along with the accumulated meat juices. Ladle some of the pan juices and vegetables over the tops of the meat. Bring to a slow simmer. Cover the pan with a lid and continue to simmer for 30 minutes or so. Once cooking is done, I like to remove the meat to a platter and mash the pan juices and vegetables so it looks more like gravy. If the gravy is too thin, bring up the heat and cook a little longer until you get the right consistency. It shouldn’t take more than a couple of minutes.
Your reward is revealed! My family loves this dish served with lots of mashed potatoes slathered with tomato gravy. But you could serve cooked rice or egg noodles.
I considered using a slow cooker. With as much prep cooking and only a final 30-minute simmer, I opted for the stovetop. However, you certainly could finish cooking in a slow cooker. I’d advise putting the browned meat patties in the bottom of the slow cooker, and then add the gravy ingredients over the cube steak. Probably 2 hours on high or 4 hours on low would work. Your gravy may be a little thinner, but there’s nothing wrong with that.
Here’s the recipe!
Yield: 4
Old Fashioned Beef Cube Steak with Tomato Gravy
Old Fashioned Cube Steak with Tomato Gravy is an old-timey dish inspired by Mom's roast beef recipe. I'm also paying homage to my Midwestern roots where hearty meals are a staple. A family favorite served with lots of mashed potatoes.
Prep Time30 minutes
Cook Time30 minutes
Total Time1 hour
Ingredients
2 pounds cube steak, four pieces
1 large onion, cut into slices
1 large yellow, red, or green pepper, cut into strips
2-3 cloves garlic, minced
1 15oz can stewed tomatoes
1 beef bouillon cube plus one cup water OR 1 cup reduced-sodium beef stock
2 Tablespoons olive oil
1/2 teaspoon crushed red pepper
1 teaspoon dried basil
Flour
Salt & Pepper
Instructions
Pat dry cube steaks with a paper towel. Sprinkle with salt & pepper on both sides. Dust with flour on both sides.
Add 2 Tablespoon olive oil to a 12" heavy-bottomed skillet. Bring to heat over medium-high heat.
Add cube steaks to the skillet, two at a time, and brown. As the meat browns, remove to a plate or to the skillet's inverted lid.
Once all the meat is browned, reduce skillet heat to medium. Add onion, sliced pepper, crushed red pepper and garlic. Stir and saute for 5 minutes.
Add stewed tomatoes, bouillon cube, and water OR beef stock, and dried basil. Bring to simmer and cook for 5-10 minutes until tomatoes are soft.
Return cube steaks to the skillet along with accumulated meat juices. Ladle the tomato/vegetable mixture over the meat. Reduce to slow simmer. Cover with lid. Cook for 30 minutes.
Remove meat to a platter. (Optional: Mash vegetables and gravy.) Pour tomato gravy over cube steak OR plate individually and ladle tomato gravy over meat.
Serve with plenty of mashed potatoes and any green vegetable.
Notes
For Slow Cooker: Place browned cube steaks in bottom. Pour tomatoes, vegetables, and pan juices over the meat. Cook on high for 2 hours or on low for 4 hours.
Doesn’t this split pea soup look yummy?? Especially when it’s finished off with crunchy cornbread croutons and a healthy dollop of sour cream. Very yummy!
I’ll admit that I didn’t grow up eating split pea soup. My mother and grandmothers never made it in my memory. My first experience with split pea soup was when my college roommates and I went to dinner at The Magic Pan, a restaurant housed inside the Glendale Town Center Mall at 61st and Keystone in Indianapolis. The Magic Pan was a popular creperie and Cindy, Beth and I loved frequent evening meals there. We ate our fair share of creamy chicken & mushroom crepes and their spinach souffle crepes – fabulous! Beth always ordered a bowl of split pea soup topped with either sour cream or sherry to begin her meal. I was curious. Honestly, I thought split pea soup looked rather disgusting, but one evening I gathered up the strength and tried it myself. OMG – my soup world was transformed! After our dinner outings came to an end and after The Magic Pan closed, I made this soup often and still do. It’s a staple on our winter-time menu. Creamy, without any added cream or half-n-half, and steamy, this soup is perfectly flavored with hints of onion, garlic, and carrots. A delightful spoonful with a little silver of sour cream – perfect.
Are Split Peas and Split Pea Soup Healthy to Eat?
Yes! Seriously healthy! Split Peas are gluten-free – you can replace the cornbread croutons in this recipe for gluten-free ones if you like. Split peas are high in fiber, low in fat, and are protein powerhouses! Instead of a dollop of sour cream, how about a heaping tablespoonful of low-fat Greek yogurt? Split pea soup can be made with low-sodium chicken broth (homemade is great, if you have it on hand) or water, and a variety of diced or cubed healthy vegetables. Sweet potatoes, carrots, and/or celery is what I’d recommend. And there’s no need to thicken the soup with flour and butter or with heavy cream. The peas thicken up enough that you may need to add additional broth or water to thin it out. One recipe I came across suggested squeezing a quarter lemon over a bowl and stirring it into the soup before eating. I contemplated that. I think it would brighten the flavors. And you don’t have to use ham, if you prefer a vegetarian version.
According to the website Speedy Remedies: 7 Health Benefits of Split Peas, these sweet little legumes can help regulate blood sugar, lower cholesterol, reduce cancer risks, promote weight control, improve heart health, help to relieve symptoms of irritable bowel syndrome, and may be helpful in reducing hot flashes.
Get out your soup pot and let’s make up a hearty and healthy batch!
Dice one large yellow onion and mince two cloves garlic. Warm a 5-quart, heavy-bottom dutch oven over medium-high heat. Add 2 Tablespoons extra virgin olive oil and bring to temp. Add the onion and garlic and saute until translucent and fragrant, 3-5 minutes. Add 1 teaspoon dried oregano.
Stir and saute for another minute. At this point, you can add three peeled and diced carrots and/or celery, if using. I’m using sweet potatoes this time (see below).
I used diced ham sold in packages at the grocery. But, this is an excellent time to use up leftover ham or you could substitute smoked ham hocks – one or two hocks or a smoked ham shank. If that’s the route you choose, add them to the broth just before you bring everything up to a boil. I like to put diced ham in with the onions and garlic and saute the ham a bit until the meat becomes slightly caramelized to add flavor. And, for this pot, I cut the russet potatoes into large chunks to give the soup a different texture. You can dice the potatoes into smaller pieces or use a couple of cupsful of frozen diced potatoes.
OK – add the potatoes, stir, and then 1/2 pound split peas. Stir all the ingredients.
Add four cups of low-sodium chicken stock (or homemade) and two cups of water. I had a leftover baked sweet potato so I peeled it and cut it into big chunks. If you’re using ham hocks or a shank instead of diced ham, now is the time to add those to the pot. Bring to a boil, reduce to simmer, and cook for 45 minutes. After the initial simmer, stir in the remaining split peas. Stir and continue to simmer for another 45 minutes or until the peas are soft. If using, remove ham hocks or ham shank, remove the meat from the bones, and add it back into the soup.
As the soup cooks, foam will rise to the surface. Just take a large spoon and skim off the foam. I’ve learned that the peas foam because of a water-soluble protein in the peas. It won’t hurt anything of you stir it back into the pot and eliminate the skimming step.
Really, there are no hard and fast rules for split pea soup. Once the cooking is complete, you can make the soup as thick (let it simmer a little longer) or as thin (add more broth/water) as you like. Use potato chunks like I’ve done here, or dice them. If you want a soup that looks homogeneous, mash the vegetables or use an immersion blender to break them down to make the soup smoother. You can add 1/2 – 1 cup of half-n-half to make the soup creamier.
While the soup is cooking, it’s time to make the croutons. Croutons are better made with day-old crusty bread like a baguette. My cornbread was leftover from the day before and is perfect to transform into buttery, crunchy bites. Cut the cornbread into large chunks. In a heavy skillet over medium-high heat, melt 2 Tablespoons olive oil and 3 Tablespoons butter.
Add the cornbread cubes to the skillet and brown on all sides. Drain on a paper towel to absorb the excess fat.
Voilà! Your beautiful soup is all ready to serve. Top bowlsful with your gorgeous crunchy croutons and a nice dollop of sour cream or Greek yogurt and sprinkle with black pepper. Happy, Happy, Happy! Enjoy!
Hearty & Healthy Split Pea Soup with Ham and Cornbread Croutons
Mimi's Split Pea Soup with Cornbread Croutons is an old-timey and satisfying bowl of steamy comfort. This recipe is a good way to use up leftover ham. Add chunks of russet and sweet potatoes and top off the bowl with crunchy cornbread croutons for a filling wintry meal.
Recipe type: Soups & Stews
Cuisine: French American
Serves: 6-8 servings
Ingredients
2 Tablespoons olive oil
1 large yellow onion, diced
2 cloves garlic, minced
1-2 teaspoons dried oregano
2 stalks celery, diced (optional)
3 carrots, peeled & diced OR sweet potatoes peeled & cut into chunks or diced
2 medium to large russet potatoes, cut into chunks or diced
1 lb diced ham OR 2 smoked ham hocks or 1 large smoked ham shank
1 pound green or yellow dried split peas
6 cups any combination low-sodium chicken broth and water
½ - 1 cup half-n-half (optional)
Croutons
Day old cornbread cut into large cubes OR day old bauguette cut into large cubes crust on
2 Tablespoons olive oil
3 Tablespoons butter, salted or unsalted
Instructions
Over medium-high heat, add olive oil. Once hot add onions & garlic and celery & carrots (if using). Stir and saute until the onion is translucent. Add oregano. Stir. Add ham, stir, and saute until the meat just begins to brown on the edges.5-7 minutes.
Add potatoes, sweet potatoes (if using) and ½ pound of split peas. If you're using ham hocks or a ham shank in place of diced ham, add to the pot. Cover with chicken stock/water. Bring to a boil, reduce to simmer, and cook uncovered for 45 minutes. Skim off the foam that rises to the top of the soup or stir the foam back into the soup Stir the pot every once in a while to prevent vegetables from sticking to the bottom of the pot.
At the end of cooking time, add the remaining split peas. Stir and continue to simmer uncovered for another 45 minutes or until all the vegetables are soft.
Remove ham hocks or shank. Stir. If the soup is too thick, add more chicken broth/water. If it's too thin, continue to simmer longer to the desired thickness. Remove meat from the hocks or shank and add back to the soup.
Leave the potatoes in chunks or mash them with a potato masher or use an immersion blender to make a creamy soup. Add half-n-half if using. Stir. Check for seasoning.
Ladle soup into deep bowls. Add croutons, sour cream or Greek yogurt, and sprinkle with ground black pepper.
For Croutons
Heat olive oil and butter in a 10" skillet over medium, medium-high heat. Once the butter begins to brown, add the cornbread cubes and brown on all sides - less than 5 minutes total. Remove from skillet and drain on paper towels.
Especially if you include these tasty, crunchy, cheesy, creamy, lemony perfect bites on your holiday dessert tray. Mimi’s Mini Lemon Cheesecakes come together in 30 minutes or less using store-bought ingredients. “How easy is that?” Well, very easy!
One of my college roommates, Cindy, turned me on these handy frozen phyllo shells earlier this year. She turned hers into appetizers filled with creamy chicken salad. Fabulous! There are hundreds of online recipes for fillings for these lovely shells: spinach-artichoke dip, brie topped with a pecan and drizzled with a little honey, pimento cheese topped with pepper jelly, shrimp salad topped with a sprig of dill, ham salad. The possibilities are endless! And, yes, I bought a couple of packages and plan to keep a supply in my freezer just in case. Find them in the freezer section of your grocery probably around regular phyllo dough and puff pastry sheets.
In Keeping With a Less Stressful Holiday Philosophy
Richard and I were invited to a neighborhood Christmas open house this week. We were asked to bring a snack. It’s not a big deal, but my schedule leading up to the party didn’t allow for much food prep. Although my tendency is to want to go full bore, I needed a delicious quick treat. Essentially, this recipe was born out of necessity – the mother of invention, right?
Anyway, I had a supply of the phyllo cups in my freezer and thought to fill them with store-bought cheesecake filling and topping them with a little dollop of lemon curd – a perfect contribution and a nice surprise – something a little different. I mean, who doesn’t love a little bite of cheesecake? Sure, who doesn’t love a big piece of cheesecake? But these little bites fit in perfectly with all the other savory and sweet bites everyone else brought to the party. I couldn’t have been happier. As I mingled, I saw my mini lemon cheesecakes on many plates and was pleased to hear my friends and neighbors ask, “Who brought these? They’re so good!” They were even more impressed when I told them how easy my little bites were to prepare.
Give It A Try
I’m not preparing a recipe for this. It’s just too easy with the right ingredients. Once assembled and on a plate, I did sprinkle the tops with freshly grated lemon zest and graham cracker crumbs. I hope you’ll be inspired by this idea to formulate your own special treats. Maybe a little meatball topped with marinara and Parm? No-Bake Chocolate and Peanut Butter Mousse topped with Mini Chocolate Chips? Here’s the link for that one!
If you decide to make your own little phyllo cup bites, I’d love to know what ideas you came up with. If you’re inspired, be sure to tag your photo on Instagram #atmimistable
I hope all of you enjoyed a fabulous Thanksgiving holiday! As promised, here’s is a recap of our menu, our results, and a turkey story – everyone has one, I’m sure.
Here’s the appetizer board we put together to get everyone started. No matter how I promise and plan for a 4:00 dinner, something always comes up to delay our meal. It’s nice to have a few things to snack on before the meal is on the table and ready to serve. It’s not a lot. Just a little nosh to keep hungry guests at bay while I’m making gravy and piling food in serving dishes.
The star of the show this year was the Roasted Beet Hummus – a recipe I found at Half Baked Harvest (bowl upper left). Brock, my son-in-law, and I are the only beet lovers in this family, but everyone thought this hummus was outstanding. It’s bright to look at and brightly flavored. I mean, you barely know you’re eating beets. I didn’t follow the recipe to the letter, however. The grocery had small fresh beets in a bundle of three, so instead of two, I used three. I didn’t have almond butter on hand and the recipe calls for only a couple of tablespoonsful – not enough to justify the cost of almond butter. So, I threw in 1/4 cup of roasted pine nuts instead. Also, it calls for two cups of chickpeas. Well, two 15oz. cans of garbanzos drained and rinsed is about 2 1/2 cups so all of them went into the food processor. Tahini is a must for hummus recipes and I keep a small jar in my pantry. Either make a lot of hummus and use up the tahini or try this recipe for Crunchy Asian Noodle Salad or both!
The center bowl is filled with Ham Salad Spread, a recipe I’ve made for ages and is quickly assembled in a food processor with ham chunks, hard-boiled eggs, diced red onion, sweet pickle relish, and then mixed together with mayo – YUM! And the third bowl is filled with Pimento Cheese Spread from The Pioneer Woman.
All three spreads are perfect on crackers or slathered into the hollow of a piece of celery. We had pita chips, Ritz crackers, and these little rice crackers I found at Trader Joe’s. The rice crackers are perfect because they’re small – no heavy loading – light and very crispy. There’s a lot of them in a bag, too.
In all the years I’ve roasted turkeys, I’ve never had one that was completely frozen on Thanksgiving morning – NEVER – until Thursday last week. Yep, woke up, took the bird from the garage refrigerator, and the darn thing was a solid block. How did that happen?? Jessica and I put it in the refrigerator the Friday afternoon before. What on earth??
I started the cool water-bath thaw method until I read on the Butterball website that it would take nine hours to thaw. Oh NO! It’s Thanksgiving morning, for cryin’ out loud! I’m grateful my son, Joseph, was resting on the family room couch after working an overnight shift and overheard my panicked telephone call to my daughter. Jessica said Kroger had fresh turkeys for sale on Wednesday, so she suggested I start there. Joseph rallied and drove me to the grocery where we found fresh Butterballs for 69¢/pound. Hallelujah! There in the cooler was a 19-pounder with my name on it.
I was back in business. All I had to do was heat the oven, slather butter between the skin and flesh. salt & pepper, and off we went. I did stuff the bird’s cavity with a quartered orange, lemon, onion, and garlic cloves. The house smelled phenomenal, just like it should on Thanksgiving. And it was the moistest turkey I’ve ever roasted.
I’ve come to the conclusion that buying a fresh bird a day or two in advance is not such a bad idea. First of all, you don’t have a 20-lb bird taking up precious refrigerator real estate for days and days. And it’s a guarantee that the turkey, while cold, will be thawed and ready to roast Thanksgiving morning. Lesson learned.
What makes this cheesecake so special? Well, it’s delicious for one thing. It’s so easy and quick to put together, and is a guaranteed “no-brainer” recipe with a satisfying mouthfeel sure to please guests. It’s a great substitute for traditional pumpkin pie.
You can bake it the night before, cool to room temperature, and stash the cheesecake in the refrigerator the night before to chill.
Tieghan Gerard uses dairy-free almond cooking milk. There is no crust and only 1/4 cup of all-purpose flour in the batter which can be switched out with gluten-free flour. So it’s perfect to serve to those with dairy and/or gluten food allergies or sensitivities. If you don’t have to worry about that, you can substitute heavy cream or evaporated milk in equal amounts for the almond cooking milk.
Additions I didn’t mention in my 2019 Thanksgiving menu post:
Here in the Midwest, lots of families serve homemade egg noodles drenched in more turkey gravy as a side dish. This was my first year to try that. Why not? Noodles, mashed potatoes, stuffing, hot homemade rolls – what’s one more carbohydrate? And, yes, we did have the obligatory green vegetable – Brussel sprouts.
I made a cherry pie because my grandsons love cherry pie, and an apple crisp because a local produce market had the largest and most fragrant apples in their shop the day I visited. Yes, we had three desserts.
Any of these recipes would be excellent choices at Christmas, too. The beet hummus would be a cheerful and tasty addition to any appetizer or charcuterie board.
If you’re invited to a holiday party or open house and need a pitch-in item, try the pumpkin cheesecake. You can decorate the top with piped whipped cream. Or try what Teighan did and make little pie crust cookies dusted with cinnamon sugar as cute ornaments on the top.
Tips for a Less Stressful Holiday
Whatever your holiday celebrations – large, small, community configured – remember to have fun. Hosts burden themselves with unrealistic expectations for the “perfect” gathering. I give you permission. Free yourself. Do what you like. Do what you enjoy! After all, I am a Mimi with so much history. Yes, I am an older Mimi so, I’ve learned the hard way. Rely on your family and friends to bring up the rear. Learn to delegate.
Have Tips or Tricks to Share?
I’d love to learn about your Thanksgiving success stories! What tips and tricks do you use for a less hectic holiday?

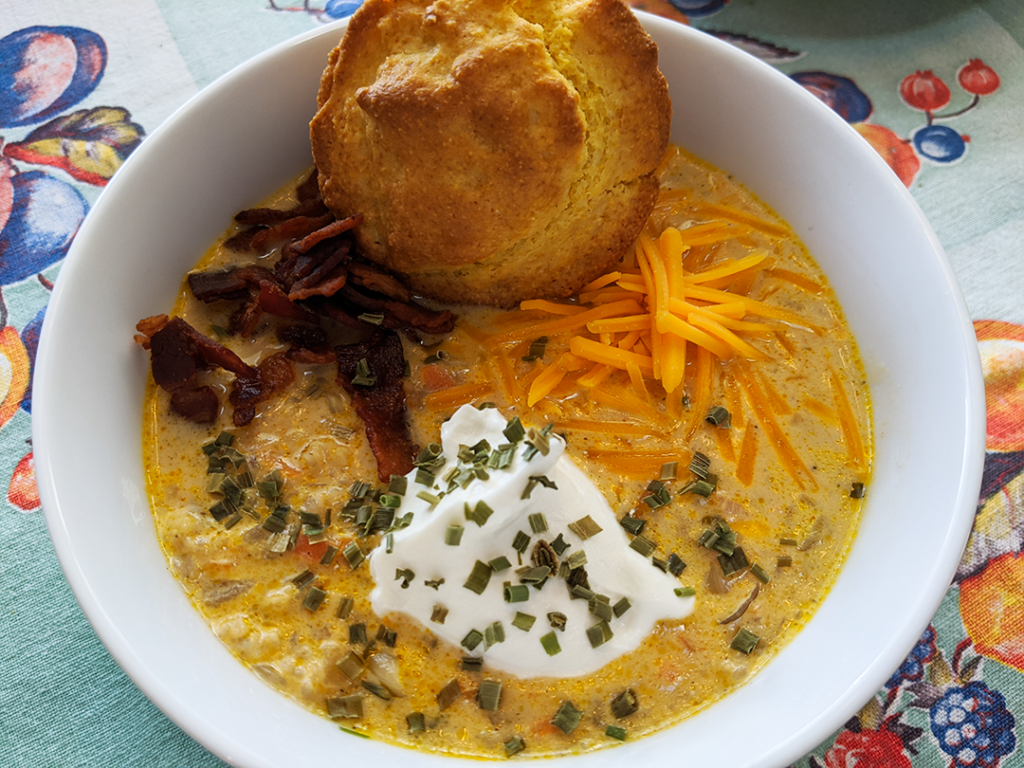

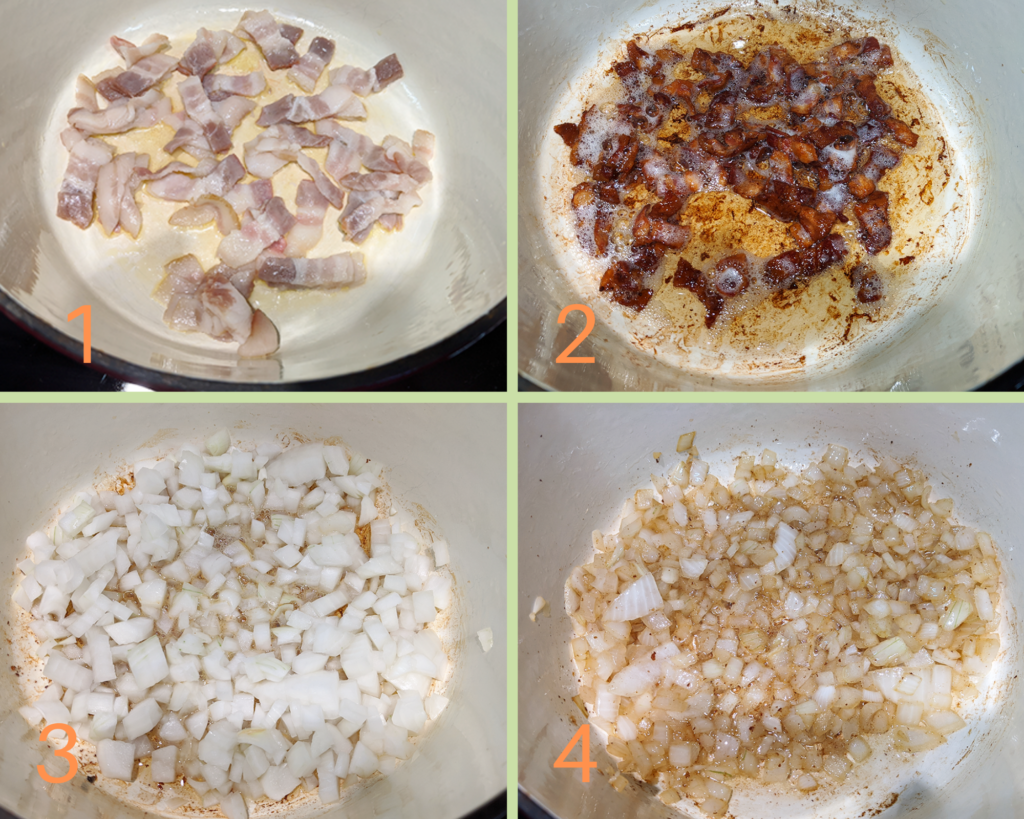
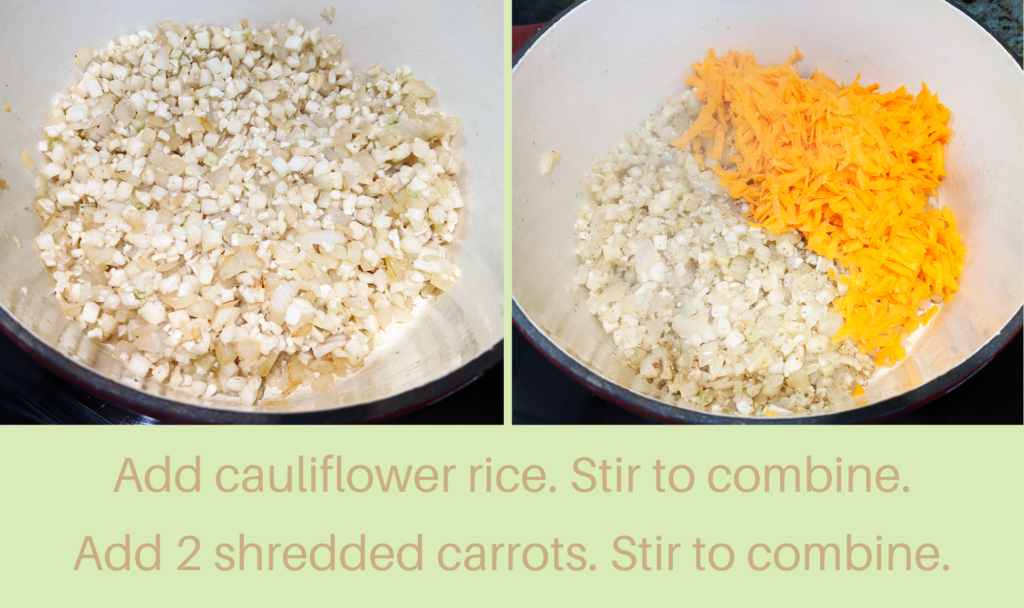
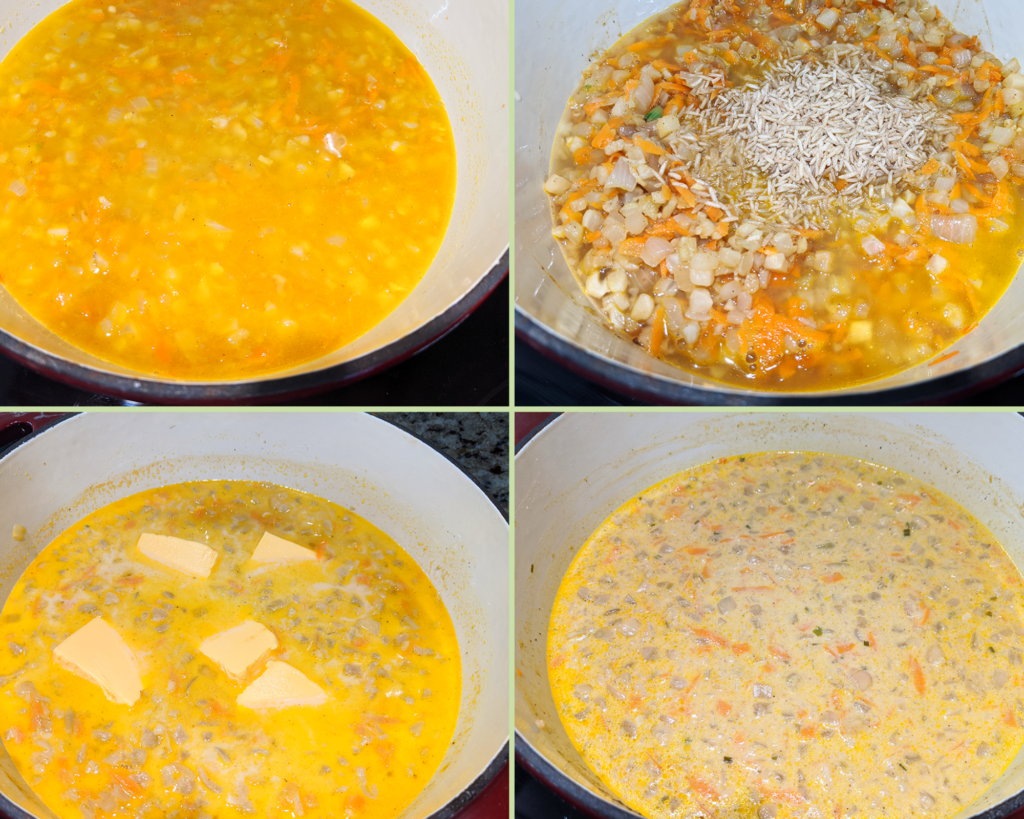
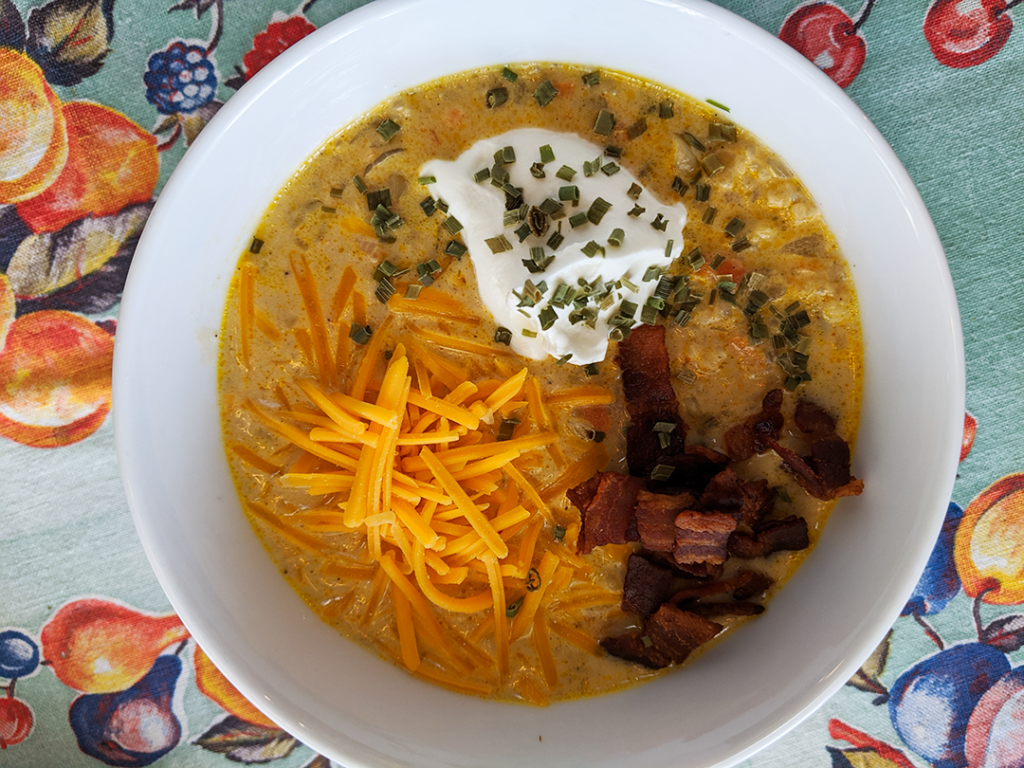

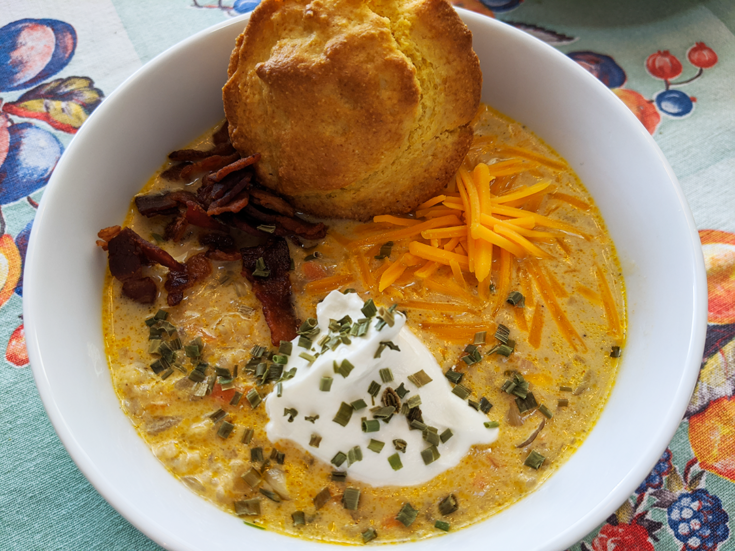
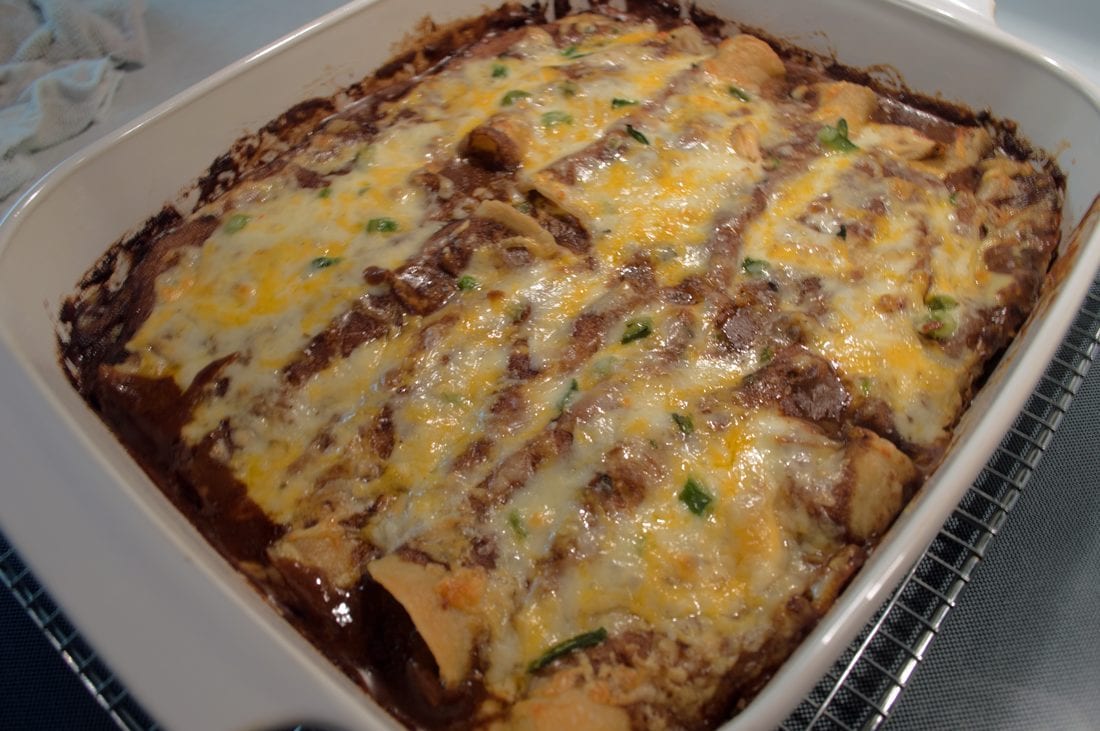
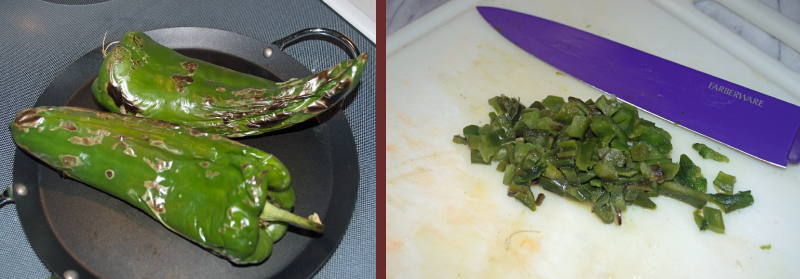


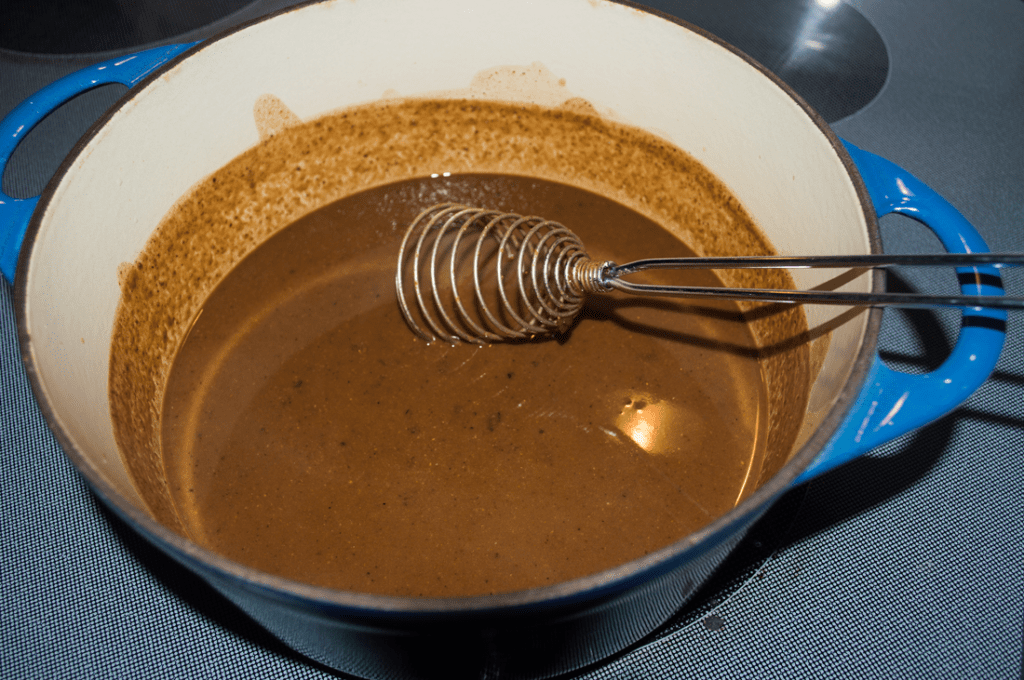
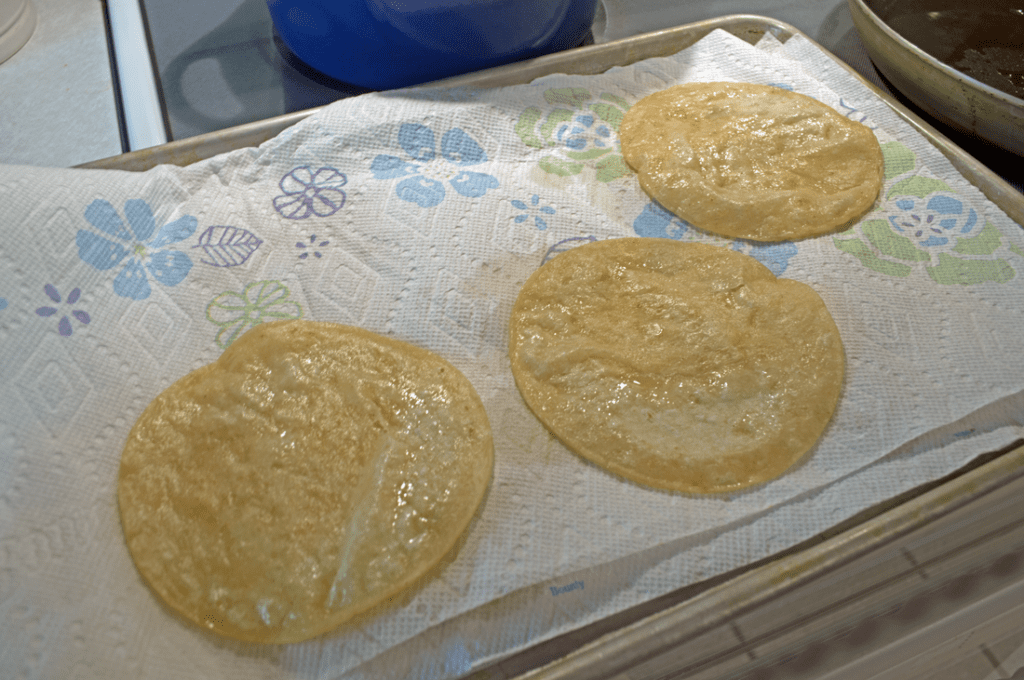
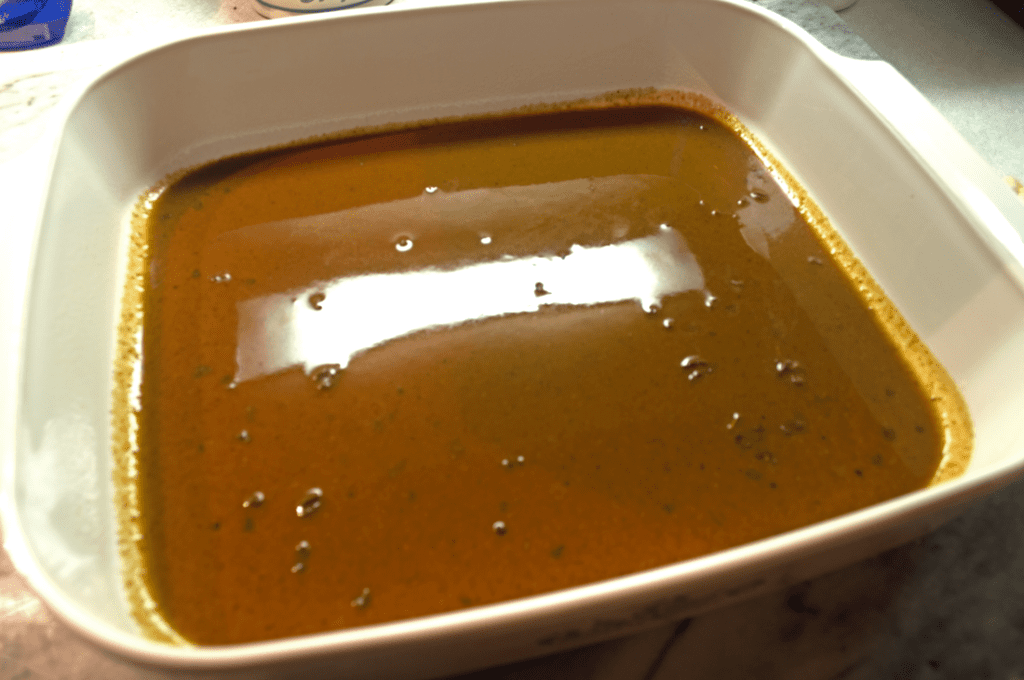
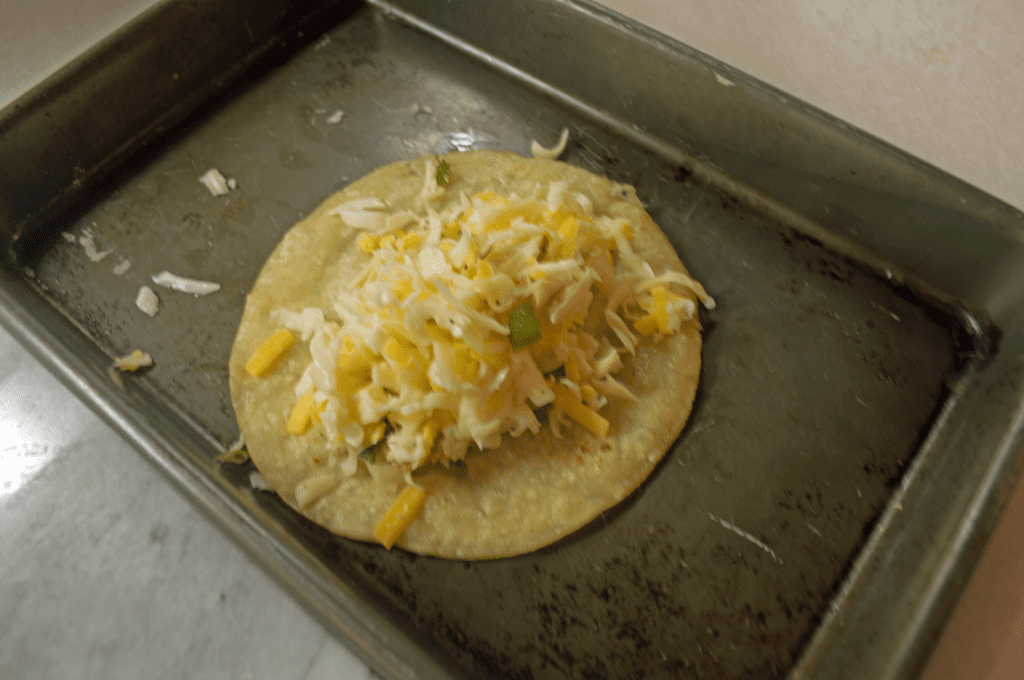
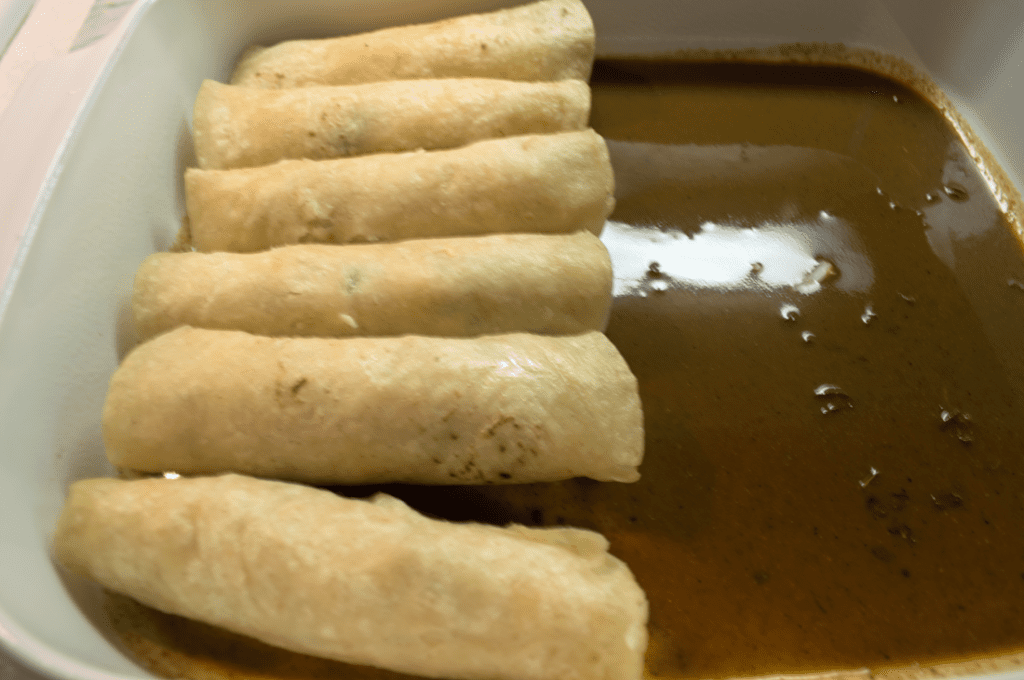
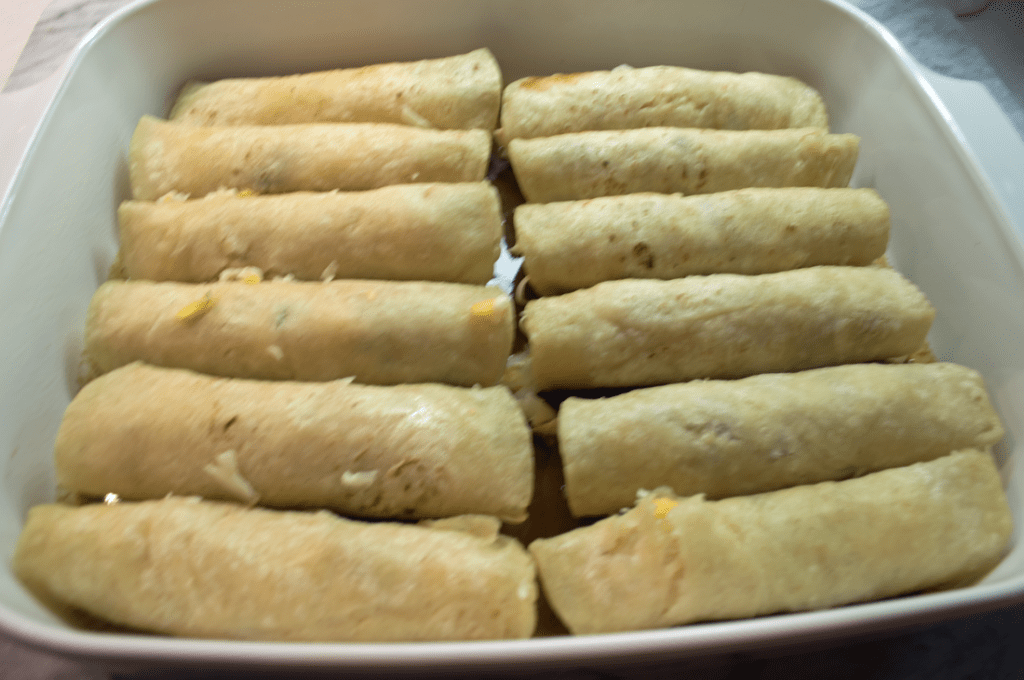
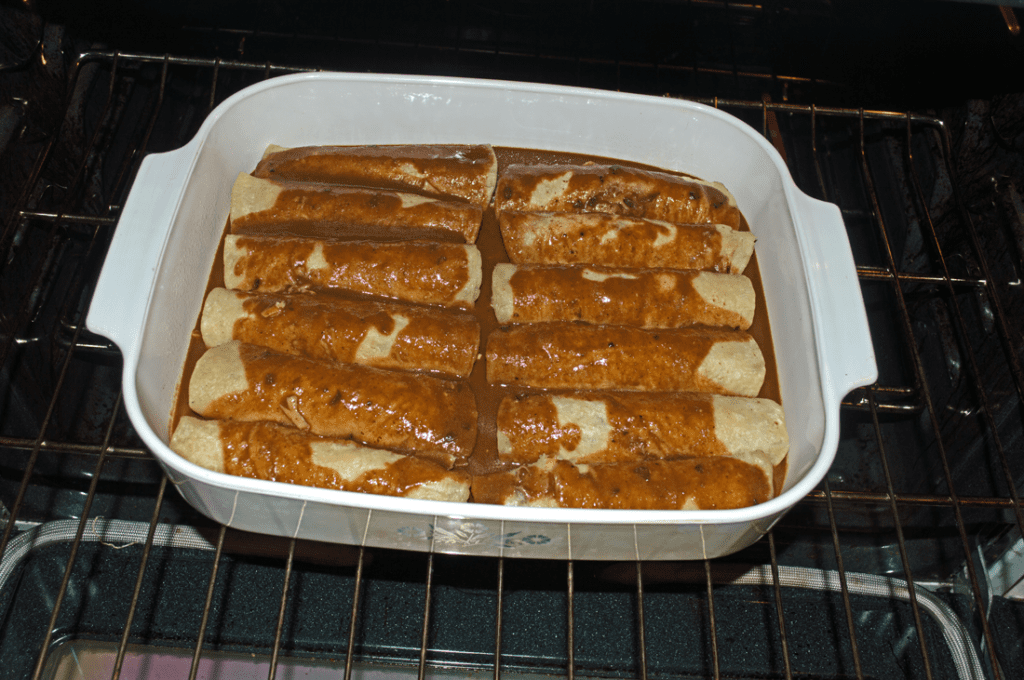


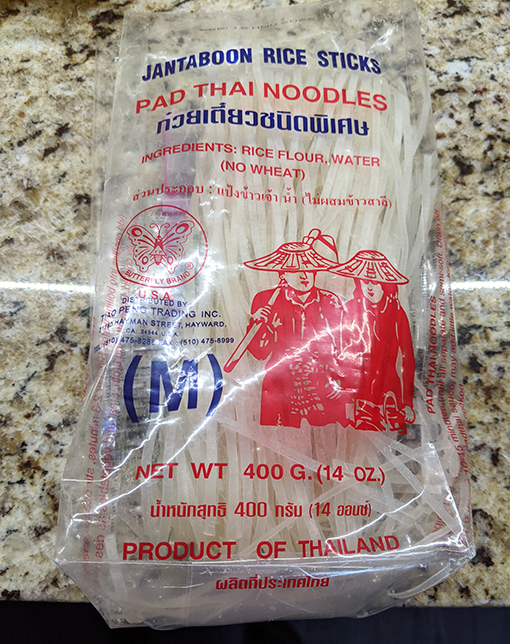 Before I dived into Tieghan’s recipe, I wanted to cook something simple with rice noodles first just to get the hang of preparing them and to test the texture. I hopped over to my favorite Asian market where they have the best noodle aisles. Not just one aisle, but two. Yeah, I was there for a while.
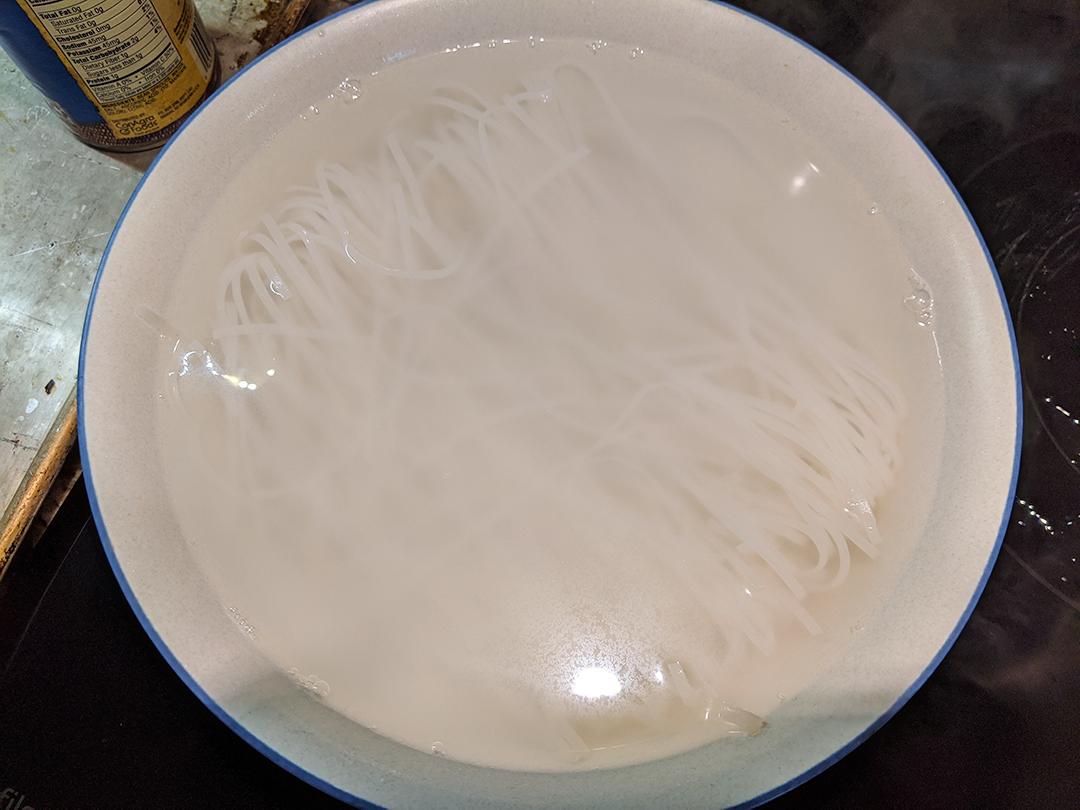
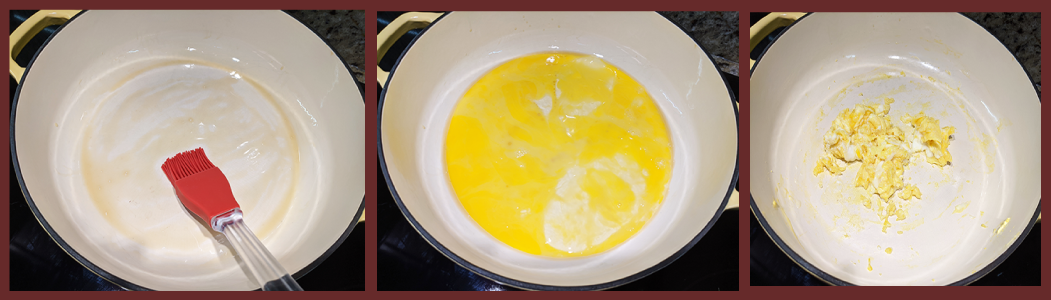
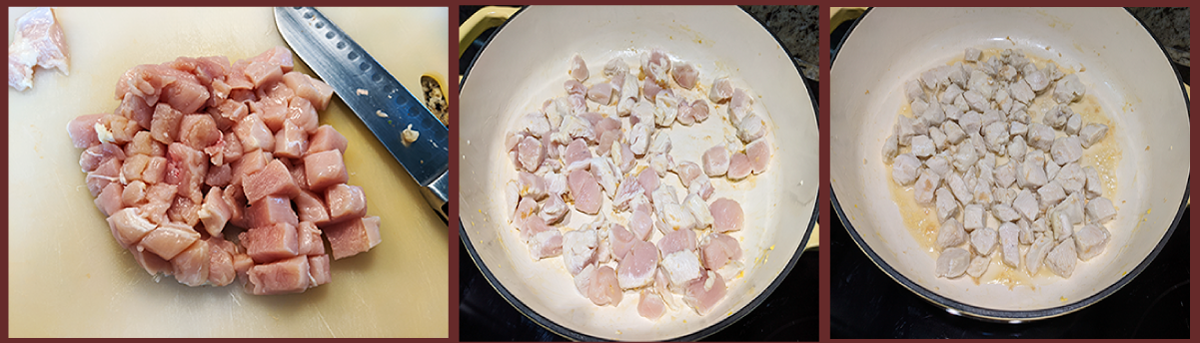
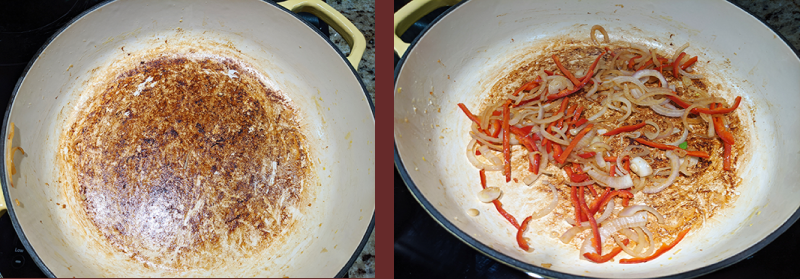
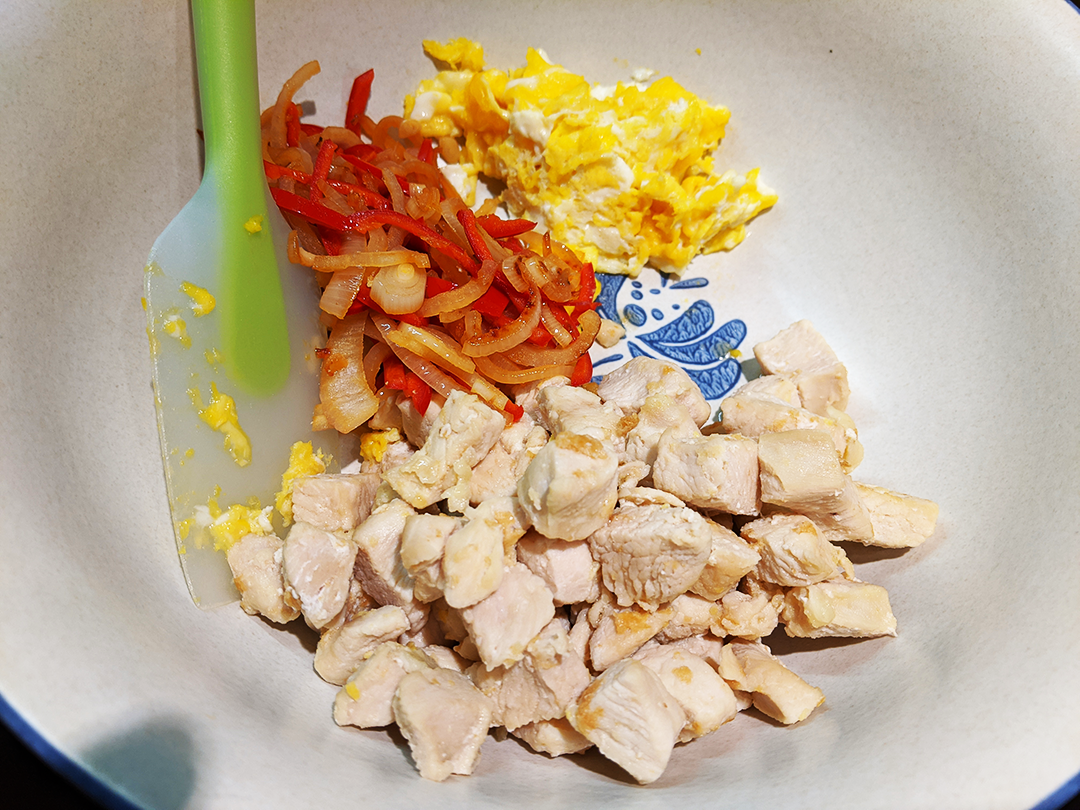
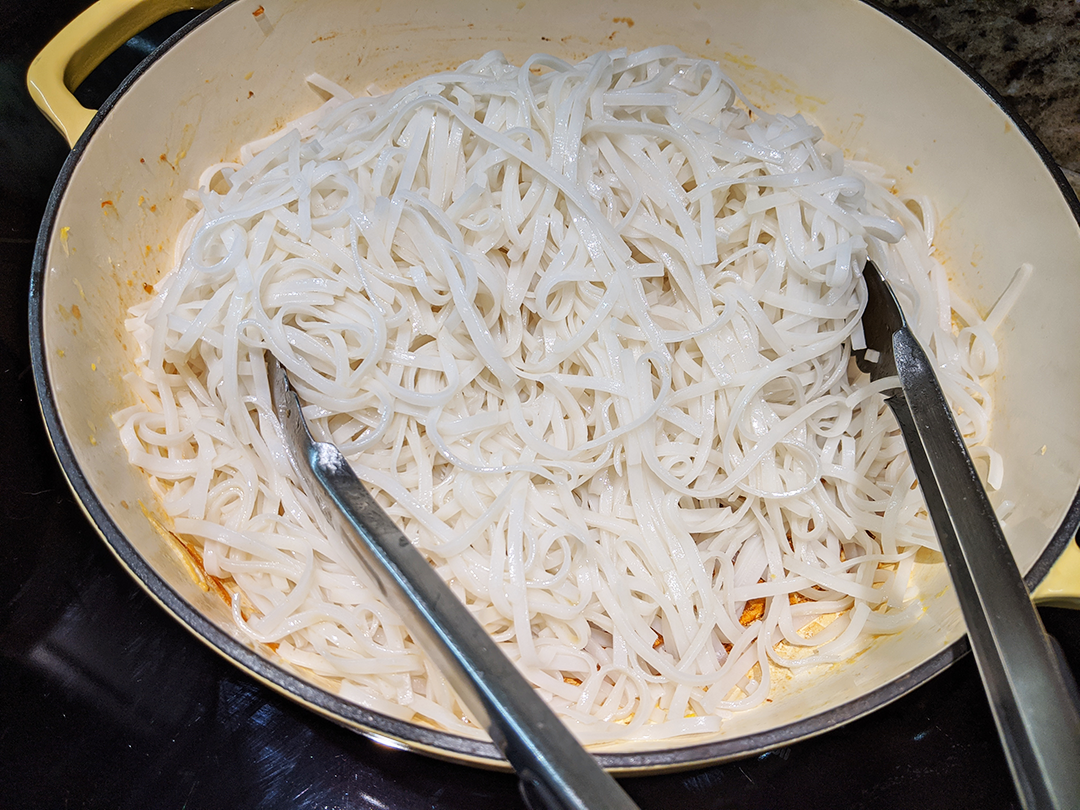
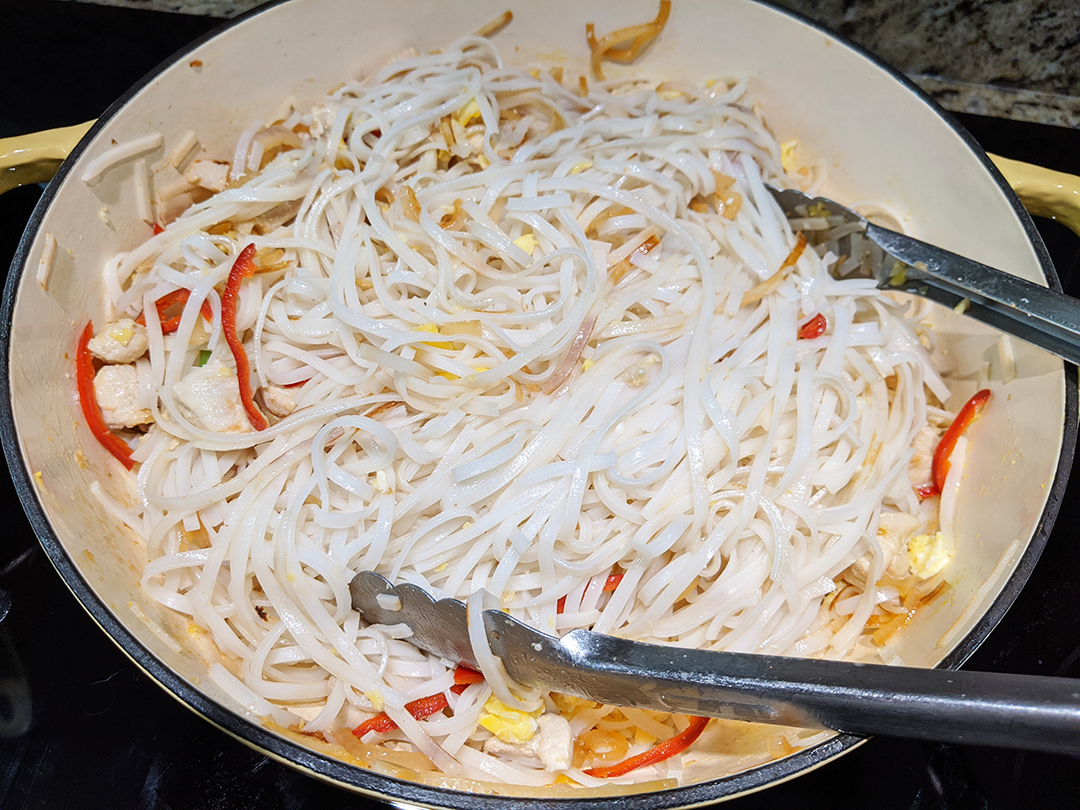
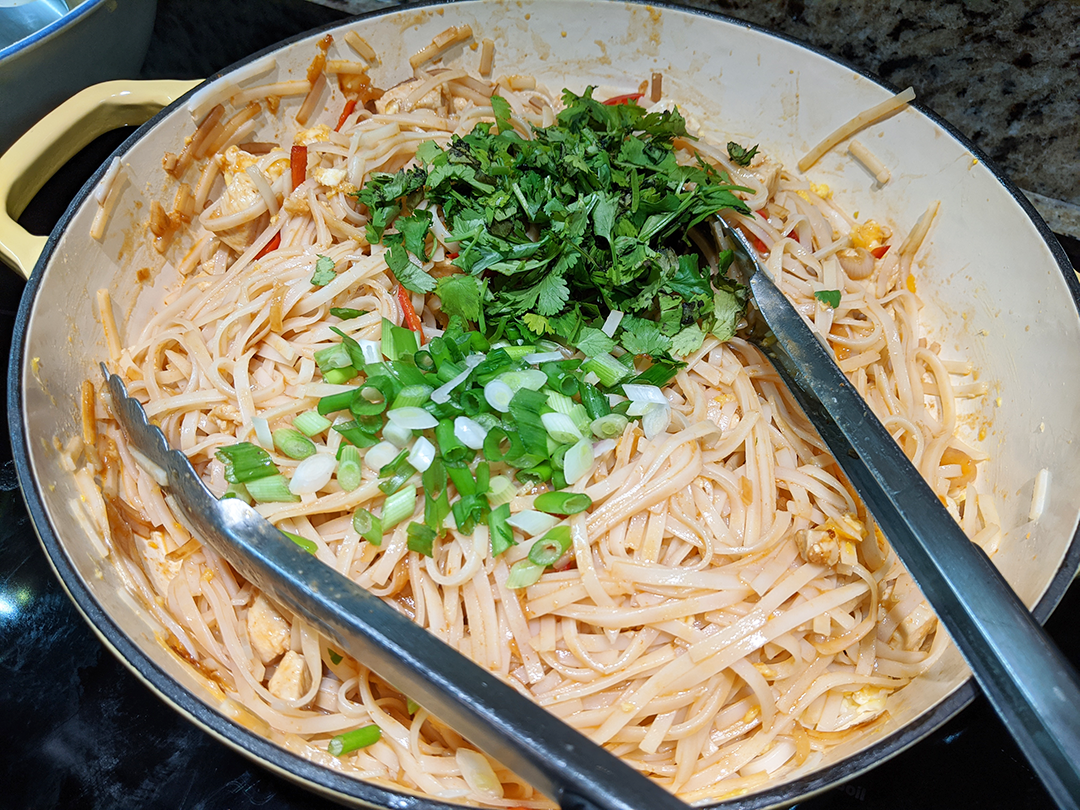

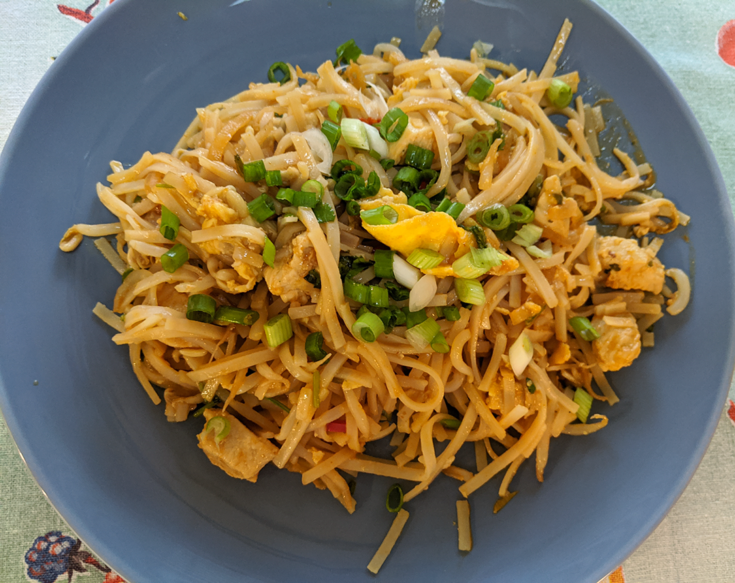


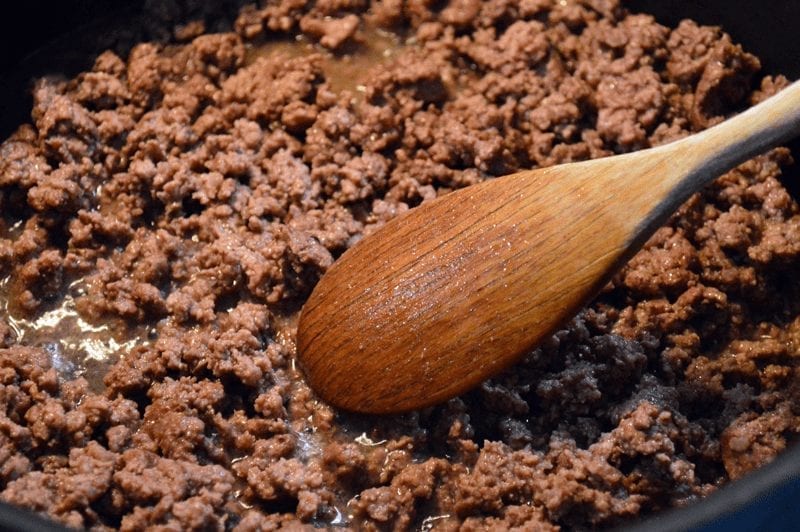
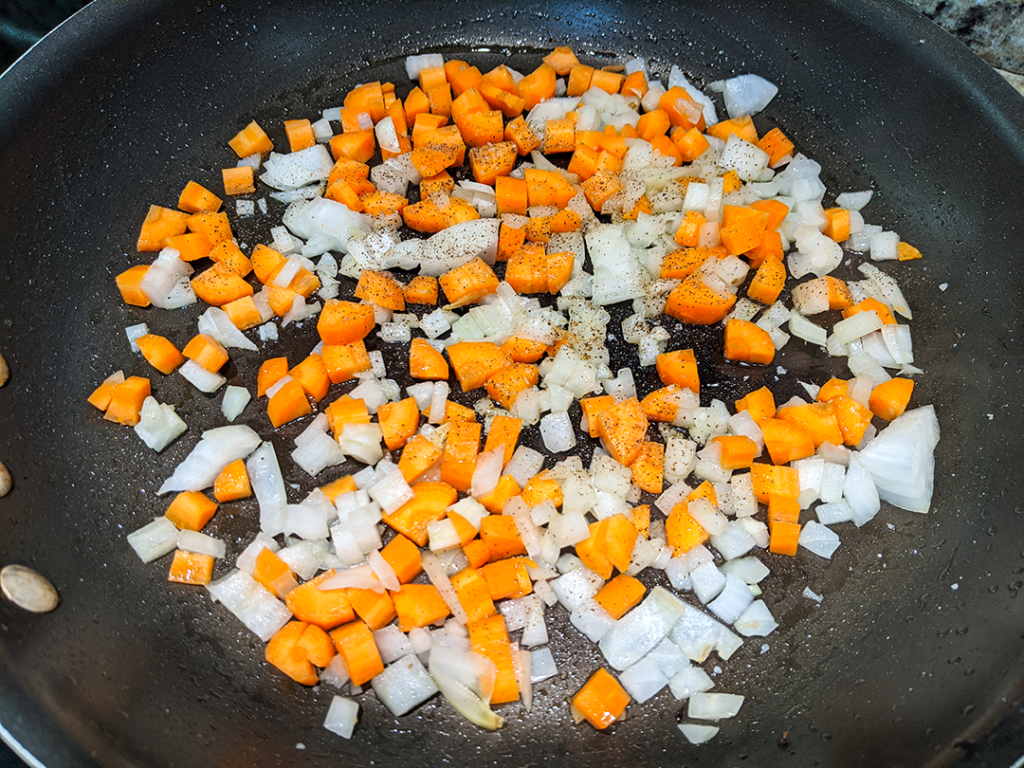
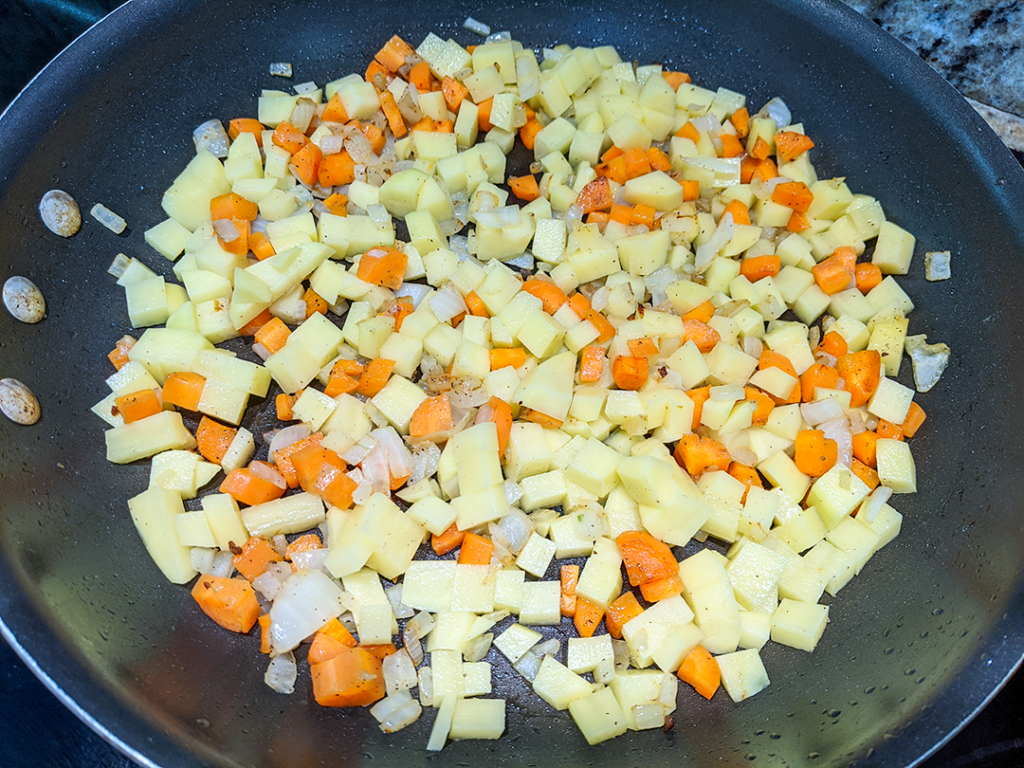
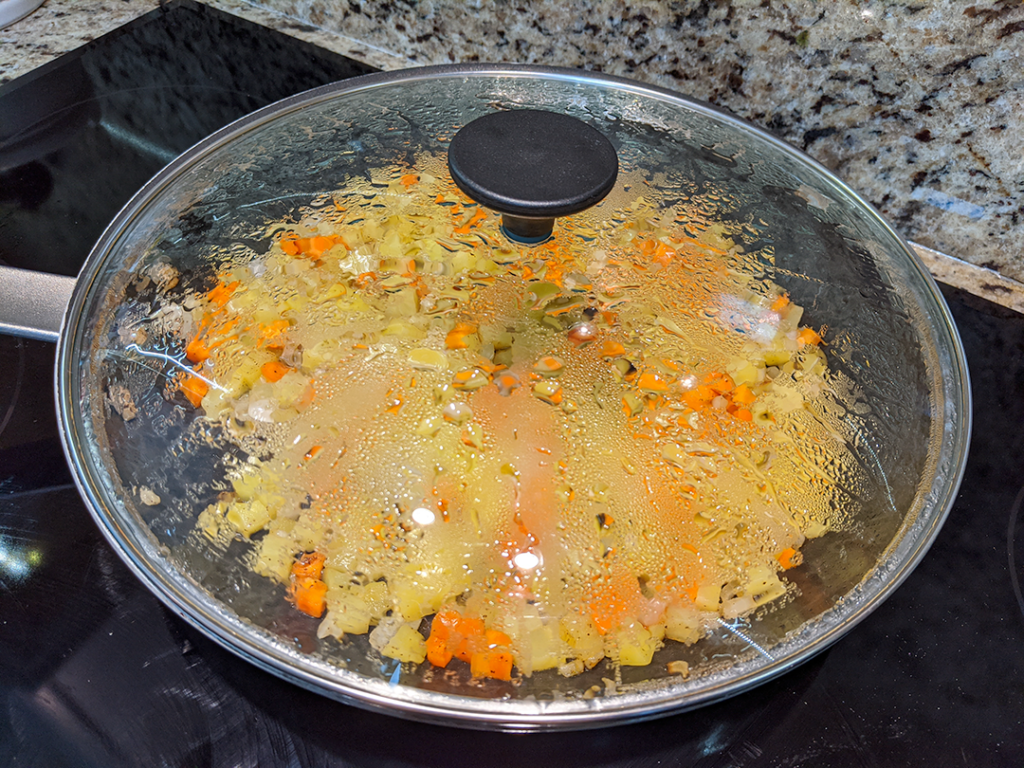
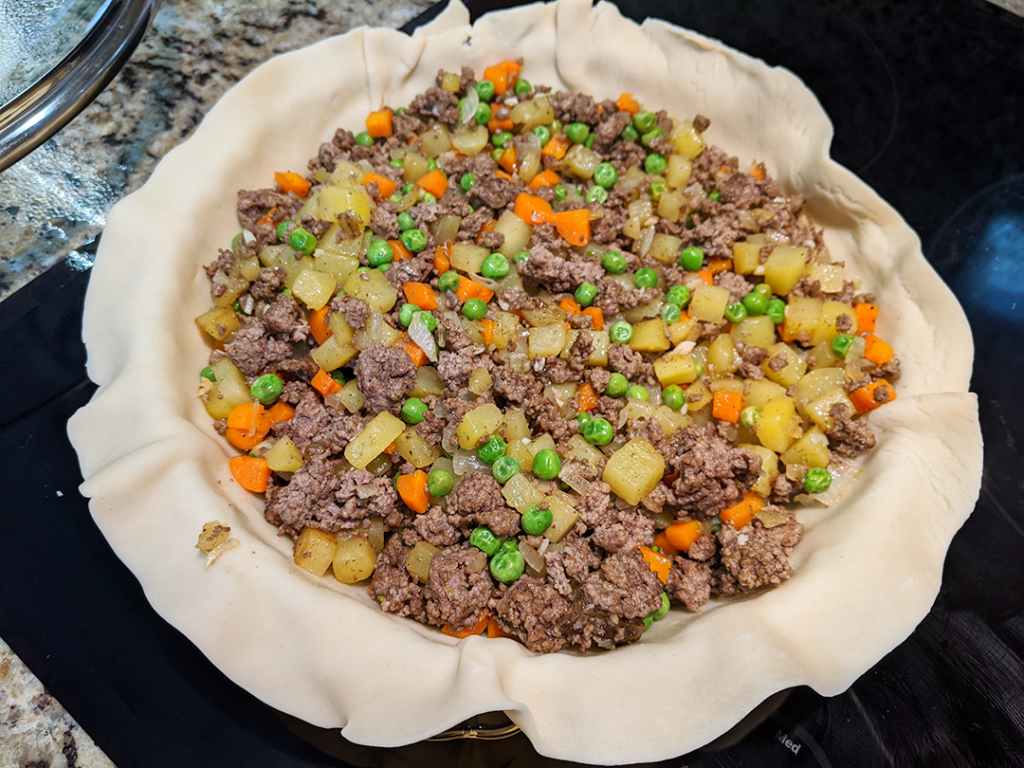
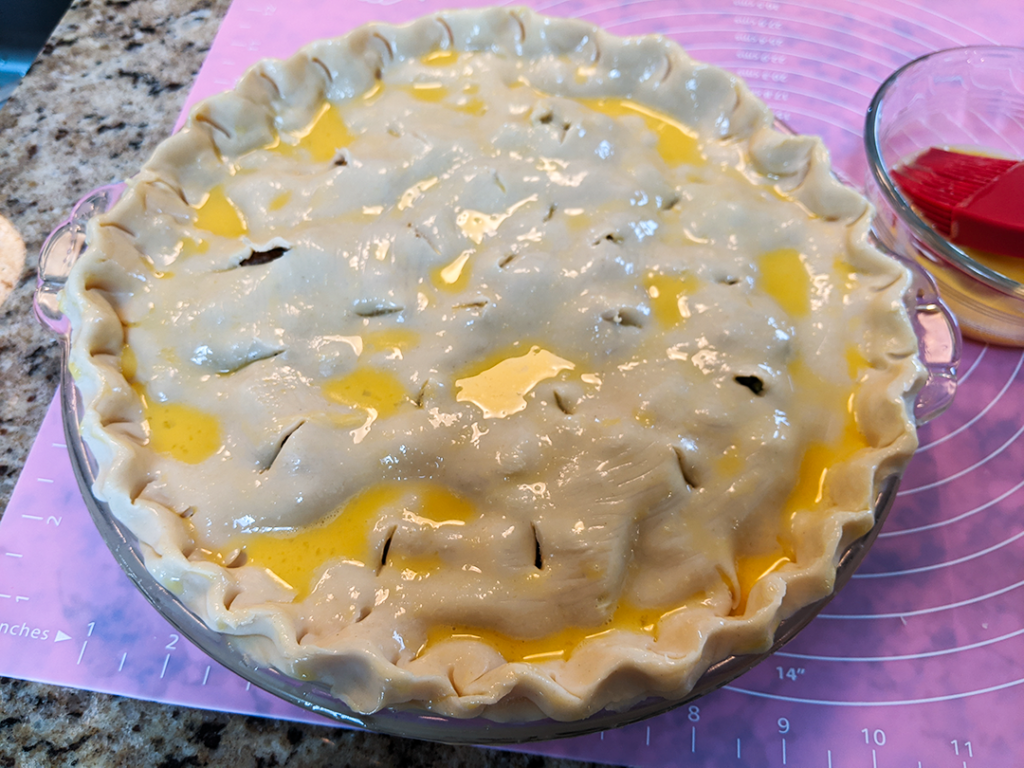
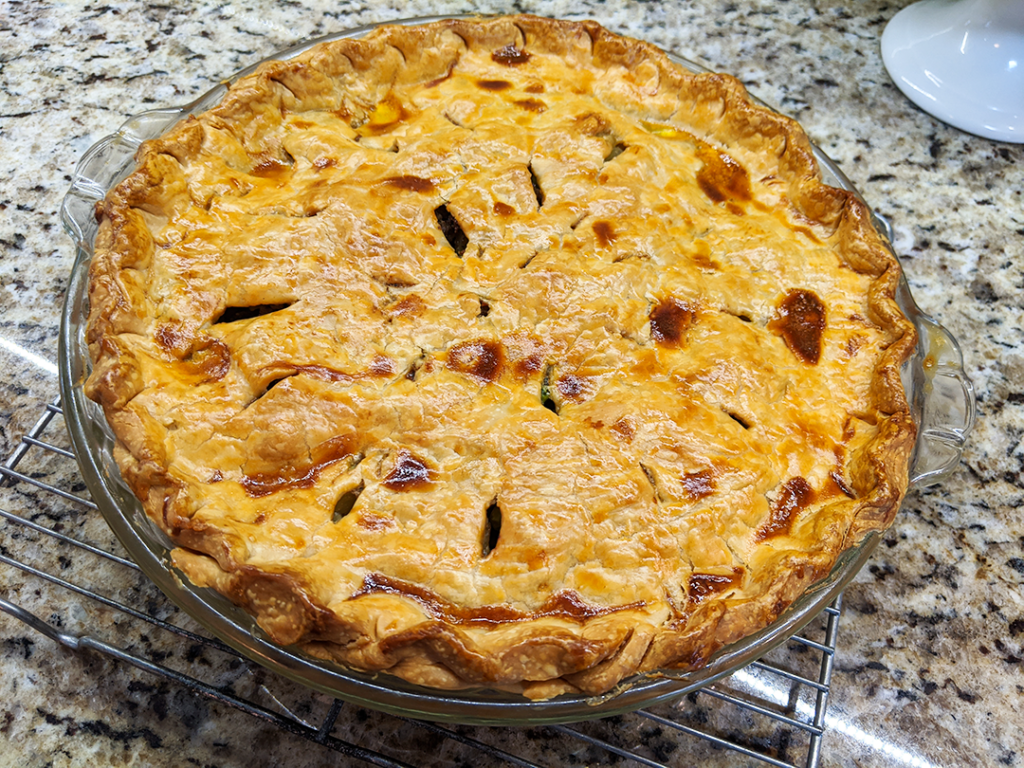

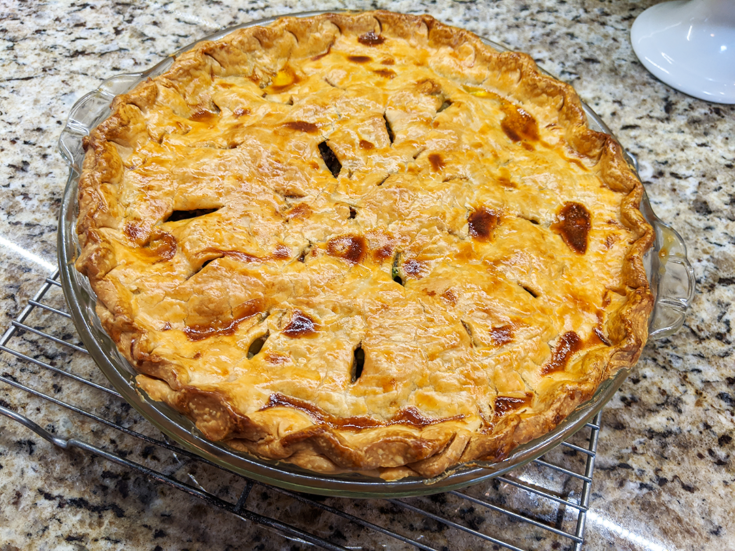


 A Word About Deep Frying
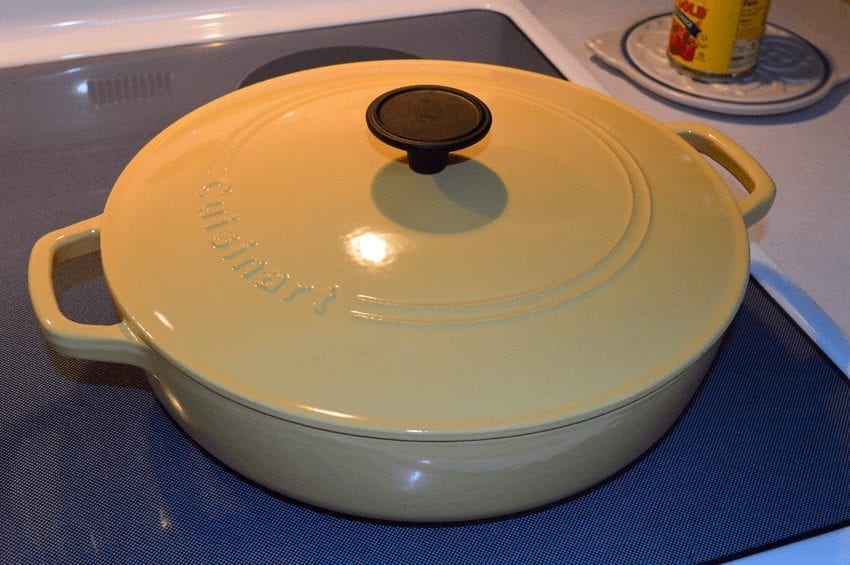

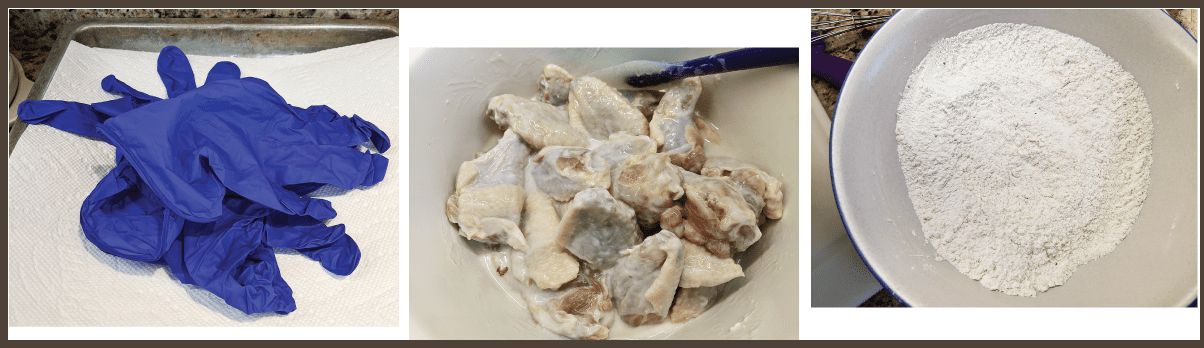

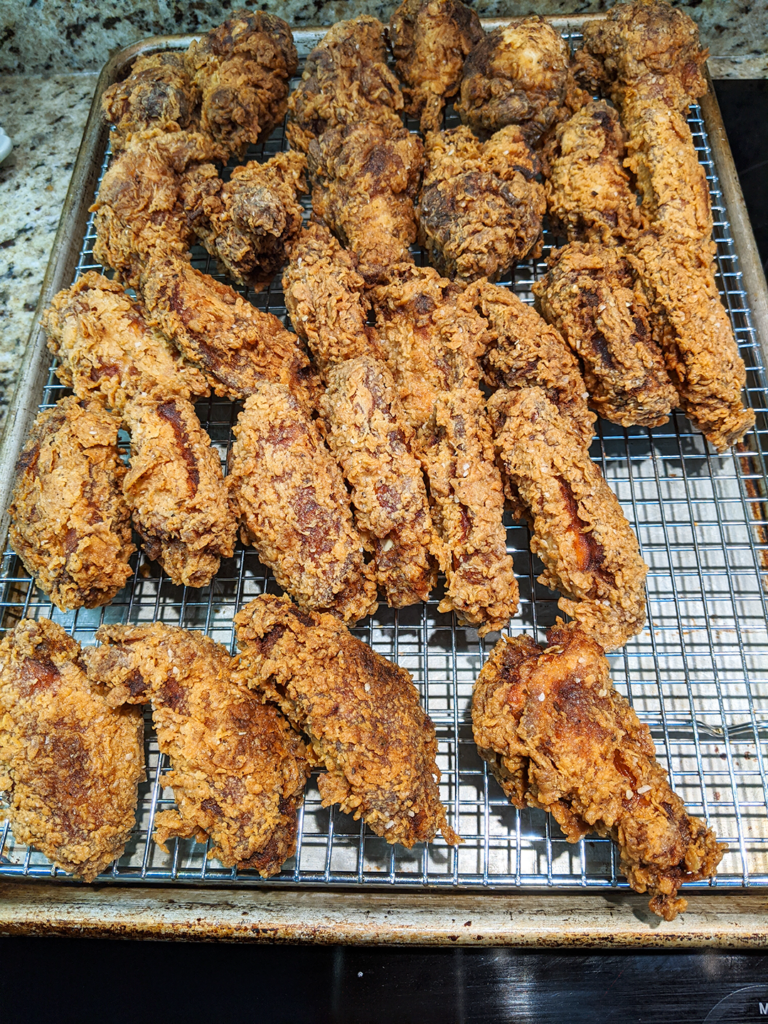


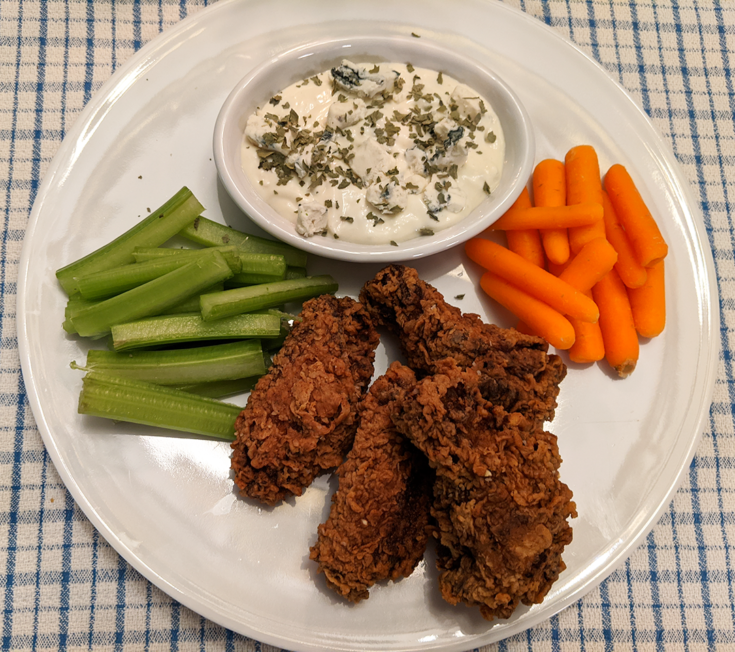


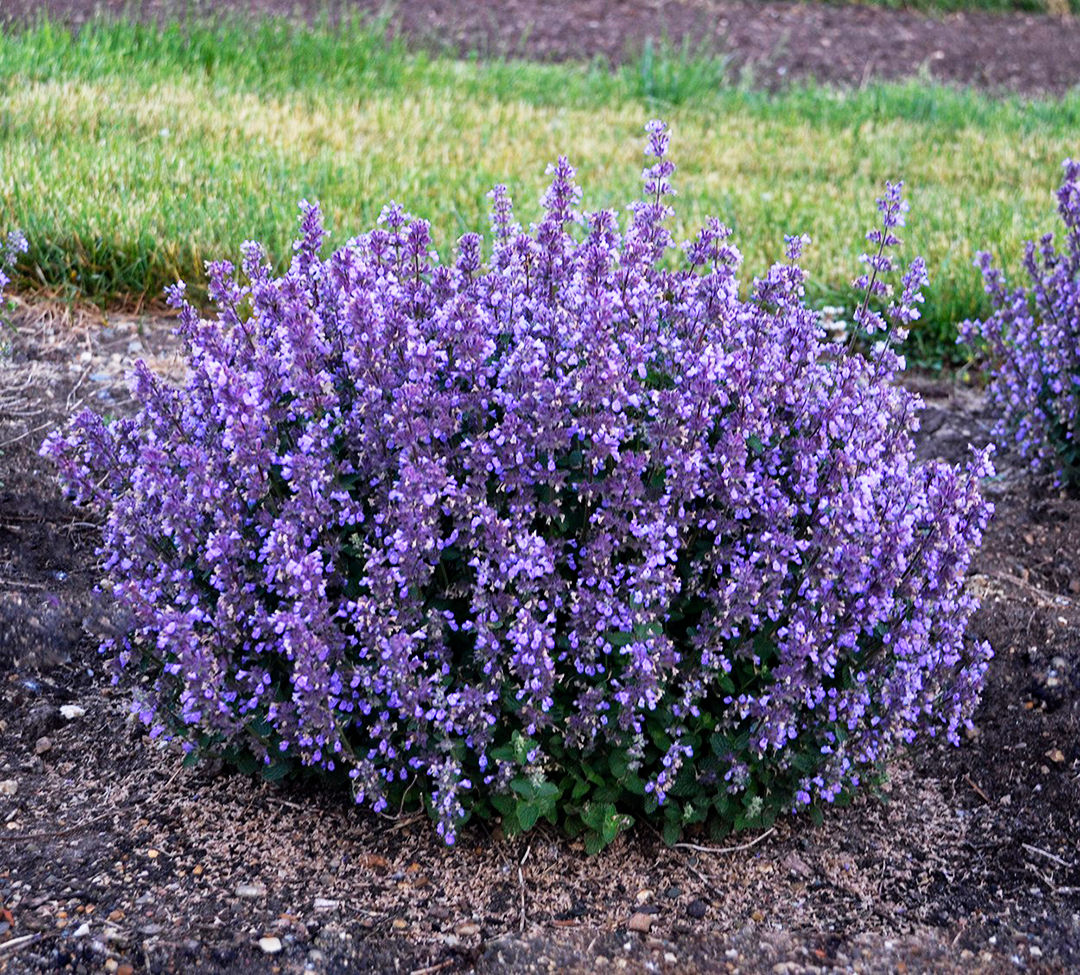


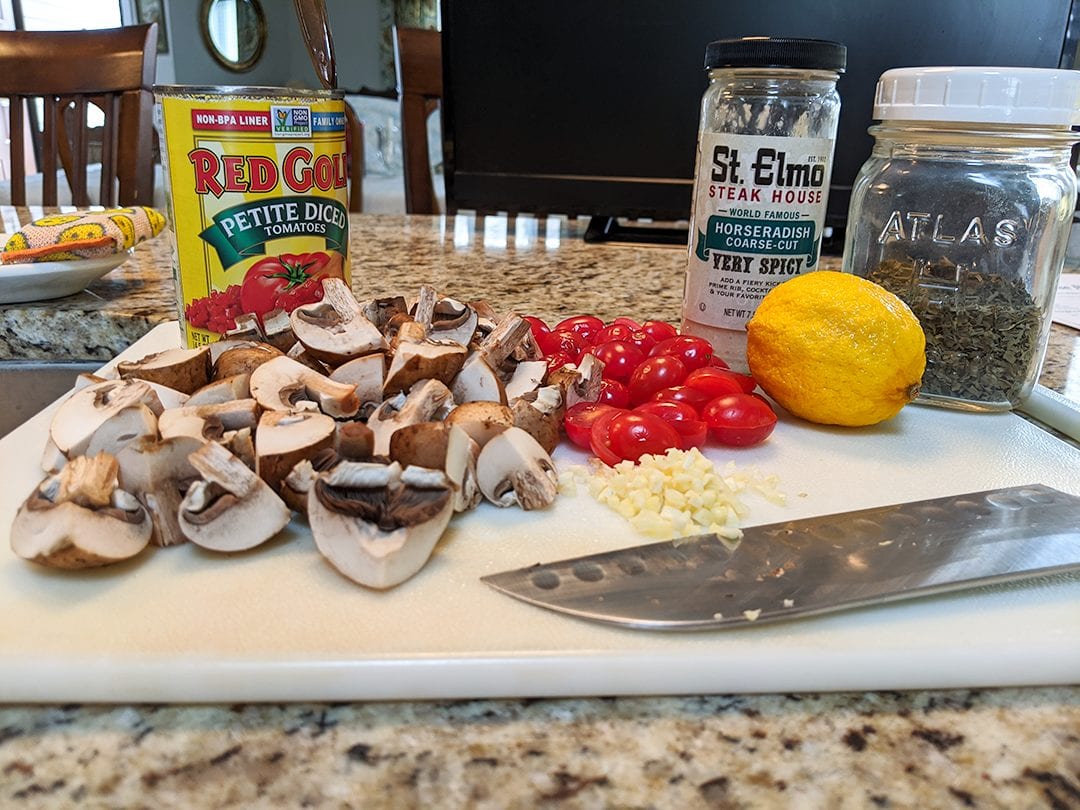
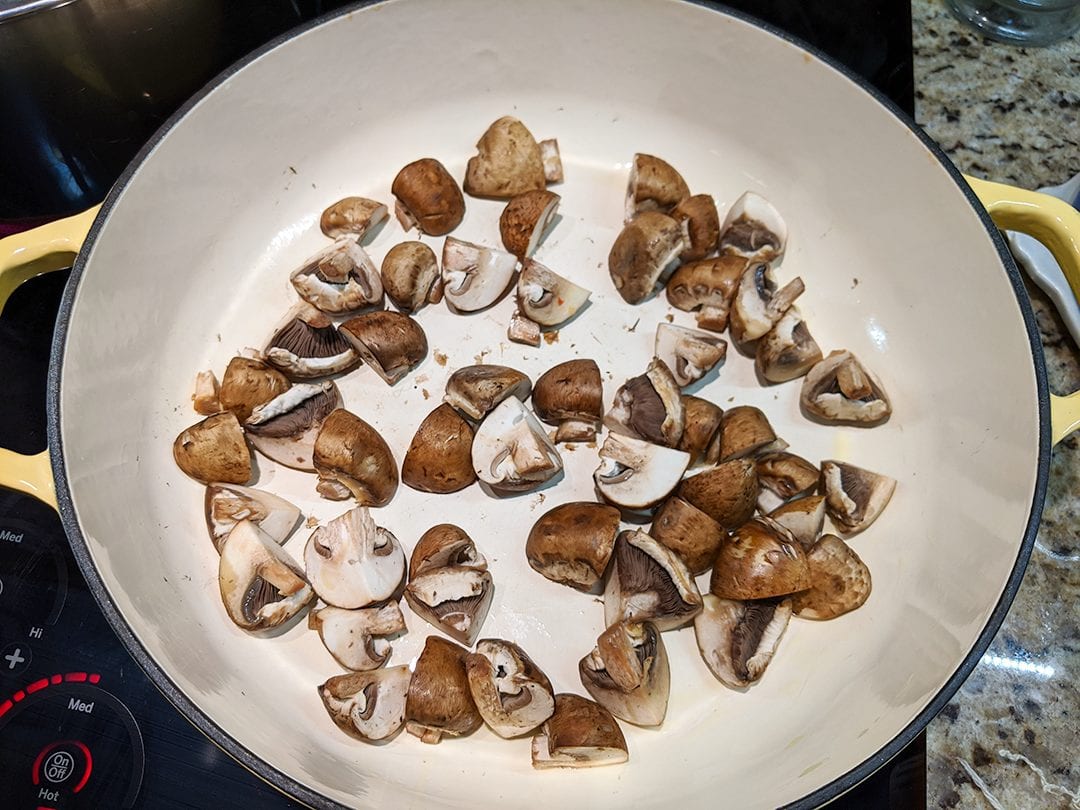
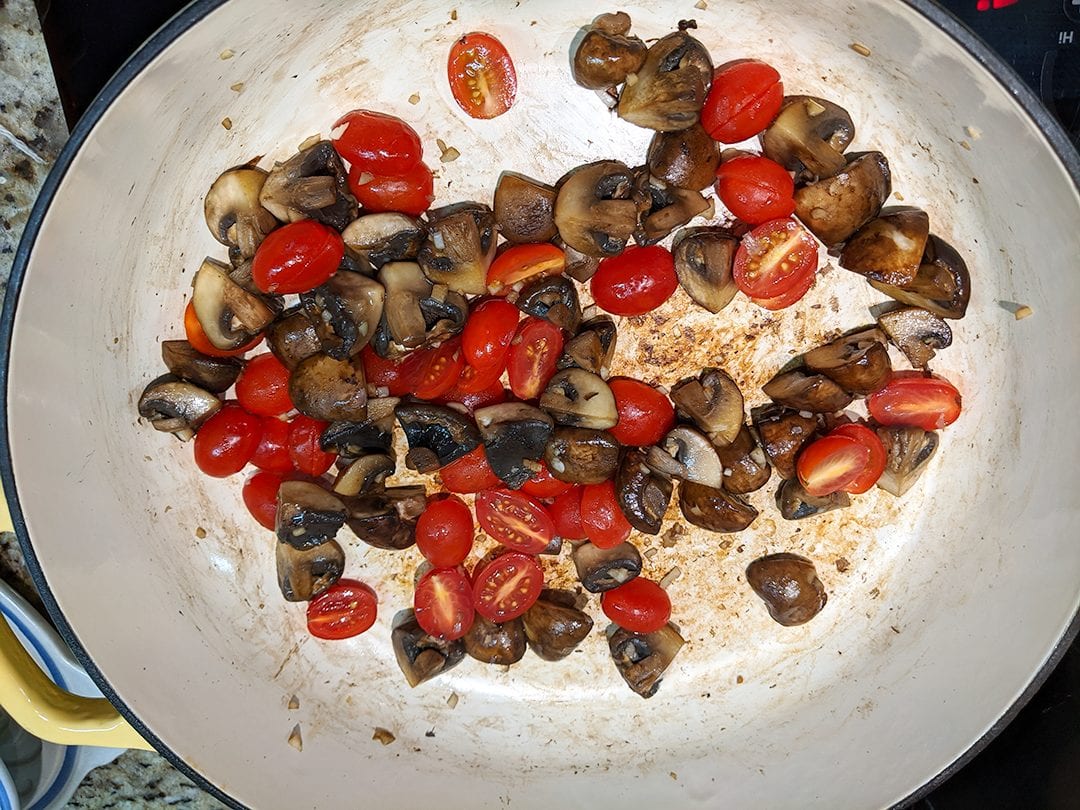
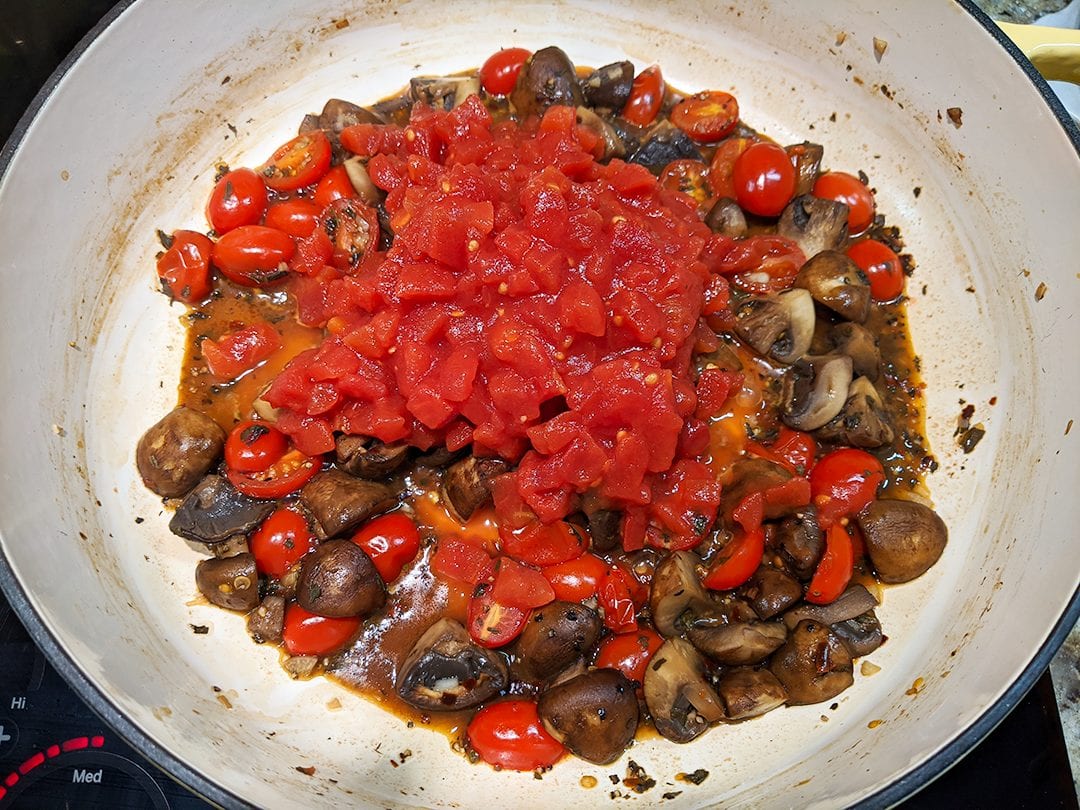
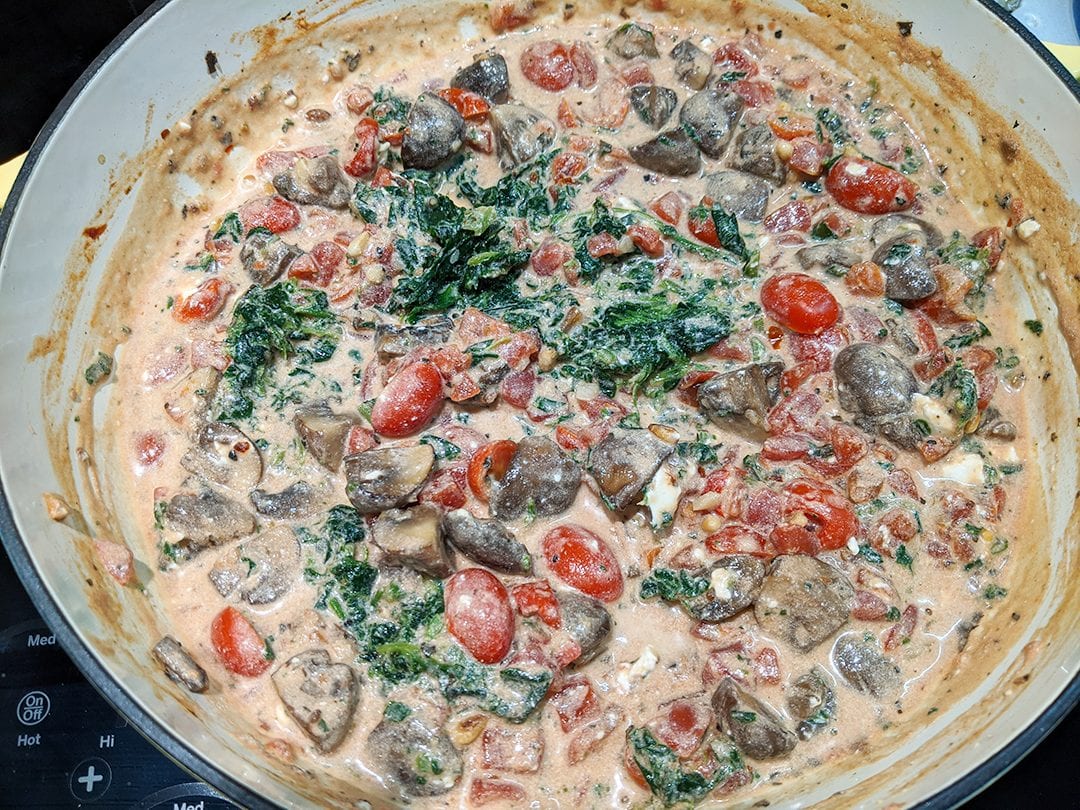
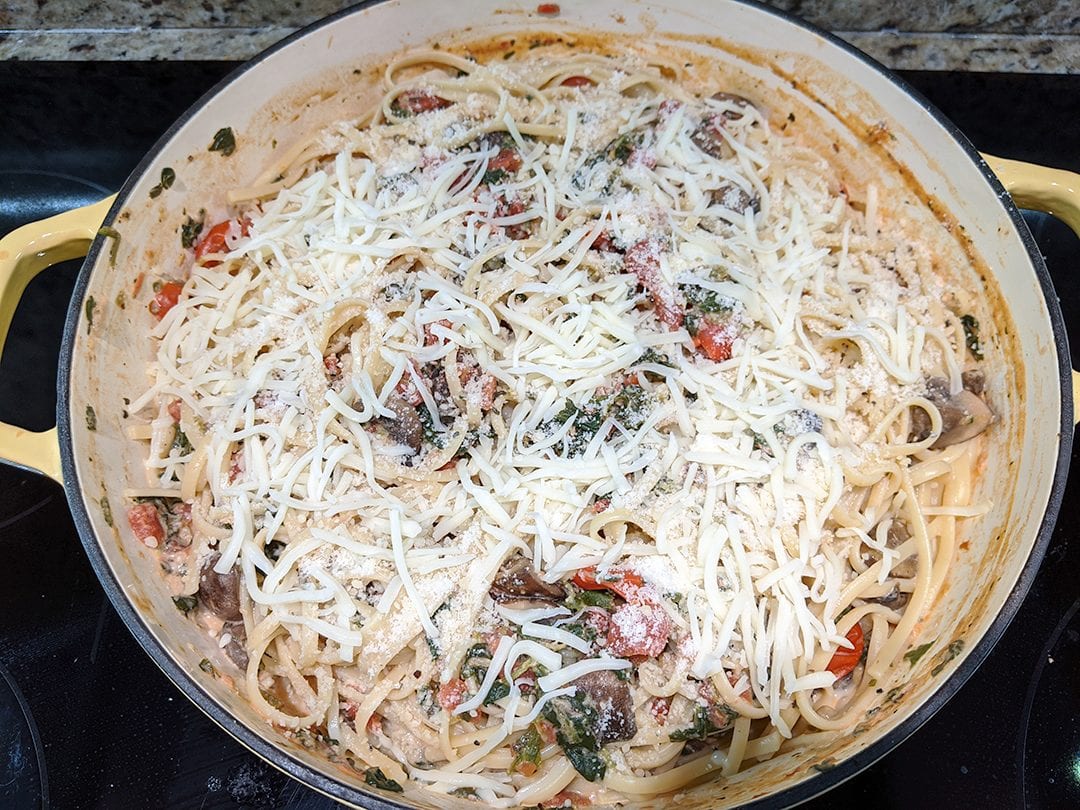
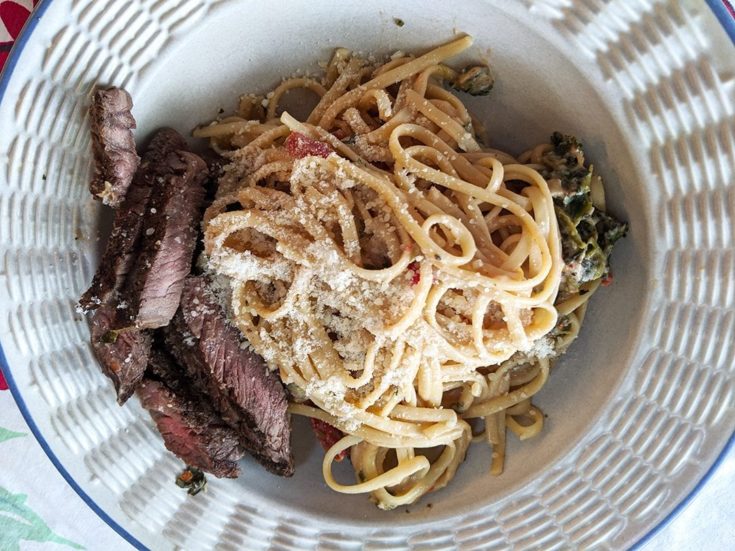
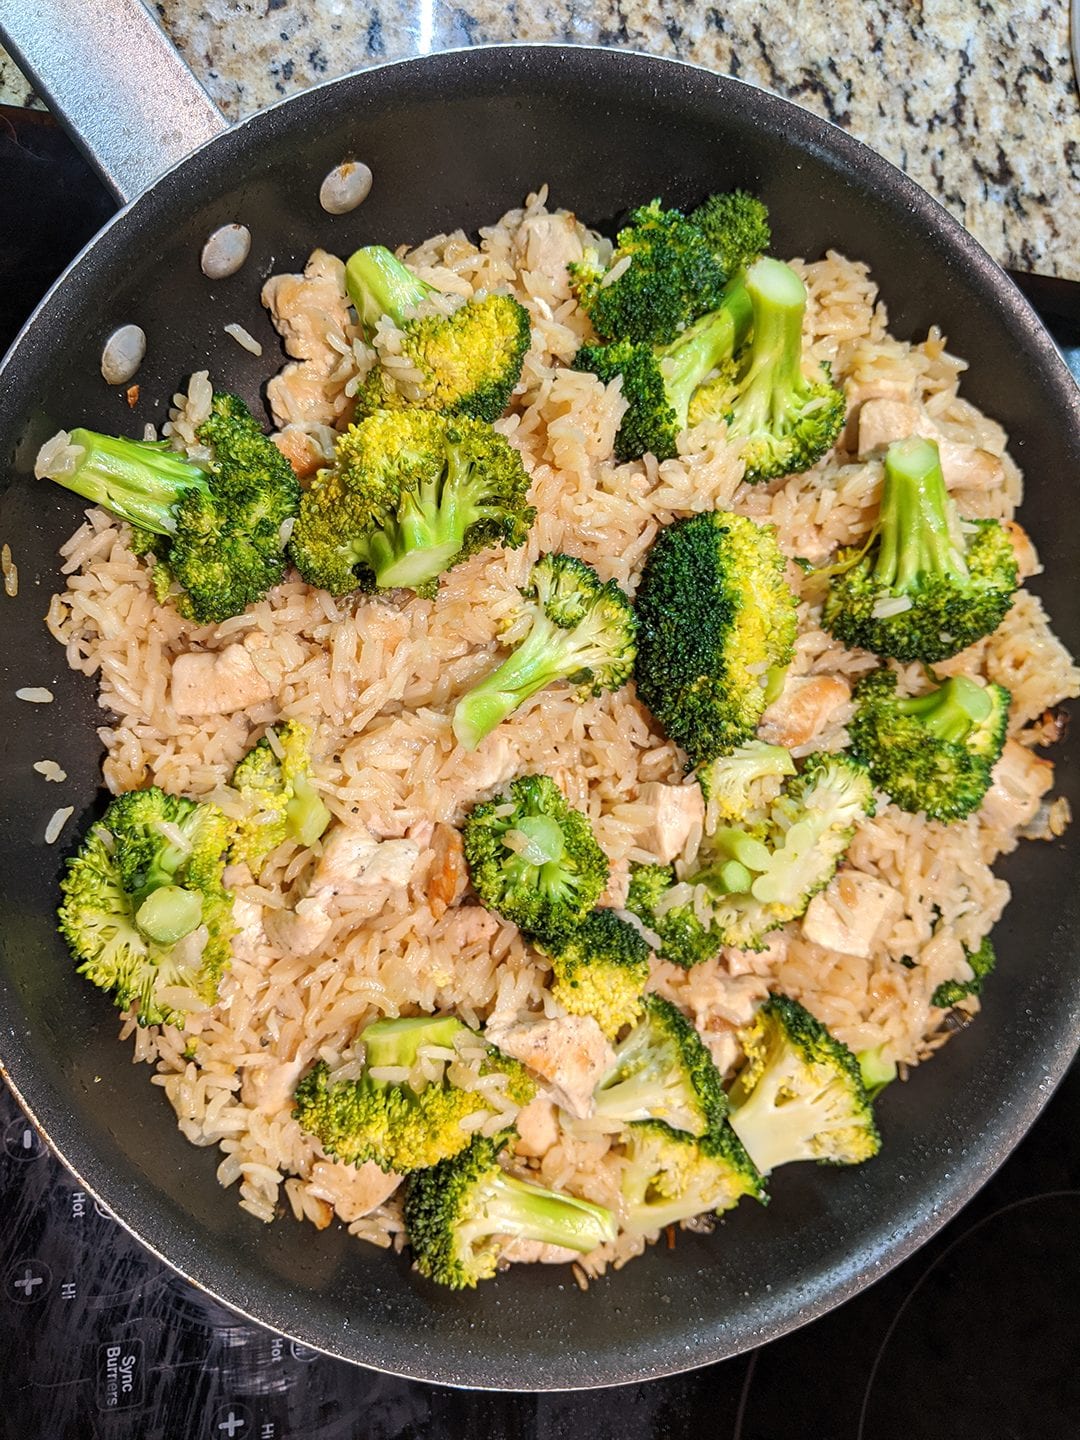
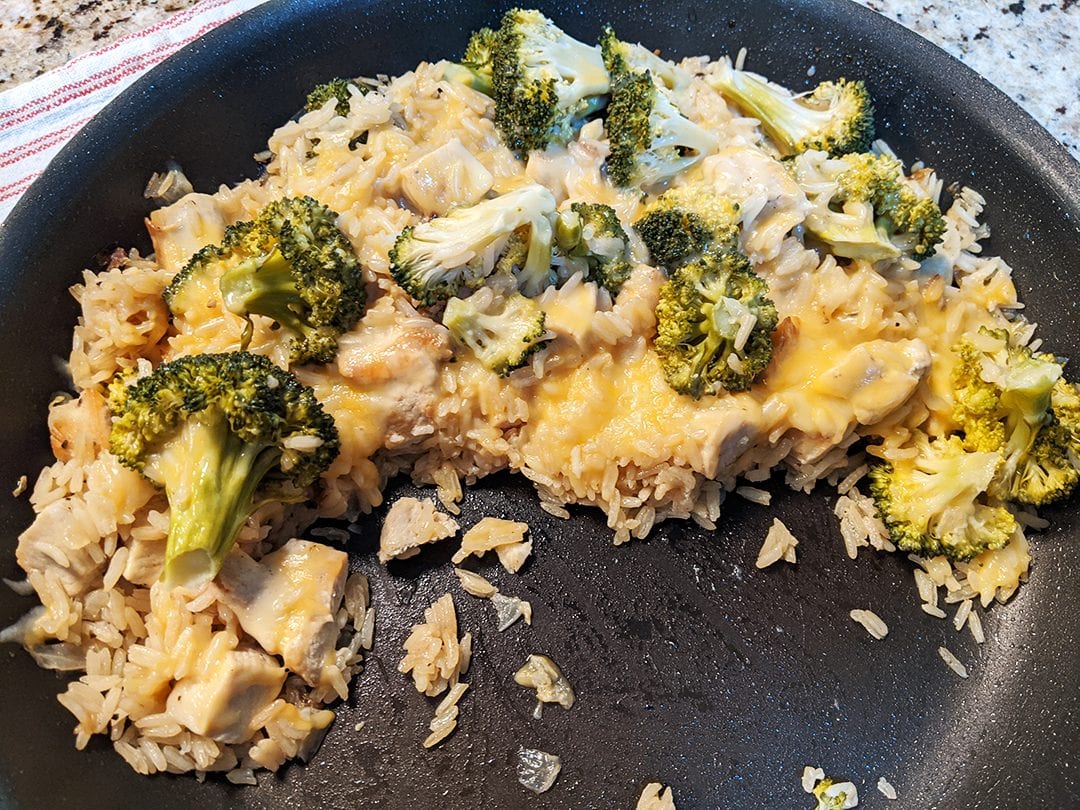
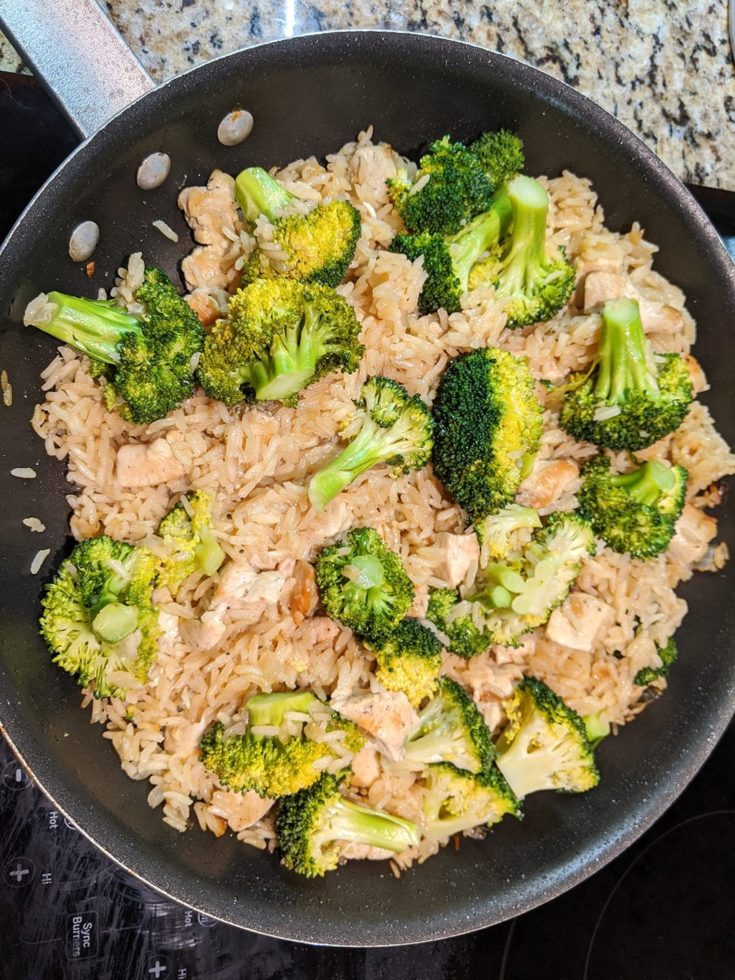

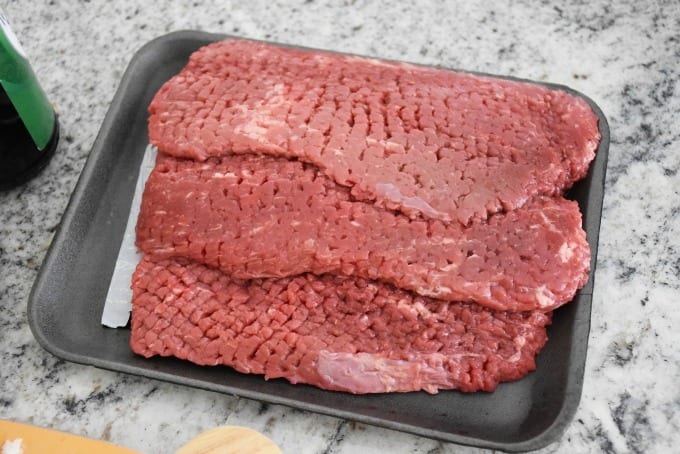
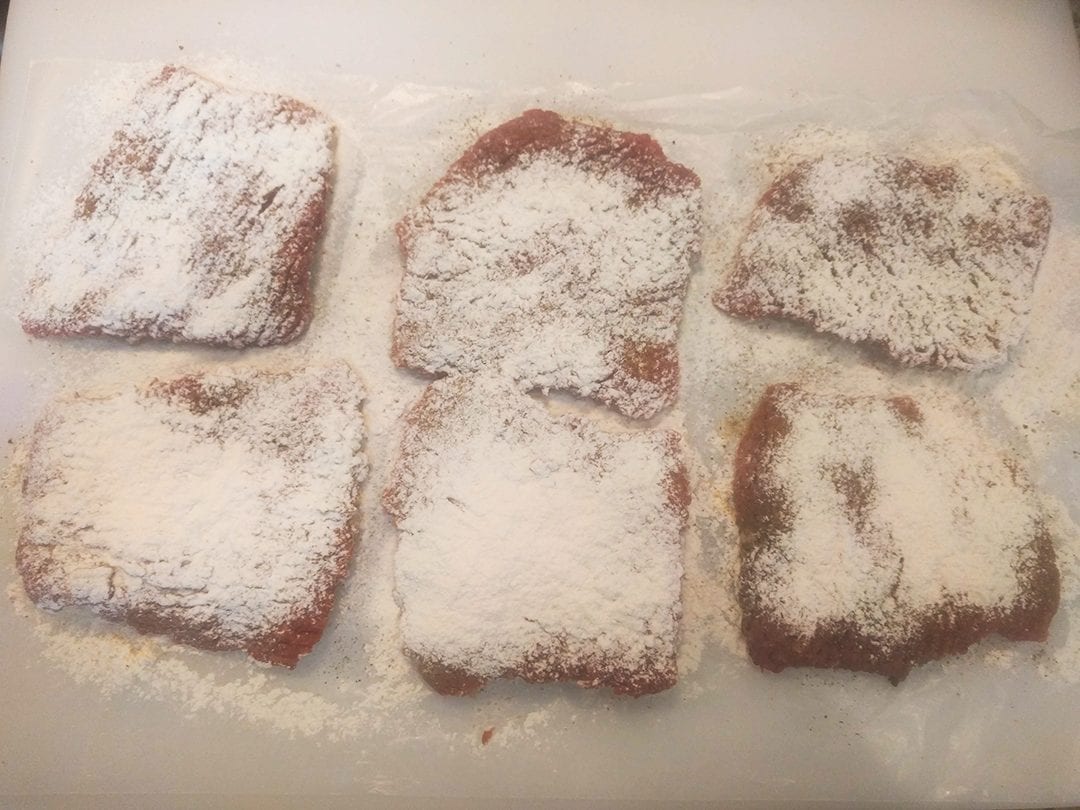
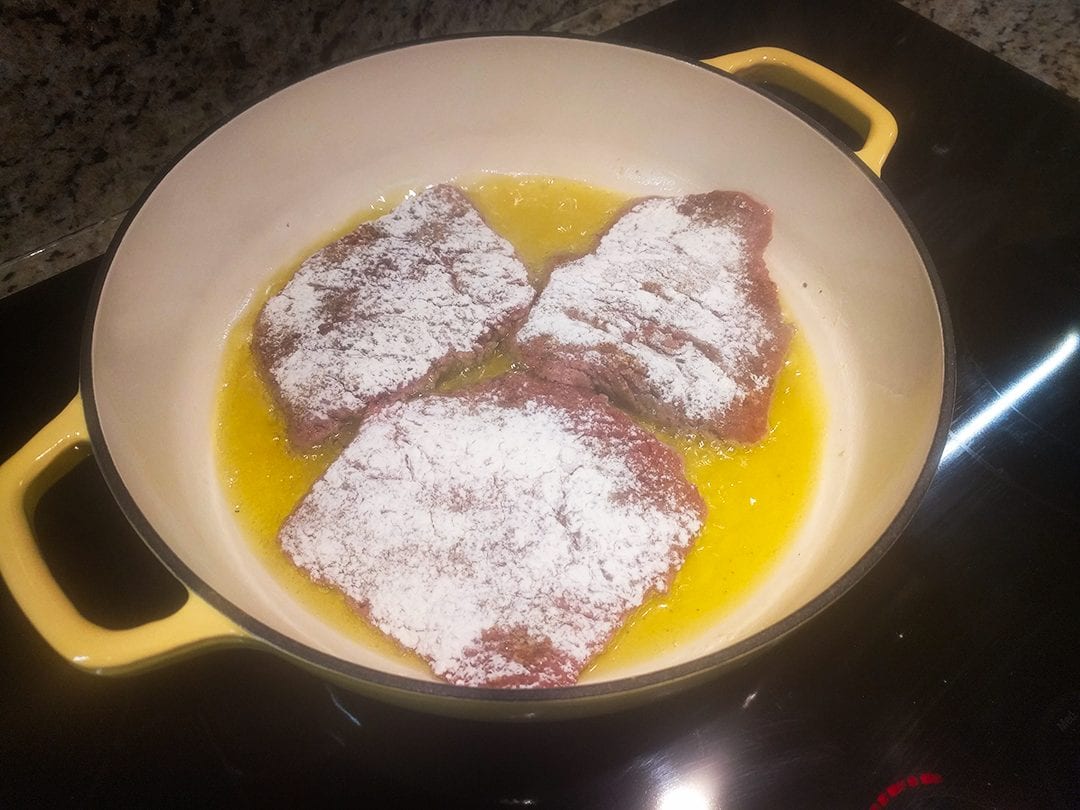
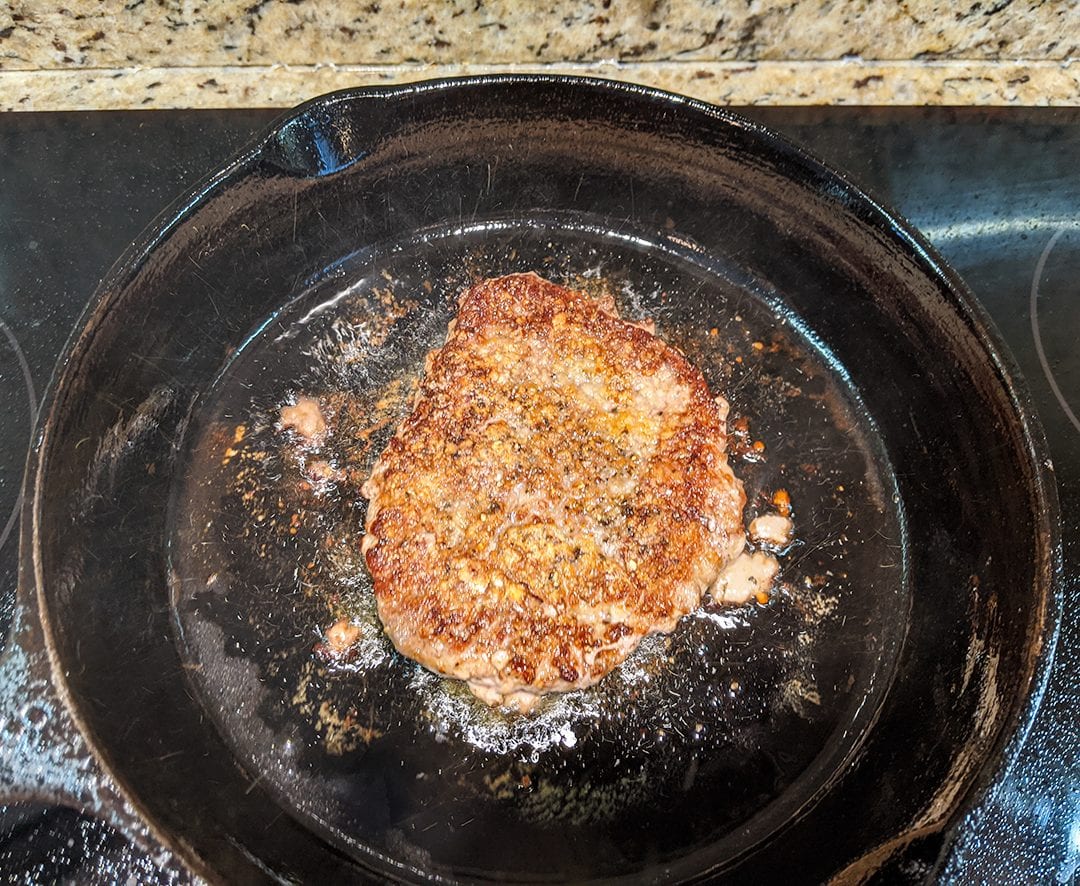
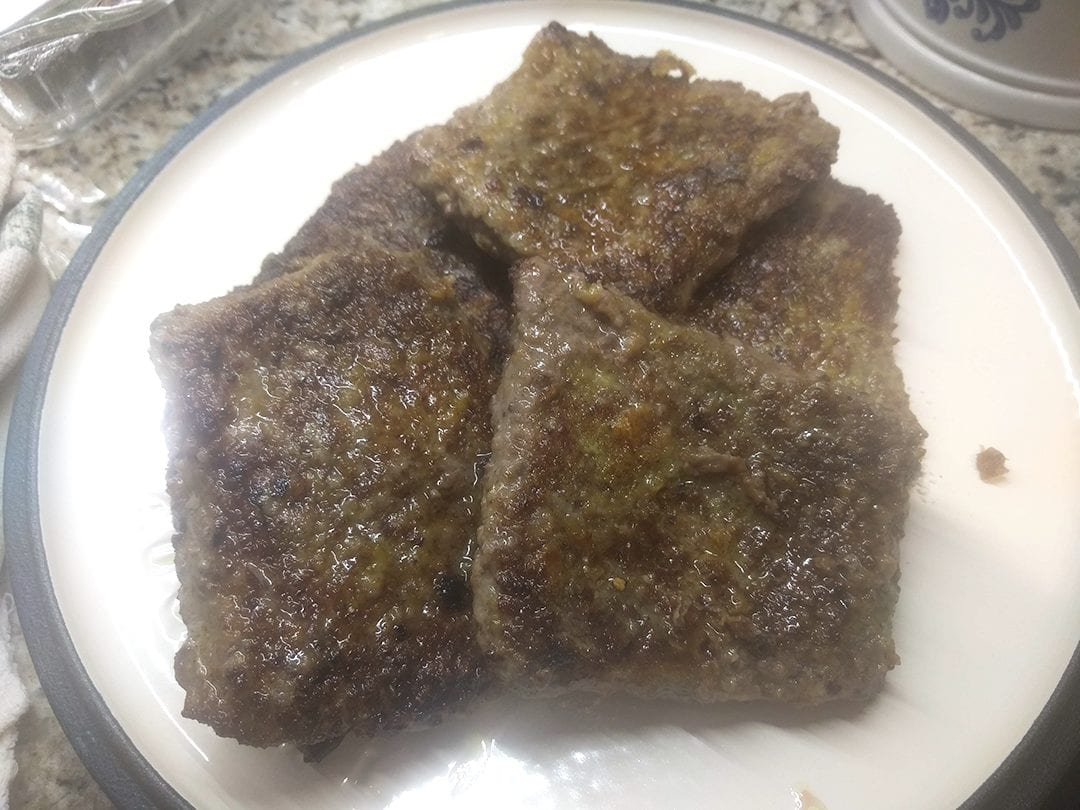
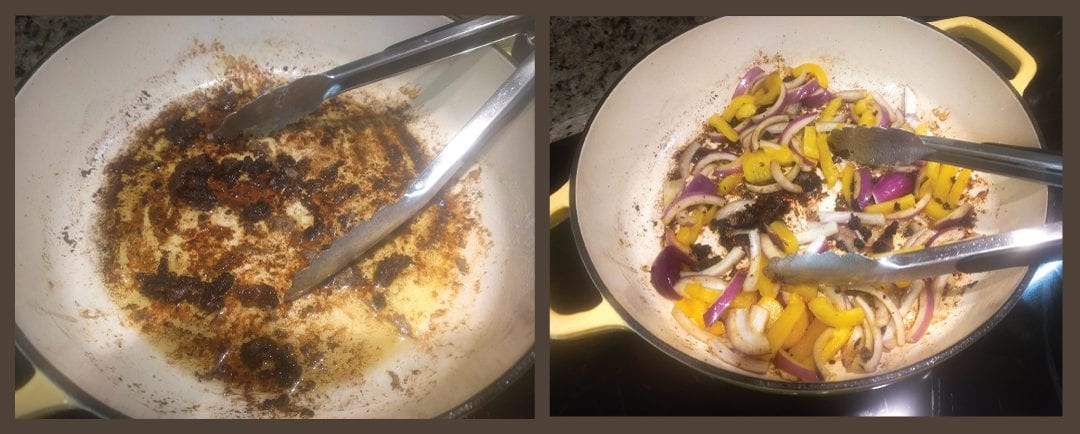
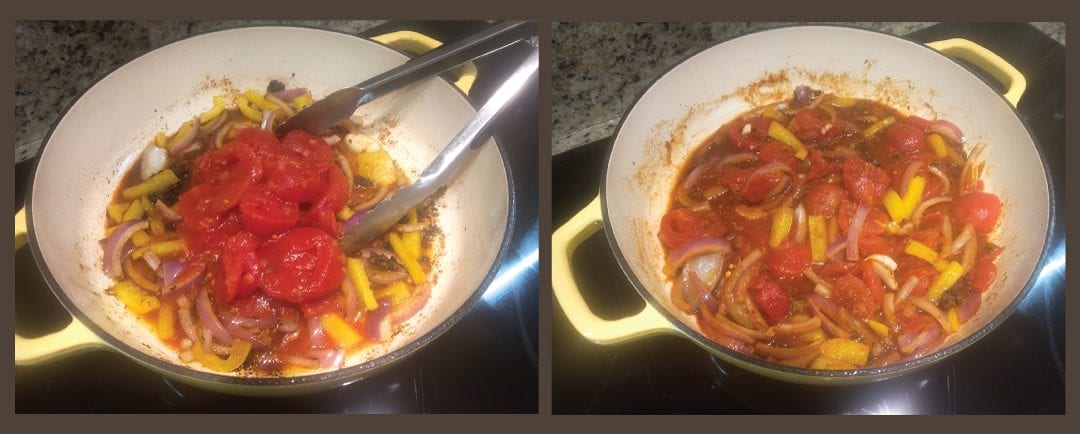
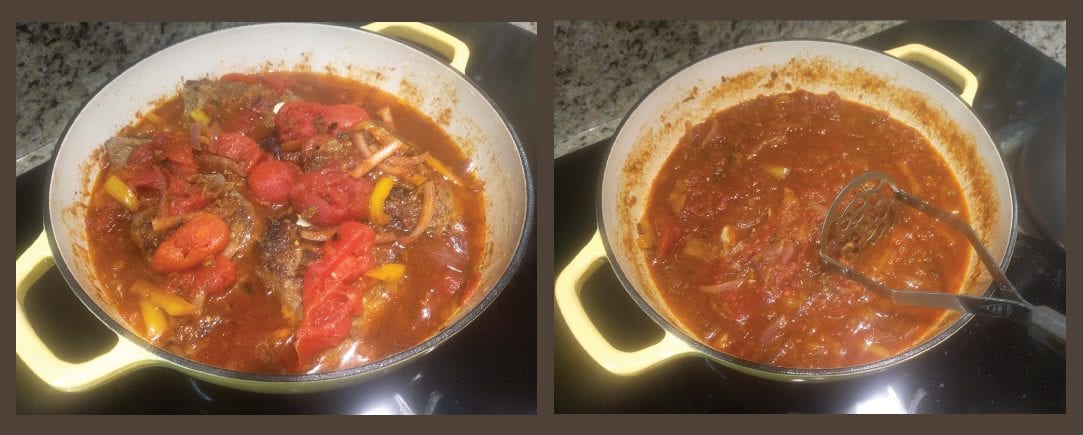
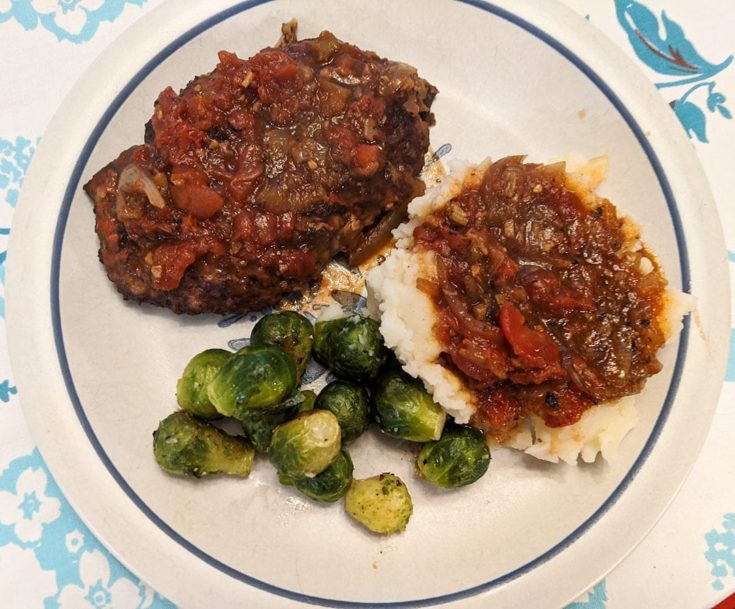
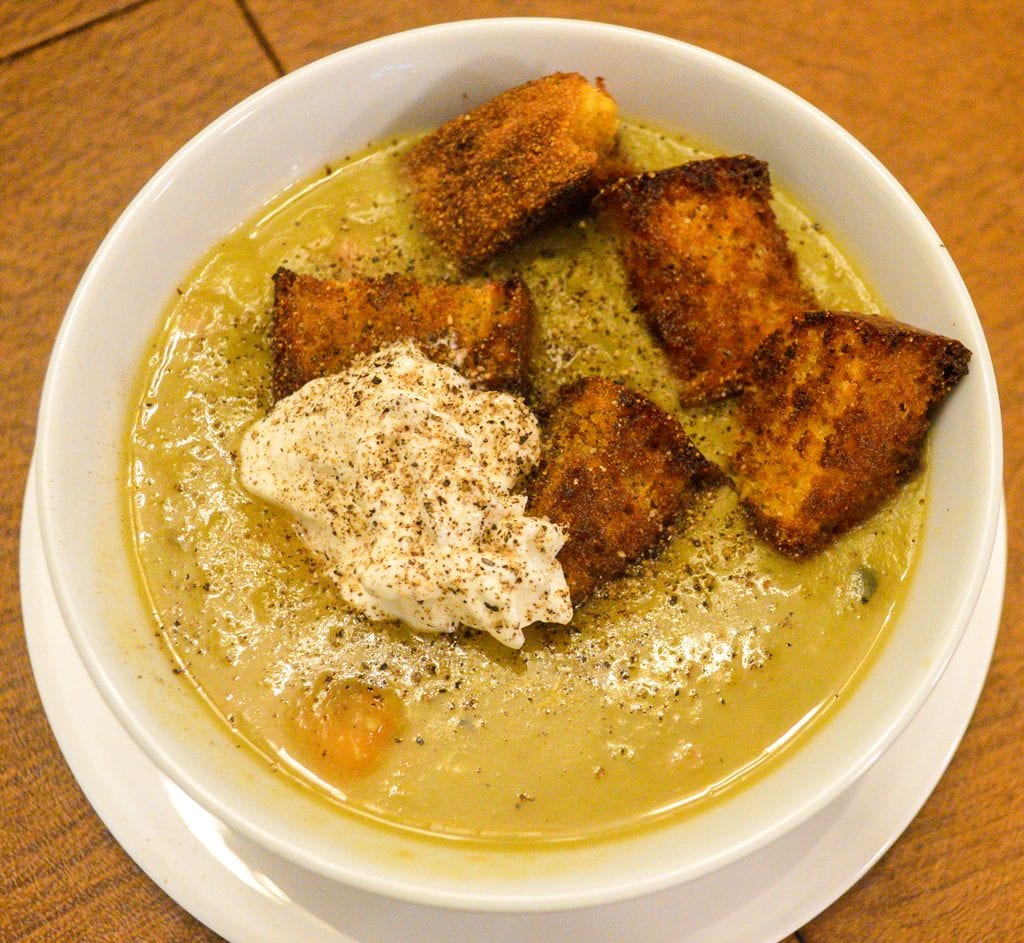
 Are Split Peas and Split Pea Soup Healthy to Eat?
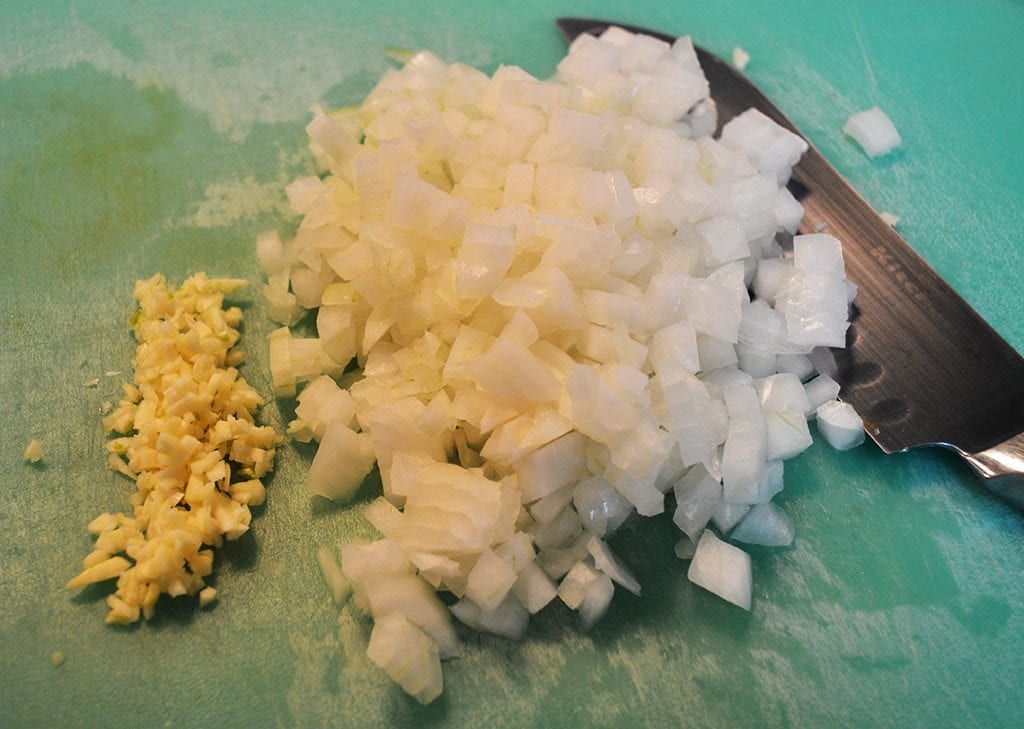
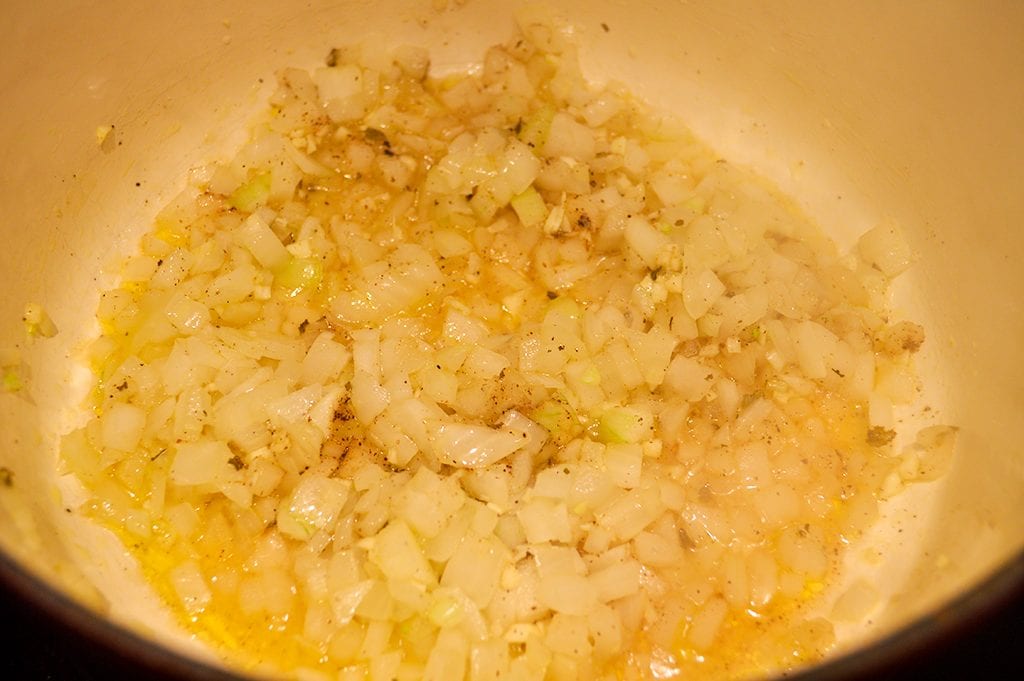
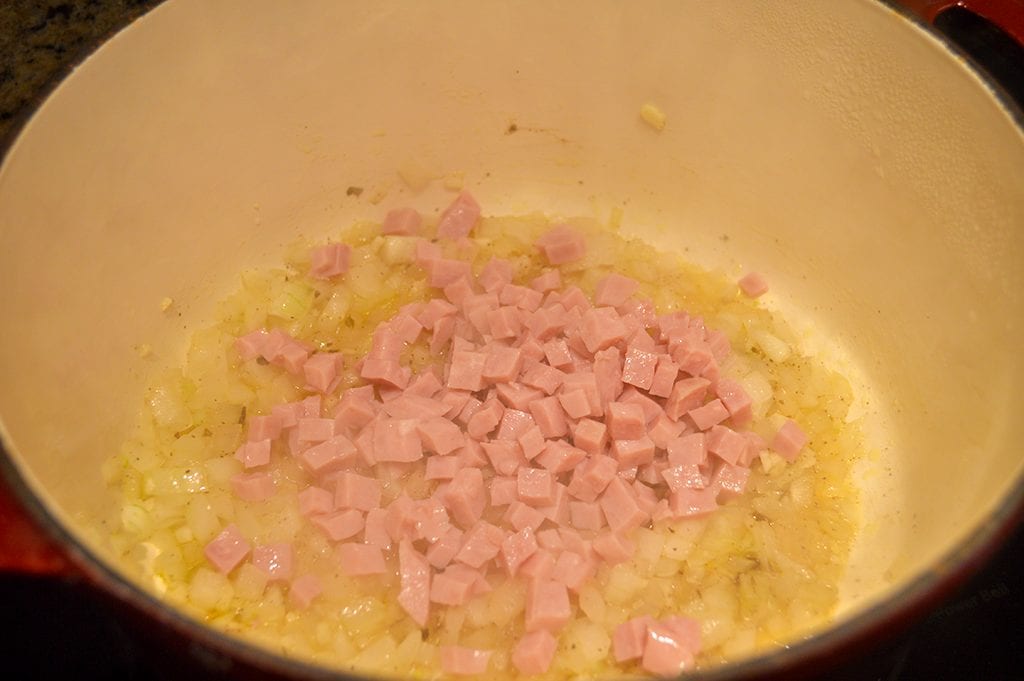
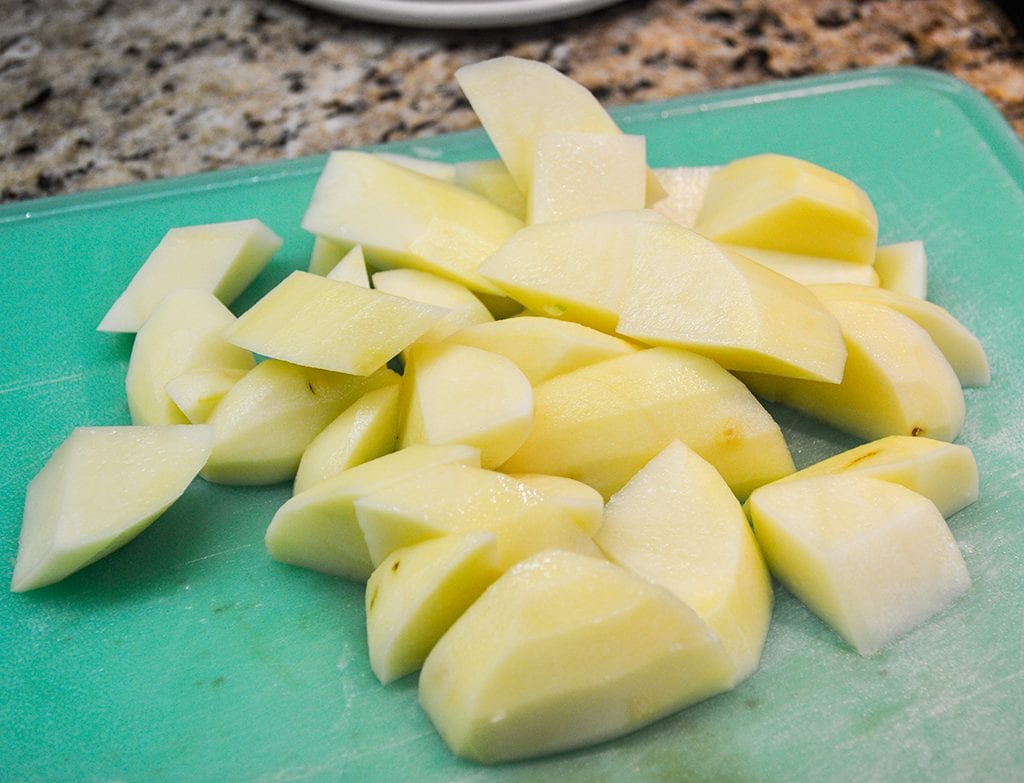
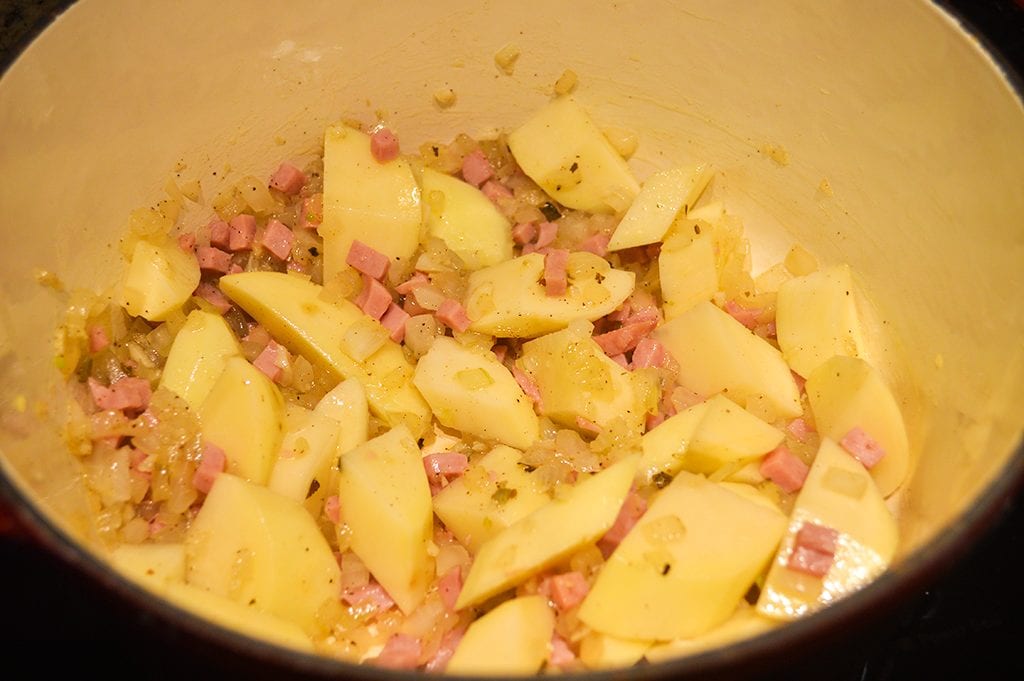
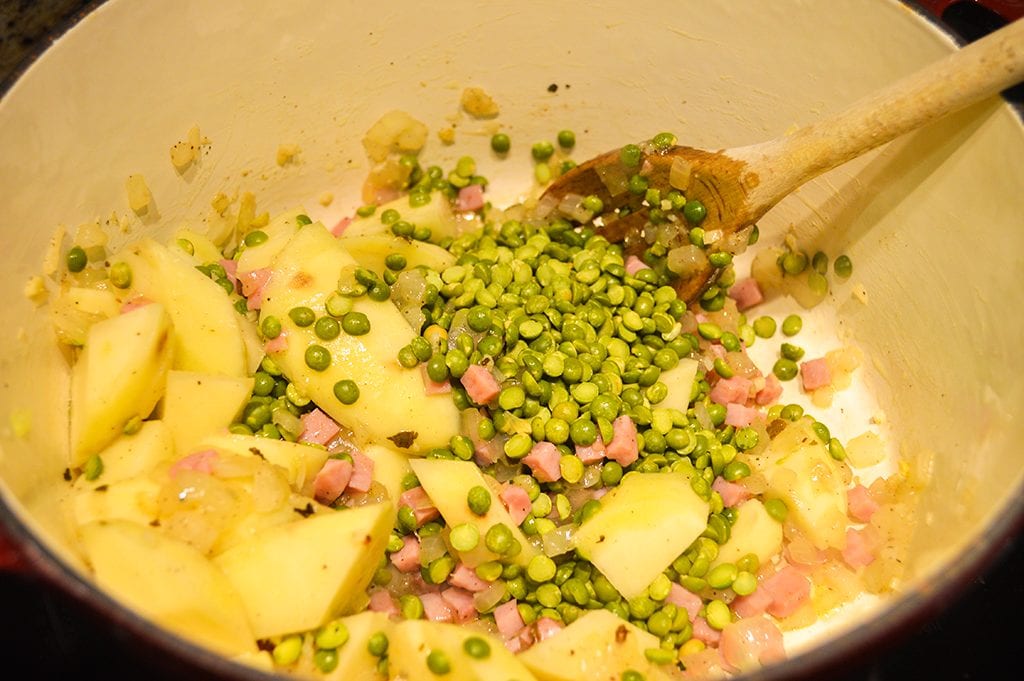
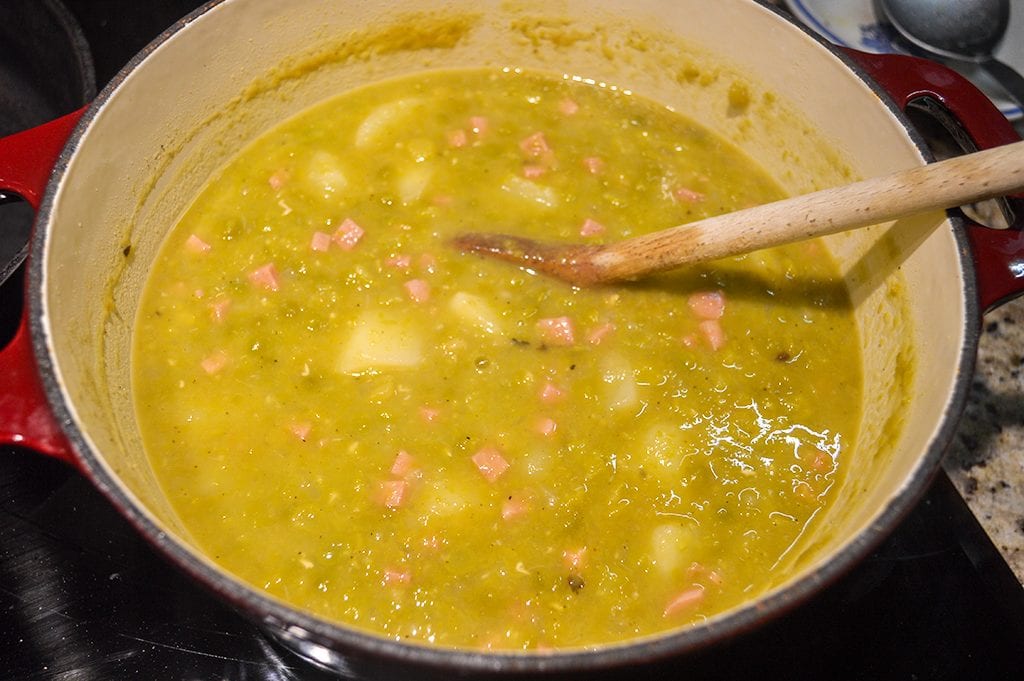
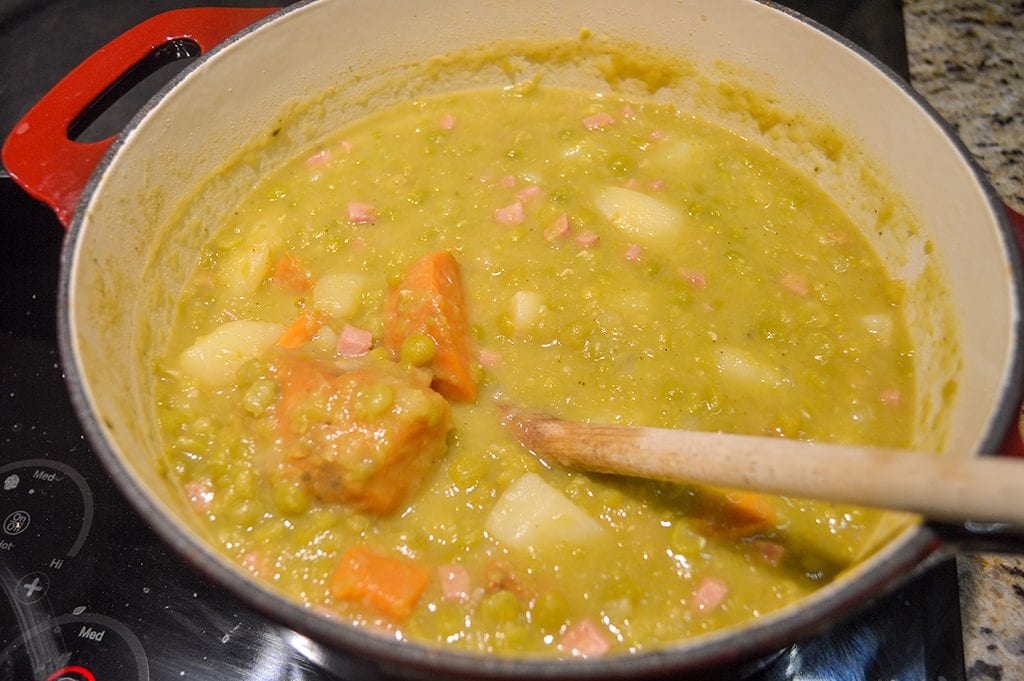

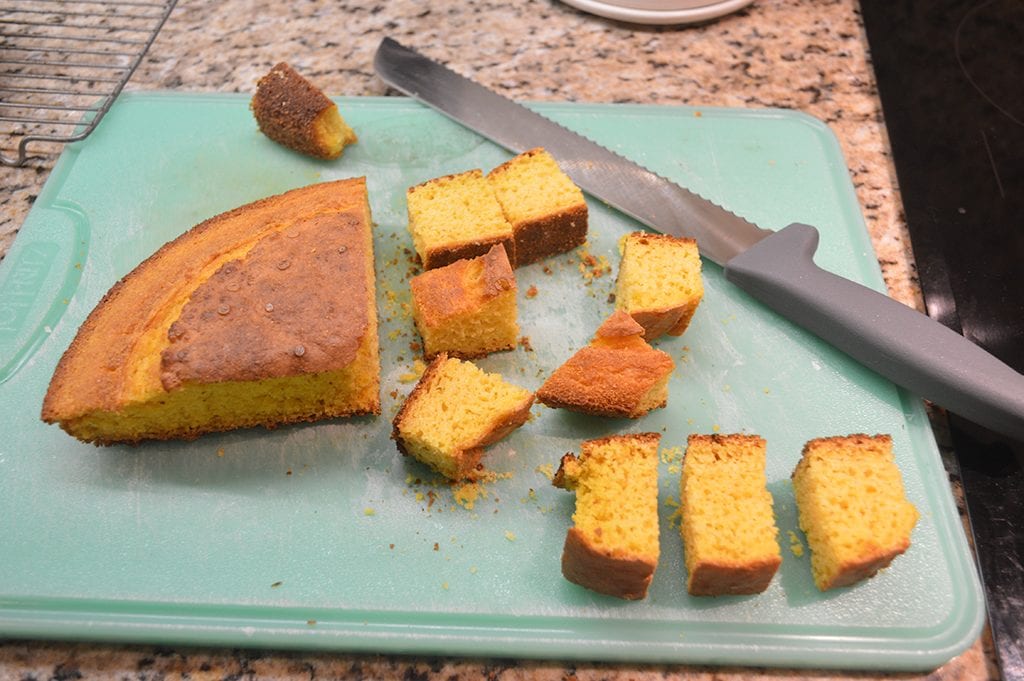
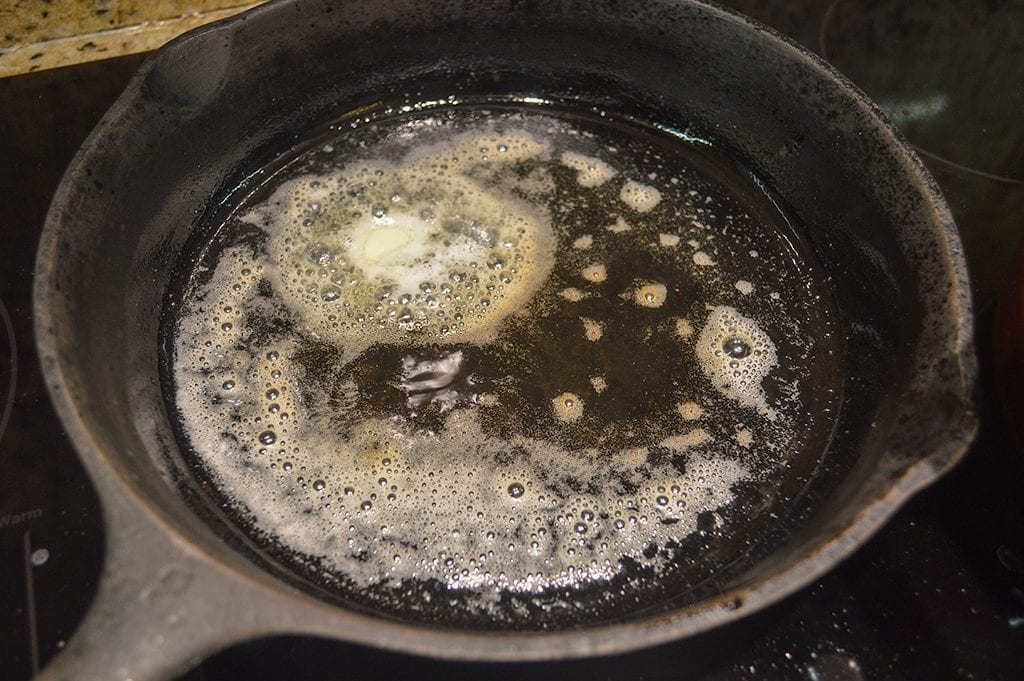
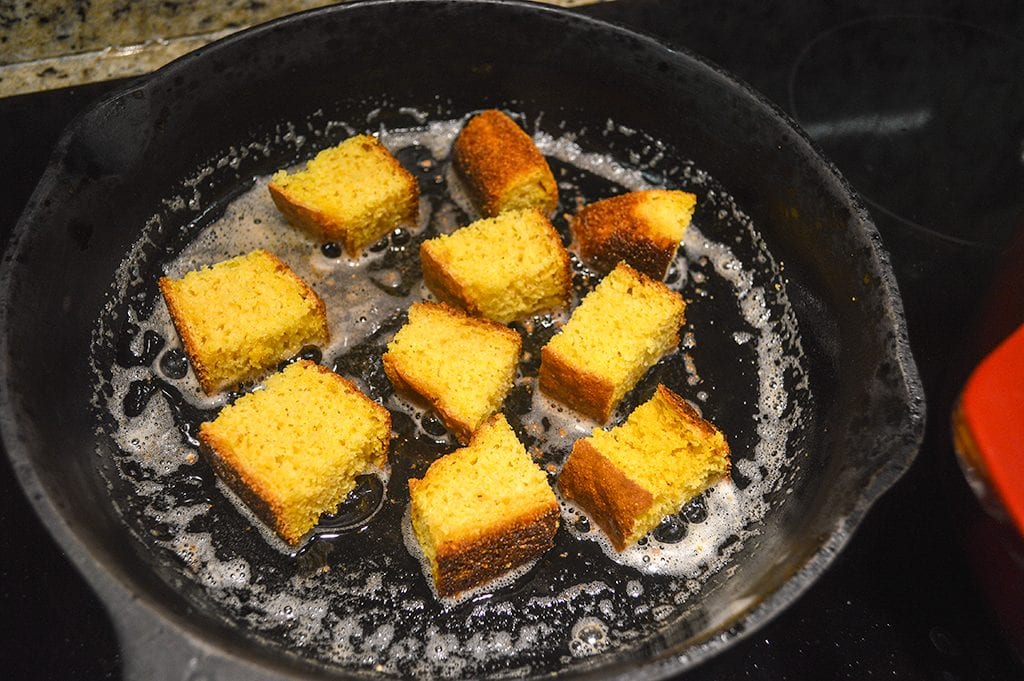
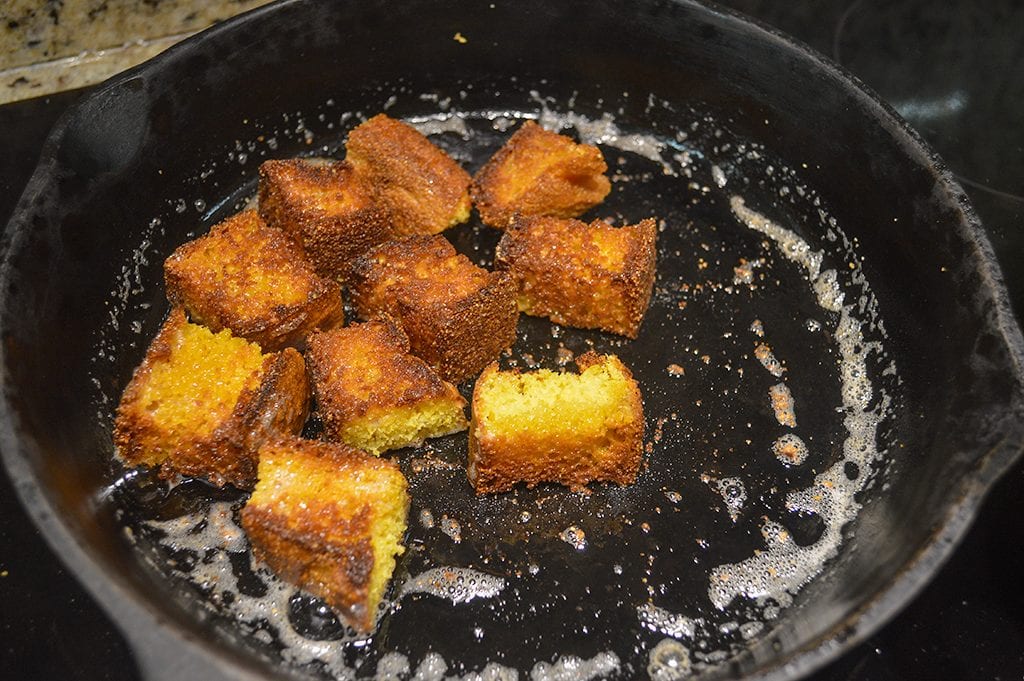


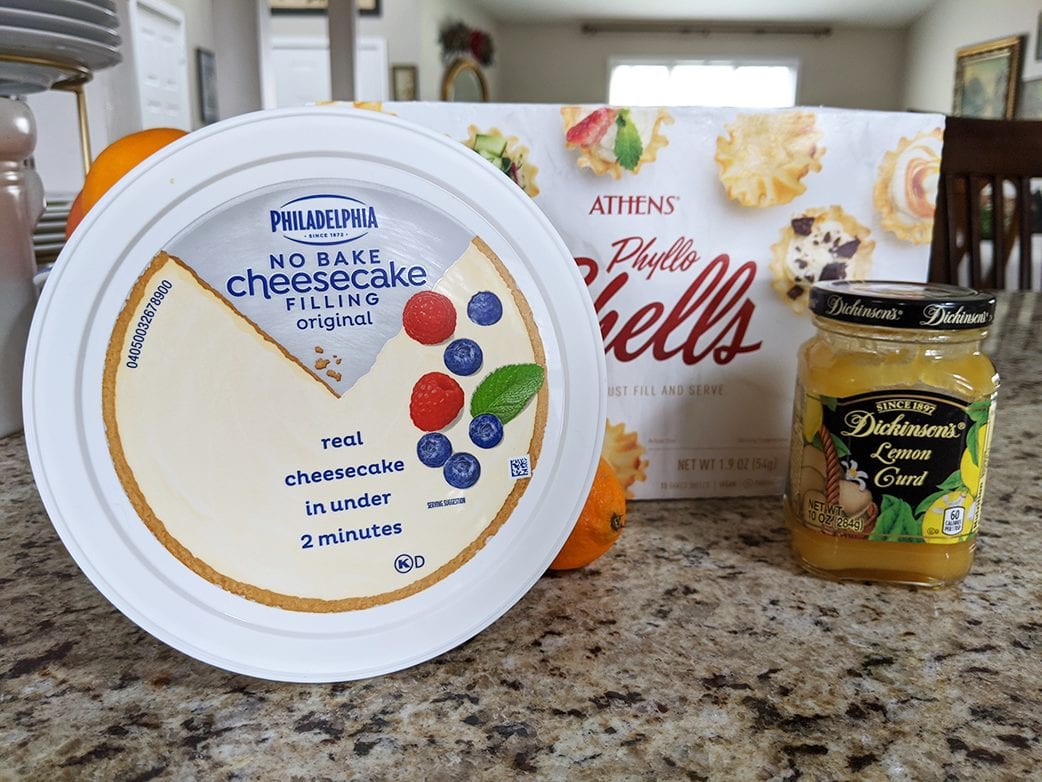


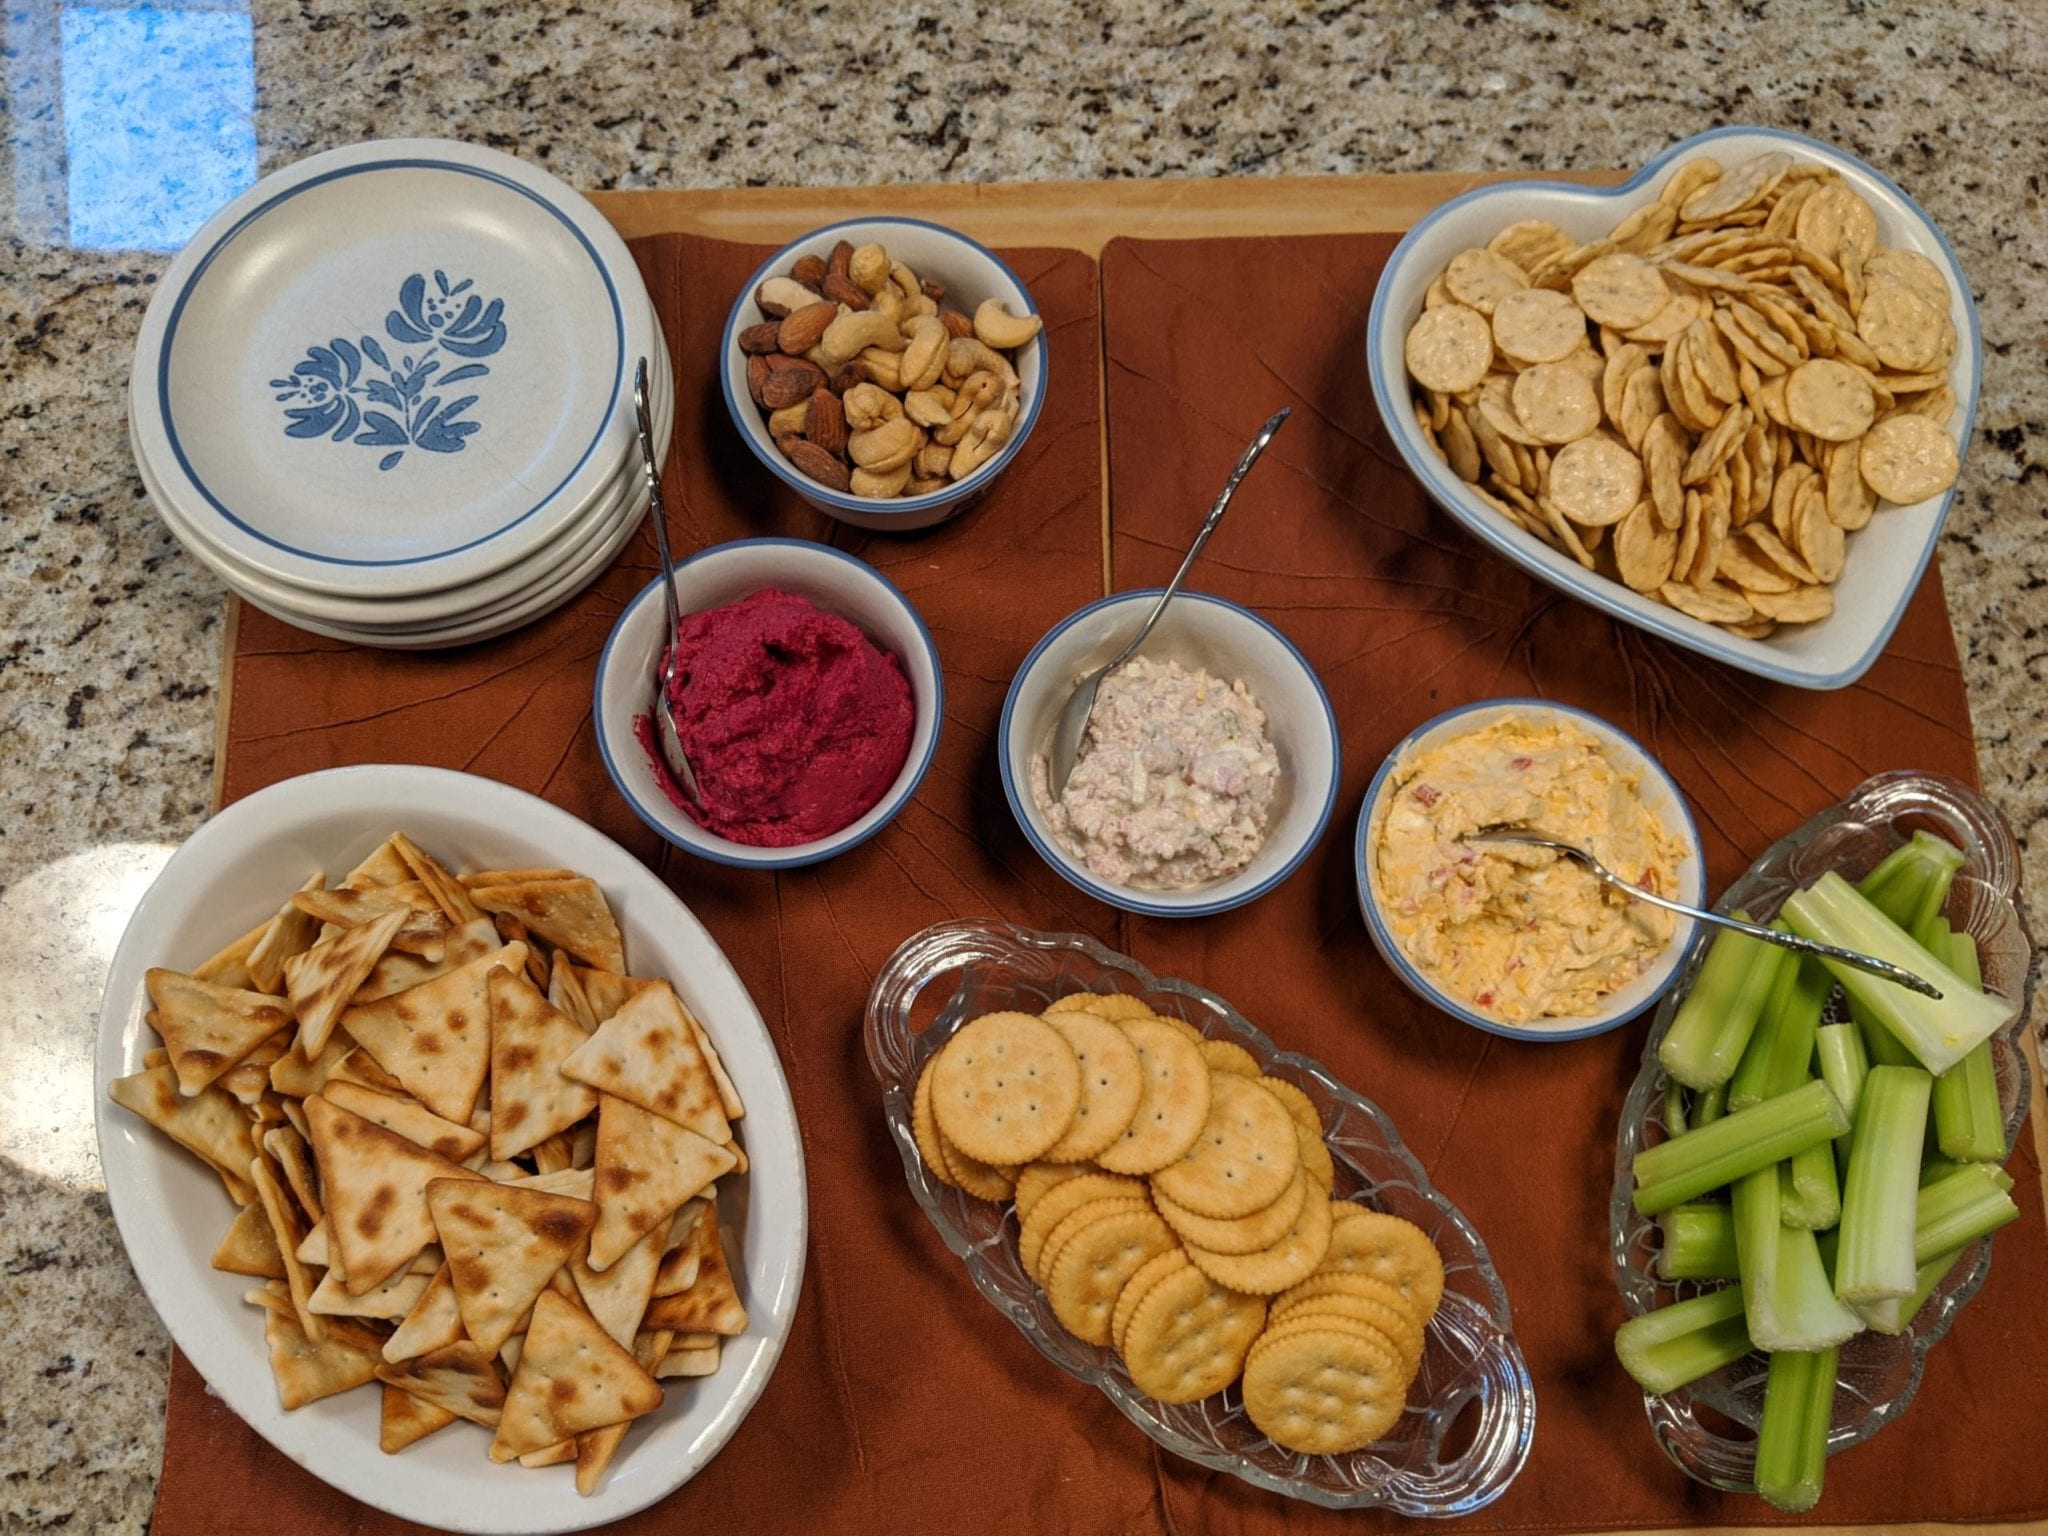
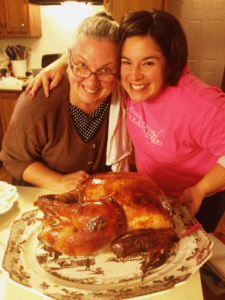 In all the years I’ve roasted turkeys, I’ve never had one that was completely frozen on Thanksgiving morning – NEVER – until Thursday last week. Yep, woke up, took the bird from the garage refrigerator, and the darn thing was a solid block. How did that happen?? Jessica and I put it in the refrigerator the Friday afternoon before. What on earth??

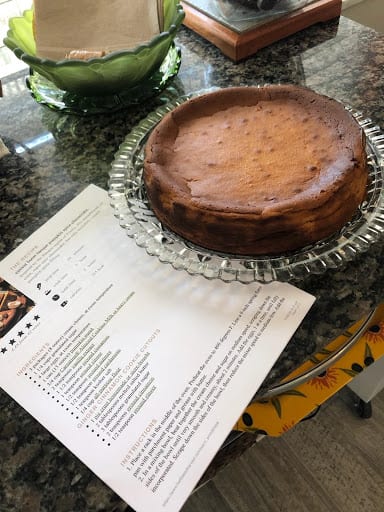 This cheesecake was another lovely surprise.