Mimi’s Minis – Lemon Cheesecakes

at mimi's table mimi's mini lemon cheesecakes 2

It’s the most wonderful time of the year!

Especially if you include these tasty, crunchy, cheesy, creamy, lemony perfect bites on your holiday dessert tray. Mimi’s Mini Lemon Cheesecakes come together in 30 minutes or less using store-bought ingredients. “How easy is that?” Well, very easy!

at mimi's table mimi's mini lemon cheesecakes phyllo 1

One of my college roommates, Cindy, turned me on these handy frozen phyllo shells earlier this year. She turned hers into appetizers filled with creamy chicken salad. Fabulous! There are hundreds of online recipes for fillings for these lovely shells: spinach-artichoke dip, brie topped with a pecan and drizzled with a little honey, pimento cheese topped with pepper jelly, shrimp salad topped with a sprig of dill, ham salad. The possibilities are endless! And, yes, I bought a couple of packages and plan to keep a supply in my freezer just in case. Find them in the freezer section of your grocery probably around regular phyllo dough and puff pastry sheets.

In Keeping With a Less Stressful Holiday Philosophy

Richard and I were invited to a neighborhood Christmas open house this week. We were asked to bring a snack. It’s not a big deal, but my schedule leading up to the party didn’t allow for much food prep. Although my tendency is to want to go full bore, I needed a delicious quick treat. Essentially, this recipe was born out of necessity – the mother of invention, right?

at mimi's table mimi's mini lemon cheesecakes phyllo 2

Anyway, I had a supply of the phyllo cups in my freezer and thought to fill them with store-bought cheesecake filling and topping them with a little dollop of lemon curd – a perfect contribution and a nice surprise – something a little different. I mean, who doesn’t love a little bite of cheesecake? Sure, who doesn’t love a big piece of cheesecake? But these little bites fit in perfectly with all the other savory and sweet bites everyone else brought to the party. I couldn’t have been happier. As I mingled, I saw my mini lemon cheesecakes on many plates and was pleased to hear my friends and neighbors ask, “Who brought these? They’re so good!” They were even more impressed when I told them how easy my little bites were to prepare.

Give It A Try

at mimi's table mimi's mini lemon cheesecakes 1

I’m not preparing a recipe for this. It’s just too easy with the right ingredients. Once assembled and on a plate, I did sprinkle the tops with freshly grated lemon zest and graham cracker crumbs. I hope you’ll be inspired by this idea to formulate your own special treats. Maybe a little meatball topped with marinara and Parm? No-Bake Chocolate and Peanut Butter Mousse topped with Mini Chocolate Chips? Here’s the link for that one!

If you decide to make your own little phyllo cup bites, I’d love to know what ideas you came up with.
If you’re inspired, be sure to tag your photo on Instagram #atmimistable

at mimi's table christmas gingerbread and cupcakes

at mimi's table mimi's mini lemon cheesecakes 3

Buttery Buttermilk Biscuits and Creamy Sausage Gravy

at mimi's table 2017 christmas wreath

At Mimi’s Table

         . . . lessons from an older and wiser girl


atmimistable buttermilk biscuits and gravy 5


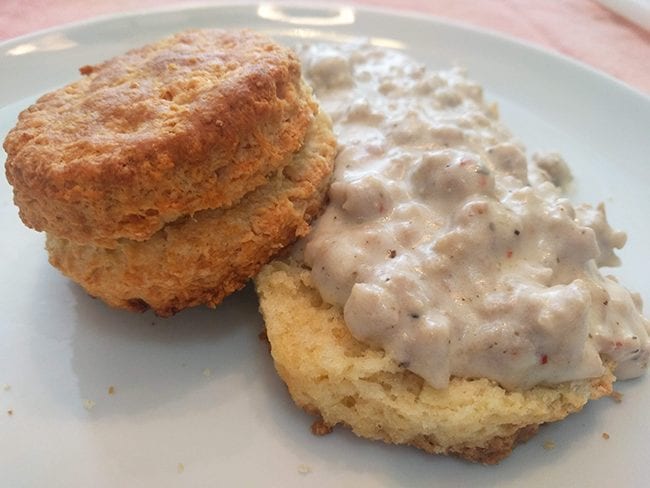
The cure for wet, wintery blues: Buttery Buttermilk Biscuits and Creamy Sausage Gravy!

We’re still having some lingering wet winter weather here in central-Indiana even after Punxsutawney Phil did not see his shadow this year which forecasts an early Spring. Officially, Spring is just 11 days off and 10 days until the official vernal equinox on March 20th. FYI: Did you know that the Vernal Equinox always falls on March 19, 20, and 21? I did not – thanks Old Farmer’s Almanac.

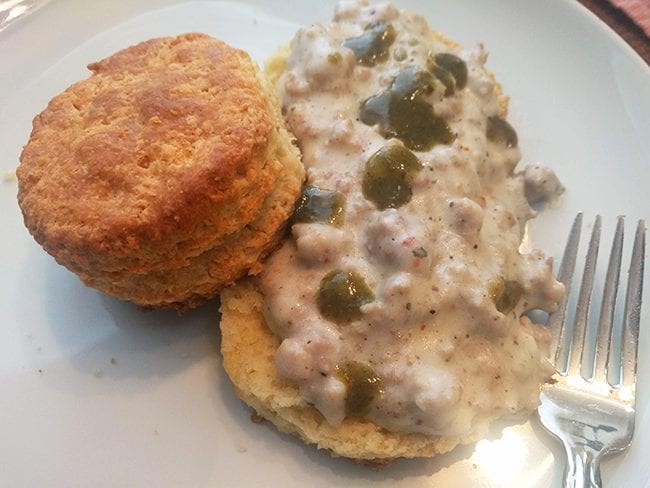
This is a roundabout way of saying that I enjoy making and eating biscuits and sausage gravy when it’s chilly outside. There’s nothing like the smell of freshly baked biscuits coming out of the oven on a cold morning just waiting to be smothered with creamy sausage gravy. It’s a fabulous way to start a wintery day. Or any other day, for that matter. Biscuits and sausage gravy is also a great hangover food. Served with crispy hash brown potatoes and/or fried or scrambled eggs, you’ll have your mojo back in a hurry. And don’t forget the hot sauce. I like the Tobasco® brand’s green jalapeno sauce. It’s milder than their other sauces and I enjoy its flavor on this dish, an omelet, or plain old scrambled eggs with cheese.

at mimi's table buttery buttermilk biscuits joanna gaines


A Little About This Biscuit Recipe

My go-to biscuit recipe is one from the Fannie Farmer Baking Book for Baking Soda Biscuits. I’ve made this recipe for over 30 years. They’re made with shortening rather than butter and have never failed. Crunchy outside, nice rise, and tender inside. Then I began experimenting with butter biscuits. My all-time favorite is from the Pine Street Bakery in Portland, Oregon. I used them in an earlier post for biscuits and gravy. And I included a great tutorial for how to properly bring the dough together. Hint: Folding and rolling the dough like you’re making puff pastry is a fabulous technique for flaky biscuits!

Recently on Pinterest, I noticed several posts for Joanna Gaines’ biscuit recipe from her new cookbook “Magnolia Table, A Collection of Recipes for Gathering.” One blogger testified that these were the highest rising, tenderest, fluffiest, and buttery biscuits she’s ever made. No wonder – the recipe calls for self-rising flour, and baking powder, and baking soda. And eggs – have not seen that before. Ever in search of a biscuit that rivals my tried-and-true Fannie Farmer’s recipe, I just had to try it out.

 The Result

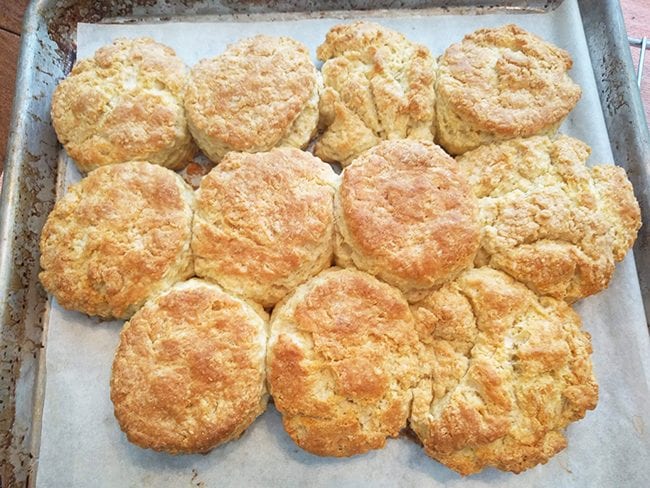
Right off the bat, I halved the recipe. The original makes 20 or so. Breakfast was just the two of us and I figured we could wolf down six and nibble on the rest throughout the day. Auggie, our beloved four-legged biscuit eater, loves the leftovers, too.

My biscuits didn’t rise evenly. I had one that towered above the rest. I figured this was the anticipated rise. They are large biscuits. I cut them with a 2 3/4″ biscuit cutter. I’ll probably use a smaller one in the future. (Hint: If you need to stretch the recipe to serve one or two more guests, a smaller cutter will add 2-4 more biscuits to the yield.)

Instructions said to place the unbaked rounds next to each other. I think if I’d spread them apart they would have risen better. Other than that, the finished product was as promised. Joanna’s biscuits sported a crispy outside crust and a lovely fluffy inside and a rich buttery flavor. Richard and I were very happy biscuit eaters! Made full-sized, these would be fabulous made into a breakfast sandwich.

Creamy Sausage Gravy

at mimi's table buttery buttermilk biscuits and creamy sausage gravy gravy


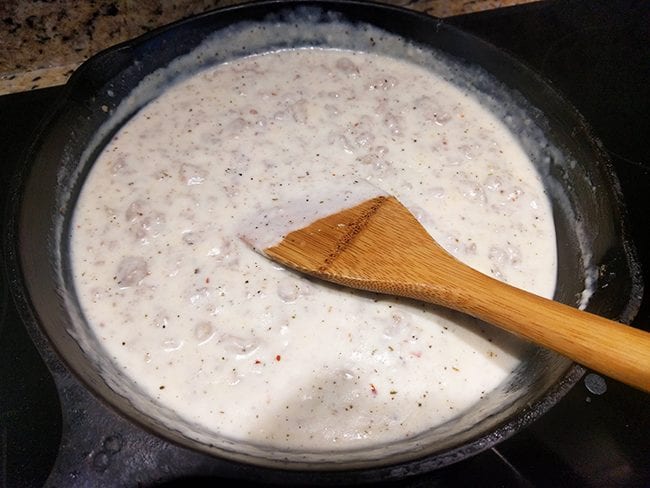
There are two recipes for sausage gravy on my blog. This one and my first one simply titled simply “Buttermilk Biscuits and Gravy.” Another family favorite but the gravy turned out a little thin. So, this time I bulked up the mixture with one pound of sage seasoned breakfast pork sausage, 1/4 cup flour, and 2 cups whole milk – I halved the gravy recipe. Ah, that’s better. I browned off the sausage, made the biscuits, and finished the sausage gravy while they were baking.

at mimi's table buttery buttermilk biscuits and creamy sausage gravy with jalapeno tobasco

Looks fabulous – RIGHT! Let’s make up a batch, shall we? at mimi's table signature


Buttery Buttermilk Biscuits and Creamy Sausage Gravy

Buttery Buttermilk Biscuits and Creamy Sausage Gravy

Biscuit and Gravy fans, gear up for one of the best buttery biscuit and creamy gravy recipes out there. Large buttermilk biscuits hot from the oven perfectly crunchy on the outside and steamy and fluffy on the inside begging to be smothered with perfectly seasoned sausage gravy.

Prep Time 50 minutes
Cook Time 20 minutes
Total Time 1 hour 10 minutes

Ingredients

For the Biscuits

  • 4 cups self-rising flour (or make your own with 1 1/2 teaspoon baking powder and 1/2 teaspoon salt per cup)
  • 2 Tablespoons baking powder
  • 1 teaspoon baking soda
  • 2-3 Tablespoons granulated sugar, optional
  • 1 teaspoon salt
  • 3./4 pound (3 sticks) unsalted butter cut into 1/2 inch cubes
  • 2 large eggs, beaten
  • 1 1/2 cups buttermilk (or make your own with 1 Tablespoon vinegar or lemon juice in 1 cup milk-let stand 5 minutes or one cup plain yogurt)

Creamy Sausage Gravy

  • 2-3 pounds breakfast sausage, sage-seasoned preferred
  • 1/2 cup all-purpose flour
  • 3-4 cups whole milk, room temperature
  • Salt & Pepper to taste

Instructions

    Remember: This recipe a whole lot of breakfast! Don't be afraid to half it for manageable servings. Unless you're feeding an army, then make it all!

    1. Preheat oven to 400F degrees.
    2. In a heavy skillet over medium-high heat, brown sausage until there is no longer any trace of pink. Tilt the pan and spoon off most of the accumulated fat leaving 1-2 Tablespoons. Set aside.
    3. In a large mixing bowl, whisk together self-rising flour, baking powder, sugar, if using, and salt.
    4. Add cubed cold butter to the bowl. Using a pastry blender, incorporate the butter into the flour mix until it is crumbly or resembles small peas. (Or use a food processor - put flour mix into work bowl, add cold butter, and pulse until the butter is incorporated. You should be able to see chunks of butter throughout. Pour into a large bowl and continue with the recipe.)
    5. Measure buttermilk in a 2-cup measure. Add eggs and beat with a fork.
    6. Make a well in the center of the flour in the bowl and add buttermilk/egg mix. Using a fork or a wooden spoon, lightly toss the flour into the liquid scrapping the sides until everything's mixed together.
    7. If the dough is a little dry, add more buttermilk 1 Tablespoon at a time. If the dough is wet, add more flour 1/4 cup at a time.
    8. Cover the bowl with plastic wrap and refrigerate for 30 minutes.
    9. Dump the dough onto a floured work surface. Bring the dough together and knead up to 10 times. A bench scrapper comes in handy!
    10. Pat the dough into a rectangle. Using a bench scrapper, lift and fold 1/3 of the dough onto itself from the short end. Repeat with the other short end. Gently pat or roll the dough into a rectangle and repeat the folding process 2 more times.
    11. Flour a rolling pin and roll into 1/2 inch thickness.
    12. Cut the dough into 2 3/4 inch rounds and place on a half-sheet pan lined with parchment paper 1/4 inch apart - not touching.. (To get a higher yield, use a smaller biscuit cutter.)
    13. Beat an egg with 1 Tablespoon buttermilk and brush over tops.
    14. Bake 15-20 minutes or until the tops are nicely browned.

    While the Biscuits are Baking

    1. Return skillet with sausage to the stovetop. Warm sausage over medium-high heat until it begins to sizzle. Sprinkle flour over the sausage and stir until no white is showing.
    2. Lower heat to medium. Slowly add whole milk to the sausage and stir with a wooden spoon or flat whisk. The gravy will thicken as it cooks. If the gravy becomes too thick for your liking, add more milk 1/2 cup at a time until you reach desired consistency.

    Notes

    This recipe makes a lot of large biscuits - 20 or more. I would half the recipe if serving 4-6. You can also use a smaller biscuit cutter for a bigger yield.

    This makes a lot of creamy sausage gravy. Feel free to half it, too!

    Serve with alone, with a few shakes of jalapeno hot sauce, scrambled or fried eggs, or golden hash brown potatoes. Enjoy!!


    Decadently Rich and Fudgy Chocolate Brownies

    at mimis table decadent rich fudgy brownies 2


    Decadently Rich and Fudgy Chocolate Brownies are guaranteed to satisfy any chocolate-lovers fantasy. WOW! These are the best brownies I’ve ever made.

    The best part is that they’re made in one bowl, just as easy as any boxed brownie mix. You can bake the batter in a 9×9 inch or 9×13 inch baking dish. I chose the 9×9 route because I wanted thick chewy brownies. The secret ingredient is the addition of instant coffee. Yep – instant coffee granules are known to intensify chocolaty flavor. And these fudgy brownies are very chocolaty. The recipe calls for chocolate chips and cocoa powder in the batter and more bittersweet chocolate chips mixed into the batter before baking. I have to make a confession . . . As soon as the baking was done and the brownies properly cooled, I wacked off a healthy chunk and kept it on my kitchen counter while I cooked dinner. Every once in a while, I’d have to sample a small bite to make sure the finished product was a good as I remembered. I whittled off little pieces until the whole chunk was gone! And then there were more brownies for dessert! Heavenly! Frosting would be overkill, in my opinion. But if that’s the way you roll, I won’t judge you. Serve with fresh whipped cream or a scoop of vanilla ice cream. (Thanks, Sam! See original recipe at sugarspunrun.com  “Brownies from Scratch”)

    Let’s whip up a batch, shall we? Be sure to have plenty of cold milk or hot coffee at the ready.


    Yield: 12-18

    Decadently Rich and Fudgy Chocolate Brownies

    Decadently Rich and Fudgy Chocolate Brownies

    Would you describe yourself as a "chocoholic?" If the smell and taste of chocolate makes your heart skip a beat, these fudgy brownies are for you!

    Prep Time 10 minutes
    Cook Time 40 minutes
    Total Time 50 minutes

    Ingredients

    • 12 Tablespoons unsalted butte or 1 12/ sticks cut into Tablespoon-size pieces
    • 1/2 cup semisweet chocolate chips
    • 1/2 cup cocoa powder. I used Penzey's Dutch-processed cocoa
    • 1/2 teaspoon instant coffee granules or powder
    • 3/4 cup granulated sugar
    • 3/4 cup light brown sugar, packed
    • 2 large to extra large eggs
    • 1 teaspoon vanilla extract
    • 1 cup flour
    • 1/2 teaspoon salt
    • 3/4 cup semisweet chocolate chips, I used 1/2 cup mini chocolate chips

    Instructions

    1. Preheat oven to 350F. Prepare a 9x9" or 9x13" baking pan. Spray with cooking spray and/or line with a piece of parchment paper large enough to come up over the sides of the pan. You can remove the brownies out of the pan by lifting up on the paper.
    2. In a microwave-proof bowl, combine butter and 1/2 cup chocolate chips. Microwave for 30 seconds. Stir well and microwave for another 15 seconds. Stir well.
    3. Add cocoa powder and instant coffee and stir.
    4. Add granulated and brown sugars and stir until completely combined.
    5. Add eggs, one at a time beating well after each addition. (You'll notice the batter will lighten and thicken the more the eggs and batter are mixed together.)
    6. Add vanilla. Stir
    7. Sprinkle salt over batter. Add flour. Stir again.
    8. Spread batter into prepared pan. Refrigerate for 15-30 minutes. Remove and bake for 30-40 minutes until a toothpick inserted in the center comes out fudgy, but not wet.
    9. Allow to cool before serving.

    Notes

    Using a 9x9" baking pan? Bake 35-40 minutes.
    Using a 9x13" pan? Bake 16-18 minutes.
    My 9x9" batch took a little longer to bake - 45 minutes or so. Keep an eye on yours close to the end of baking time. If you have to bake a little longer, no problem. But there's nothing worse than a burnt batch of lovely brownies!
    Yield depends on the size you cut your brownies.


    Easy Apple Pie Cheesecake

    at mimi's table apple pie cheesecake 3

    Do you love apple pie? Do you love cheesecake?
    Planning holiday dessert menus and want a little of both? Looking for an alternative to pumpkin pie?
    Problem solved!
    Combine your two favorites into one Apple Pie Cheesecake!

    I found this brilliant recipe for Apple Pie Cheesecake at Tasty in Kathryn Aubin’s feature 4 Pies to Bake With Your BFFJust like any cheesecake, this takes some time to bake, but that’s it. The remainder of the process is easy, easy, easy. Seriously – a no-brainer easy. Apple Pie Cheesecake can be made the day before serving and kept cold in the refrigerator. In fact, it should be made the day before to allow the cheesecake to cool and set.

    I strayed from Kathryn’s recipe only by omitting the nutmeg in the apple topping and using puff pastry for the top lattice rather than pie crust. I mean, who doesn’t love the puffy, buttery, lightness of puff pastry? I did sprinkle demerara sugar on top of the puff pastry after the egg wash. Demerara has big crystals and gives the crust a nice little crunch. I get lots of compliments every time I use demerara on pies, cookies or bars,  If you play your cards right and your family insists on tradition, make the cheesecake with puff pastry topping and use the other pie crust for a pumpkin pie or any other single crust pie.

    Oh, did I mention the crust is made from one refrigerated pie crust you will find in any grocery store’s refrigerator section? One of my college roommates bakes professionally. She makes lots of pies and uses refrigerated store-bought pie crust because it’s made with lard, not shortening or butter. Anyone who’s baked pies for a while understands the value of lard in pie crust dough. Lard makes the pastry tender, lighter and flakier. My mother and grandmother could whip up a lard pie crust in the blink of an eye. I’ve done that, too, not as fast as my predecessors I might add, but I prefer using 1/2 lard and 1/2 vegetable shortening. I find the dough to be more manageable that way.

    at mimi's table apple pie cheesecake 5

    Forgive me, I did not take pictures of the springform pan or of mixing the cream cheese, sugar, eggs, etc. But here’s a pic of the apples simmering in water, sugar, cinnamon, and butter. Can it get any better than that? Wait – read the recipe.

    at mimi's table pie graphic

    Shall we bake an Apple Pie Cheesecake? YES!


    at mimi's table apple pie cheesecake 1

    Yield: 8 servings

    Easy Apple Pie Cheesecake

    Easy Apple Pie Cheesecake

    I found this brilliant recipe for Apple Pie Cheesecake at Tasty in Kathryn Aubin's feature 4 Pies to Bake With Your BFF. Just like any cheesecake, this takes some time to bake, but that's it. The remainder of the process is easy, easy, easy. Seriously - a no-brainer easy. Apple Pie Cheesecake can be made the day before serving and kept cold in the refrigerator. In fact, it should be made the day before to allow the cheesecake to cool and set.

    Prep Time 20 minutes
    Cook Time 2 hours 45 minutes
    Total Time 3 hours 5 minutes

    Ingredients

    • 1 pie crust, premade refrigerated or homemade for a 9" pan
    • 1 sheet frozen puff pastry
    • 3-8oz bars cream cheese, room temperature
    • 1 cup granulated sugar
    • 1 cup sour cream or Greek yogurt
    • 1 teaspoon vanilla extract
    • 1/2 teaspoon ground cinnamon
    • 1/2 teaspoon nutmeg, freshly grated (It's so much better! Get whole nutmegs and a Microplane)
    • Zest and juice of 1/2 lemon, if desired
    • 1/4 teaspoon salt
    • 3 eggs, large to jumbo, room temperature
    • 3-4 medium sized apples, peeled and chopped into 1/2" pieces
    • 2 Tablespoons corn starch
    • 1 Tablespoon butter
    • 1 egg for eggs wash plus 1 Tablespoon water
    • 1 teaspoon demerara sugar, optional

    Instructions

    1. Preheat oven to 300F degrees.
    2. Line a 10" springform pan with one pie crust. Press along the bottom and sides. Halfway up the sides of the pan is fine.
    3. In the large bowl of a mixer with a paddle attachment, mix all the cream cheese and sugar until smooth.
    4. Add sour cream, vanilla extract, lemon zest if using, cinnamon, and nutmeg. Mix until well blended.
    5. Add eggs one at a time until well blended.
    6. Pour cheese mixture into springform pan and bake for 1 hour 15 minutes. Afterward, turn oven off but let cheesecake sit in oven in the oven for another hour.
    7. Apple Topping
    8. While the cheesecake is baking, prepare the apple topping.
    9. Peel and dice 3-4 medium size apples.into a medium only-ins replaceWithoutSep" id="125" data-gr-id="125">bowl I used gala apples. Dribble lemon juice from half a lemon over apples. Set aside.
    10. In a large skillet over medium heat, add sugar, cinnamon, cornstarch and water over medium-low heat. Stir to incorporate.
    11. Once simmering, add apples. Stir until apples are soft, about 10 minutes. Remove from heat, add 1 Tablespoon butter and let cool.
    12. Once the cheesecake has baked, remove to a cooling rack. Increase oven temperature to 425F degrees.
    13. Pour apple mixture over the cheesecake.
    14. Cut thawed puff pastry into strips and weave over the top of the apple mixture.
    15. Brush with egg wash (1 egg + 1 Tablespoon water)
    16. Sprinkle with 1-2 teaspoons demerara sugar, if using.
    17. Bake for 25-30 minutes until the crust is golden brown
    18. Chill and serve

    Notes

    This is a great holiday cheesecake! Bake the day before serving and chill well in your refrigerator. Top with whipped cream or a scoop of vanilla ice cream or how about cinnamon ice cream.

    Variations: Add 1/2 cup minced pecans to the cheesecake batter before baking. Or top with salted caramel sauce. YUM!


    Macrina Bakery Lemon Sour Cherry Coffee Cake

    at mimi's table macrina bakery logo seattle washington

    Macrina Bakery’s Lemon Sour Cherry Coffee Cake is one of the best cake recipes in my arsenal. The Macrina Bakery is in Seattle. I’ve not been there, but it is a well-loved bakery in the area. You know, like the Magnolia Bakery in New York. I’ve never been there either, but have their cookbook.

    The original Macrina cake was presented upside down. The round edges of the bundt were hitting the plate, which made for a flat top. The glaze was poured over and pooled on top and dripped down the sides. Then garnished with rehydrated dried sour cherries on top. Lovely, very lovely.

    However, I like my bundt cakes right side up. It’s easier to cut that way, right, but a fabulous presentation is theirs. I’ve also baked the cake in two large loaf pans, so we can eat one and freeze the other. I’ve taken this cake in its various forms everywhere. Ladies bridge (lame, but that’s the kind of Mimi I am), church pitch-ins, family gatherings – it’s perfect – loads of compliments!

    at mimi's table macrina bakery lemon sour cherry coffee cake 1 seattle washington

    This recipe makes a large batter. It fit perfectly in my 10-cup bundt pan but would work in a 12-cup pan, too. And little mini bundts or mini loaves – another idea for individual service – so cute!

    at mimi's table 10 cup nordic ware party bundt cake pan

    Talk about CUTE! Take a look at this Nordic Ware Party Bundt pan. My lovely friend Beth and I talked about how much I coveted this bundt pan. Perfect slices. No more straddling between peaks and valleys in a traditional bundt. Then, for crying out loud, she gifted it to me at Christmas. It is perfect. Thanks, Beth!

    Why do I love this recipe? It has lots of lemony flavor. Anything with sour cherries and lemon is a win-win in my book. And Greek yogurt is used in the recipe instead of sour cream. Yogurt can be used as a substitute for any recipe that calls for sour cream. Did you know that? I do substitute often to help cut down on fat in lots of different recipes, sweet and savory. But, I mean, it’s cake. The recipe calls for a cup of butter in addition to yogurt. Why am I cutting down on fat? I don’t know. It makes me feel righteous, I guess, and somehow health conscious. Whatever …

    at mimi's table macrina bakery lemon sour cherry coffee cake 3

    Isn’t this beautiful out of the pan? If you try this cake recipe, I’d love to hear your comments.

    Shall we make a beautiful lemony-cherry cake?
    I think so.

    Macrina Bakery Lemon Sour Cherry Coffee Cake
     
    Cook time
    Total time
     
    Macrina Bakery's Lemon Sour Cherry Coffee Cake is one of the best cake recipes in my arsenal. Perfectly moist with a balanced taste of lemon and sour cherry, this cake will become one of your favorites.
    Recipe type: Cake
    Cuisine: American
    Serves: 24 slices
    Ingredients
    • For the Cake
    • 1½ cups dried tart cherries. I used dried Montmorency cherries from Trader Joe's.
    • 4 cups unbleached flour
    • 1 tablespoon baking powder
    • ½ teaspoon baking soda
    • ½ teaspoon salt
    • 2 sticks unsalted butter, at room temperature
    • 2¼ cups granulated sugar
    • 3 Tablespoons freshly grated lemon zest
    • 1 teaspoon lemon extract
    • 5 eggs
    • ¼ cup freshly squeezed lemon juice
    • 1 cup plain yogurt
    • For the Glaze
    • 1 cup confectioners’ sugar
    • 2 teaspoons freshly grated lemon zest
    • 2 tablespoons freshly squeezed lemon juice
    Instructions
    1. DIRECTIONS
    2. Preheat oven to 325F.
    3. Spray a 10-12-cup bundt pan with non-stick cooking spray.
    4. Place the dried cherries in a medium bowl and cover with hot tap water.
    5. Let the cherries soak for 10 minutes, then drain thoroughly and pat dry between two
    6. sheets of paper toweling; set aside.
    7. Sift the flour, baking powder, baking soda and salt into a large bowl; whisk and set aside.
    8. Combine the butter, sugar and lemon zest in the bowl of a stand mixer.
    9. Using the paddle attachment, mix on medium speed for 5 to 8 minutes, until the mixture
    10. becomes smooth and pale in color.
    11. Add the eggs one at a time, making sure each egg is fully incorporated before adding
    12. another.
    13. After all the eggs have been incorporated into the batter, slowly add the lemon juice, and mix for 1 more minute.
    14. Scrape down the sides of the bowl, and mix for 30 more seconds.
    15. Remove the bowl from the mixer and alternately add small amounts of the flour mixture and the yogurt to the batter, mixing with a wooden spoon or spatula until all dry ingredients are incorporated.
    16. Set aside 10 – 12 cherries for garnish, then gently fold the remaining cherries into the batter. be careful not to overmix.
    17. Pour the batter into the prepared bundt pan, filling two-thirds of the pan.
    18. Bake on center rack of the oven for 1 hour and 10 minutes, or until the top of the cake is golden brown.
    19. Check the center of the cake with a skewer; if it comes out clean, the cake is done.
    20. Cool the cake on a wire rack for at least 20 minutes.
    21. Invert the pan to remove the cake, and let it cool completely.
    22. Sift the confectioners’ sugar into a medium bowl; add the lemon zest and lemon juice.
    23. Mix with a spoon until smooth, then drizzle over the cooled coffee cake.
    24. Top with the reserved plump cherries.
    Notes
    Macrina Bakery gets all the credit for this recipe. I added 1 teaspoon lemon extract, but the rest is theirs. Please read about the Macrina Bakery and visit their website. Enjoy!