

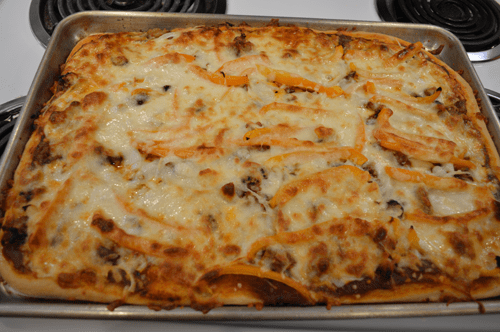
Final Product – sausage, vegetable and cheese
After we switched over from satellite television to cable here in the Billings, I very much enjoyed watching “Bitchin’ Kitchen,” a theme based cooking show with none other than Canadian chef and comedian Nadia G. Not to be confused with June Cleaver, Nadia saunters around her kitchen wearing sweet ruffled aprons and stiletto heels. She’s an awesome chef with an offbeat sense of humor, which I very much enjoy. Her series aired on the Cooking Channel, a different network than Food Network Television, and my cable company doesn’t carry Cooking. (In fact, the Cooking Channel has many more interesting shows than Food Network, which is running rampant with lots of repeats and one cooking challenge show after another. I’m not as big a fan as I used to be.)
Anyway, I digress . . . stay with me – this all comes together.
Over the years, I’ve come away with the impression that some cooks believe “lard” is a four-letter food word. However, it seems to be regaining popularity as more and more cooks realize lard’s significant value in baked and savory goods. My mother used vegetable shortening to make pie crusts, but there were rare occasions when she would use half lard and half shortening, or when she would use lard exclusively. If you can manage the softness of the raw crust, in my opinion, lard is the way to go, especially in savory pie crusts, and using a half and half mixture is great for fruit pies. I also prefer to use lard when making refried beans – the resulting creaminess seals the deal. You don’t need a whole lot to make a big difference.
One of my favorite “Bitchin’ Kitchen” episodes was “Dysfunctional Family Pizza Night,” where she shared her recipes for All Dressed G Style Pizza and Potato Pizza. What? What was that?? Potato Pizza??? Too many carbs and too much fun! More than intrigued, I watched intently convinced I have to get a mandoline. Here’s the link to the episode.
The real trick I learned was that Nadia smeared “leaf lard” to grease her cooking sheet as she prepared her pan to pat down the crust. My first question was, “What in the heck is leaf lard?” According to “About.com,” leaf lard is a very high quality lard. It has a neutral flavor “prized” by cooks, so it is ideal for baking and frying. I learn something every day. Hmmm, not an easy ingredient to track down, however.
So, since I don’t have an aversion to lard and I wanted to see if lard made a difference, I just used a smear of the boxed stuff I had in the refrigerator. I made our regular sausage, vegetable and cheese pizza – not the potato pizza I still have my eyes on. But wow – Richard and I both thought the crust was very different. I pre-baked, as Nadia suggested, and was happily surprised with the crispy, crunchy results in the final product. The crust was light, too.
This pizza crust recipe makes enough to line a 11″ x 17″ sheet pan, and you only use one tablespoon of lard to grease the entire pan, so no need to believe it’s a bad thing. And the crust is made with a combination of unbleached and whole wheat flour, so in that regard, it’s a great thing! Just be sure to give yourself enough time to rise the dough – Nadia’s instructions say to allow about three hours for two risings. Once I wrapped the bowl, I got away with two hours. The dough is beautiful and easy to work with.
"Dysfunctional Family Night" Pizza Crust
Lovely, crunchy pizza crust recipe
Ingredients
- 1 teaspoon yeast
- 1 1/4 cup warm water
- 3 Tablespoons extra-virgin olive oil
- 1 teaspoon salt
- 1 teaspoon sugar
- 1 1/2 cups unbleached all-purpose flour
- 1 cup whole wheat flour
- 1 Tablespoon lard
Instructions
- In a measuring cup or medium bowl, stir together the yeast, sugar and warm water. Let sit until yeast begins to foam, about 5 minutes or so. Add 2 Tablespoons olive oil and salt. Whisk and set aside.
- In a large bowl, mix together the flours. Add the liquid ingredients and stir until the liquid is absorbed. You can continue to mix and knead by hand, or use the kneading attachment of a stand mixer to complete the process.
- If using a stand mixer, watch the dough and add more flour one or two tablespoons at a time until a soft dough forms and it begins to pull away from the sides of the bowl. You can finish the dough by hand to bring it into a smooth ball.
- Coat a bowl with one tablespoon olive oil. Roll the pizza dough in the oil. Cover the top of the bowl with plastic wrap and cover the bowl with a dish towel. Put in a warm place and let rise until double in bulk, 1-2 hours.
- Punch down the dough, recover, and let rise for another hour.
- Smear a 11" x 17" (half sheet) baking pan with lard, and use lard for a crunchy crust. Stretch pizza dough to cover the bottom of the pan. Brush lightly with olive oil. At this point, you can pre-bake the crust to make sure it's nice and crispy.
- Top with your favorite toppings and bake in a hot oven, 425 - 450 degrees F. Baking time depends on what toppings used.
Notes
The dough needs to rise twice, so be sure to leave yourself enough prep, rise and baking time. About 3 1/2 hours should be plenty. depending on how quickly the dough rises. It's so well worth the time.
[yumprint-recipe id=’9′]
I loved that show. I want to try the recipe, but I was wondering if I used two and 12/2 cups of all purpose flour and leaving out the wheat?
Yep. I make it often with all-purpose flour.