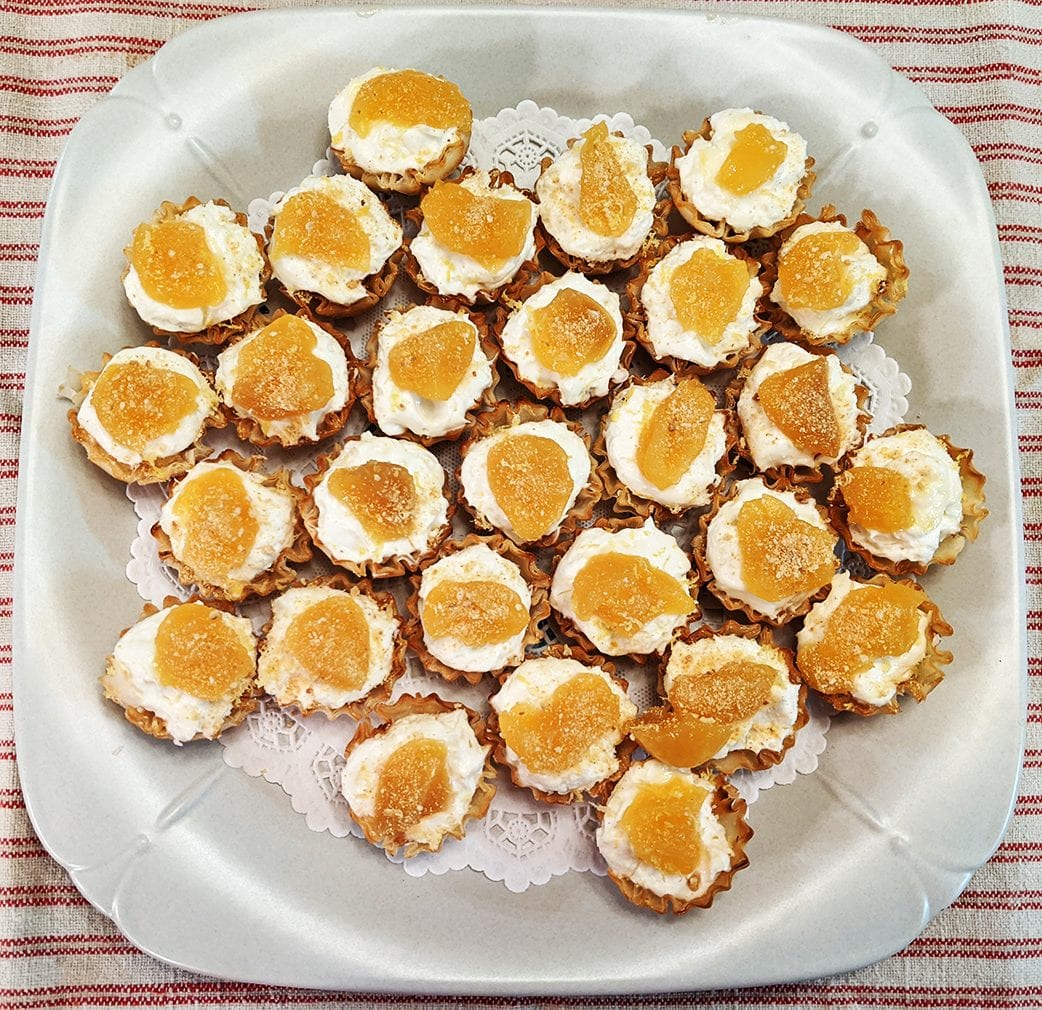
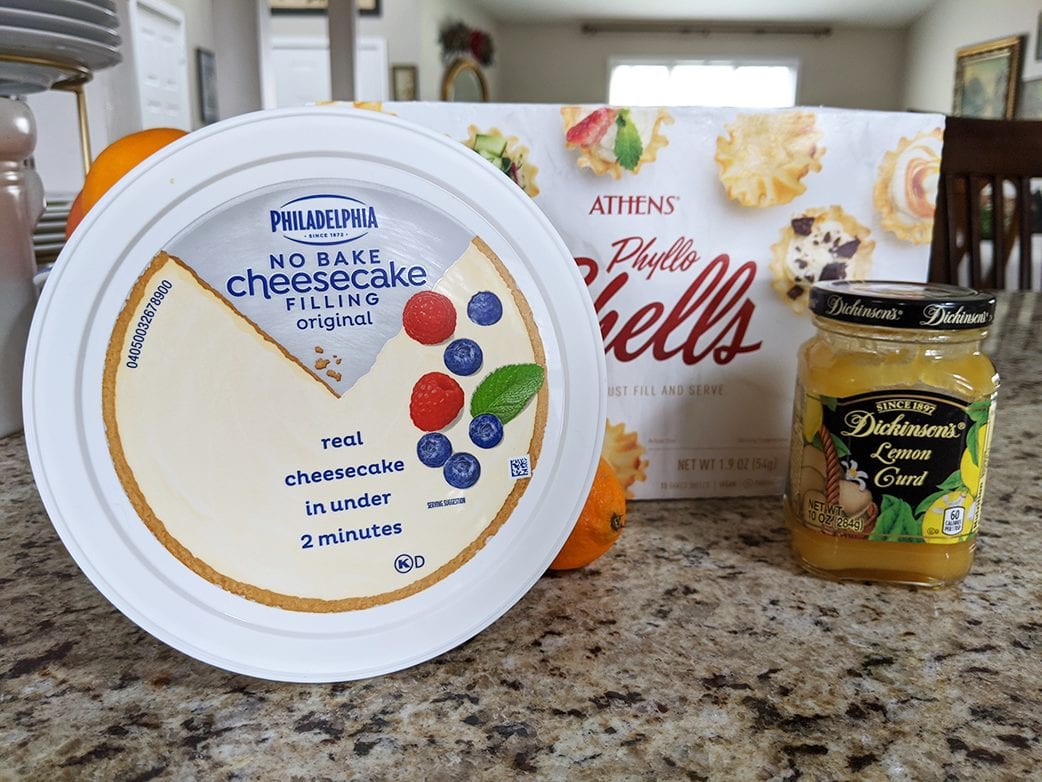
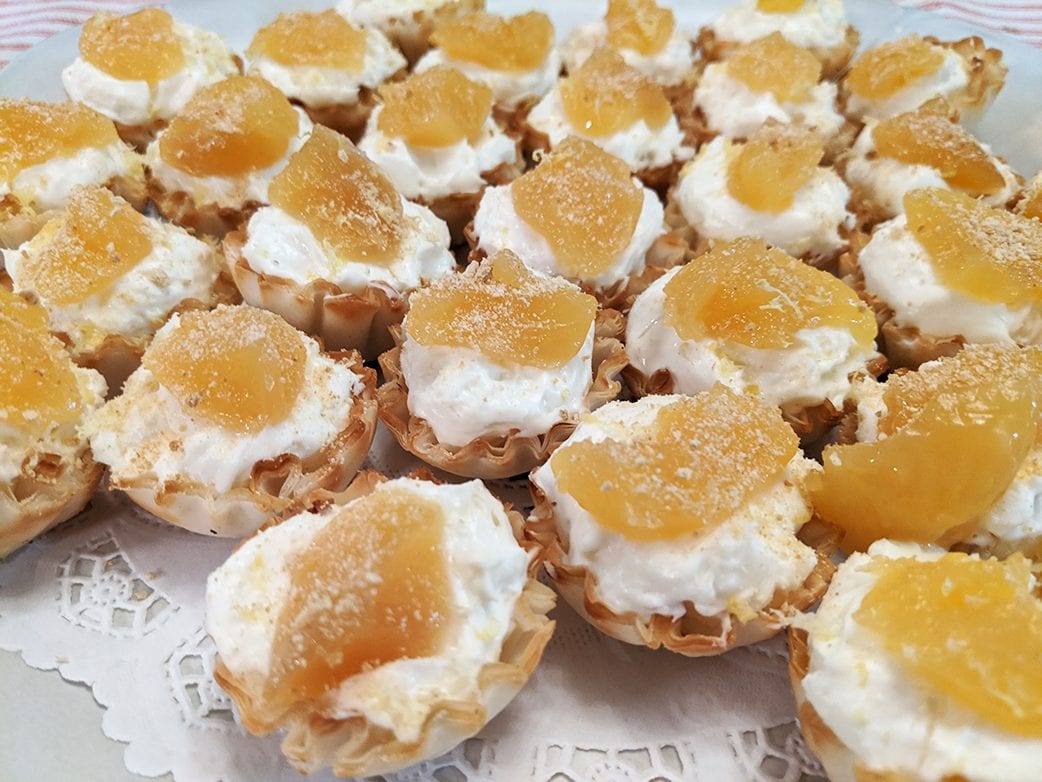
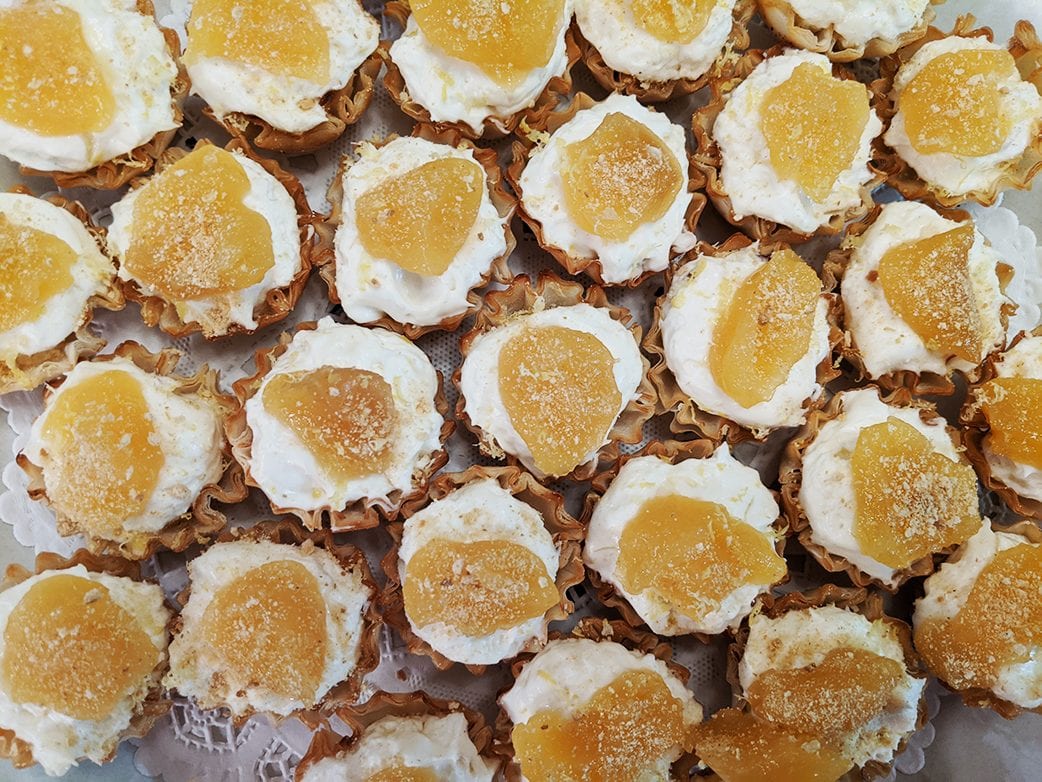
Especially if you include these tasty, crunchy, cheesy, creamy, lemony perfect bites on your holiday dessert tray. Mimi’s Mini Lemon Cheesecakes come together in 30 minutes or less using store-bought ingredients. “How easy is that?” Well, very easy!
One of my college roommates, Cindy, turned me on these handy frozen phyllo shells earlier this year. She turned hers into appetizers filled with creamy chicken salad. Fabulous! There are hundreds of online recipes for fillings for these lovely shells: spinach-artichoke dip, brie topped with a pecan and drizzled with a little honey, pimento cheese topped with pepper jelly, shrimp salad topped with a sprig of dill, ham salad. The possibilities are endless! And, yes, I bought a couple of packages and plan to keep a supply in my freezer just in case. Find them in the freezer section of your grocery probably around regular phyllo dough and puff pastry sheets.
In Keeping With a Less Stressful Holiday Philosophy
Richard and I were invited to a neighborhood Christmas open house this week. We were asked to bring a snack. It’s not a big deal, but my schedule leading up to the party didn’t allow for much food prep. Although my tendency is to want to go full bore, I needed a delicious quick treat. Essentially, this recipe was born out of necessity – the mother of invention, right?
Anyway, I had a supply of the phyllo cups in my freezer and thought to fill them with store-bought cheesecake filling and topping them with a little dollop of lemon curd – a perfect contribution and a nice surprise – something a little different. I mean, who doesn’t love a little bite of cheesecake? Sure, who doesn’t love a big piece of cheesecake? But these little bites fit in perfectly with all the other savory and sweet bites everyone else brought to the party. I couldn’t have been happier. As I mingled, I saw my mini lemon cheesecakes on many plates and was pleased to hear my friends and neighbors ask, “Who brought these? They’re so good!” They were even more impressed when I told them how easy my little bites were to prepare.
Give It A Try
I’m not preparing a recipe for this. It’s just too easy with the right ingredients. Once assembled and on a plate, I did sprinkle the tops with freshly grated lemon zest and graham cracker crumbs. I hope you’ll be inspired by this idea to formulate your own special treats. Maybe a little meatball topped with marinara and Parm? No-Bake Chocolate and Peanut Butter Mousse topped with Mini Chocolate Chips? Here’s the link for that one!
If you decide to make your own little phyllo cup bites, I’d love to know what ideas you came up with. If you’re inspired, be sure to tag your photo on Instagram #atmimistable
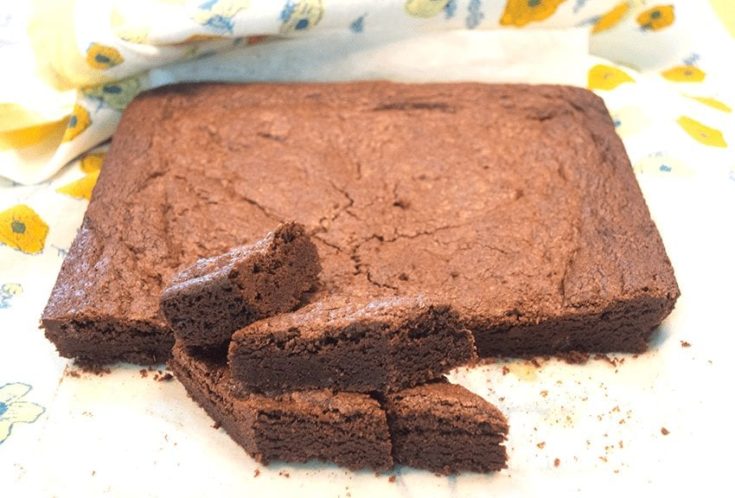
Decadently Rich and Fudgy Chocolate Brownies are guaranteed to satisfy any chocolate-lovers fantasy. WOW! These are the best brownies I’ve ever made.
The best part is that they’re made in one bowl, just as easy as any boxed brownie mix. You can bake the batter in a 9×9 inch or 9×13 inch baking dish. I chose the 9×9 route because I wanted thick chewy brownies. The secret ingredient is the addition of instant coffee. Yep – instant coffee granules are known to intensify chocolaty flavor. And these fudgy brownies are very chocolaty. The recipe calls for chocolate chips and cocoa powder in the batter and more bittersweet chocolate chips mixed into the batter before baking.I have to make a confession . . . As soon as the baking was done and the brownies properly cooled, I wacked off a healthy chunk and kept it on my kitchen counter while I cooked dinner. Every once in a while, I’d have to sample a small bite to make sure the finished product was a good as I remembered. I whittled off little pieces until the whole chunk was gone! And then there were more brownies for dessert! Heavenly!Frosting would be overkill, in my opinion. But if that’s the way you roll, I won’t judge you. Serve with fresh whipped cream or a scoop of vanilla ice cream.(Thanks, Sam! See original recipe at sugarspunrun.com “Brownies from Scratch”)
Let’s whip up a batch, shall we? Be sure to have plenty of cold milk or hot coffee at the ready.
Yield: 12-18
Decadently Rich and Fudgy Chocolate Brownies
Would you describe yourself as a "chocoholic?" If the smell and taste of chocolate makes your heart skip a beat, these fudgy brownies are for you!
Prep Time10 minutes
Cook Time40 minutes
Total Time50 minutes
Ingredients
12 Tablespoons unsalted butte or 1 12/ sticks cut into Tablespoon-size pieces
1/2 cup semisweet chocolate chips
1/2 cup cocoa powder. I used Penzey's Dutch-processed cocoa
1/2 teaspoon instant coffee granules or powder
3/4 cup granulated sugar
3/4 cup light brown sugar, packed
2 large to extra large eggs
1 teaspoon vanilla extract
1 cup flour
1/2 teaspoon salt
3/4 cup semisweet chocolate chips, I used 1/2 cup mini chocolate chips
Instructions
Preheat oven to 350F. Prepare a 9x9" or 9x13" baking pan. Spray with cooking spray and/or line with a piece of parchment paper large enough to come up over the sides of the pan. You can remove the brownies out of the pan by lifting up on the paper.
In a microwave-proof bowl, combine butter and 1/2 cup chocolate chips. Microwave for 30 seconds. Stir well and microwave for another 15 seconds. Stir well.
Add cocoa powder and instant coffee and stir.
Add granulated and brown sugars and stir until completely combined.
Add eggs, one at a time beating well after each addition. (You'll notice the batter will lighten and thicken the more the eggs and batter are mixed together.)
Add vanilla. Stir
Sprinkle salt over batter. Add flour. Stir again.
Spread batter into prepared pan. Refrigerate for 15-30 minutes. Remove and bake for 30-40 minutes until a toothpick inserted in the center comes out fudgy, but not wet.
Allow to cool before serving.
Notes
Using a 9x9" baking pan? Bake 35-40 minutes. Using a 9x13" pan? Bake 16-18 minutes. My 9x9" batch took a little longer to bake - 45 minutes or so. Keep an eye on yours close to the end of baking time. If you have to bake a little longer, no problem. But there's nothing worse than a burnt batch of lovely brownies! Yield depends on the size you cut your brownies.
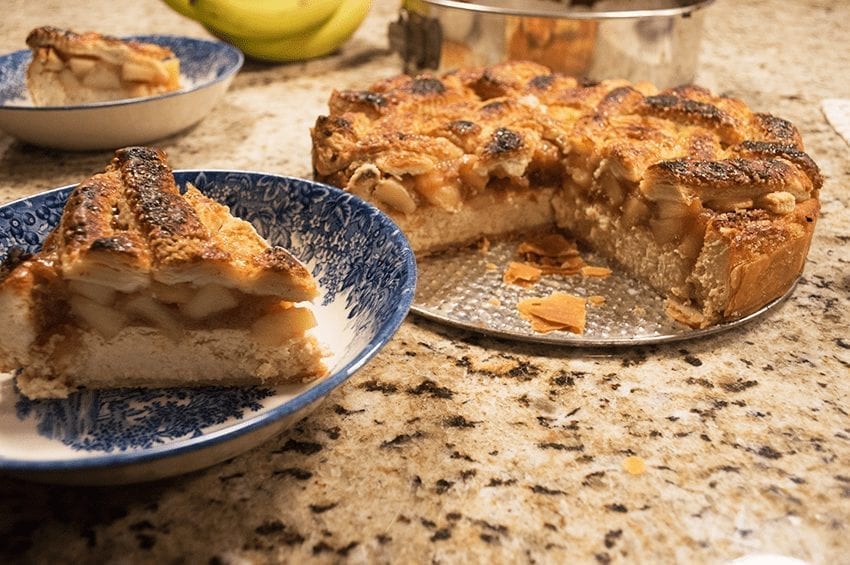
Do you love apple pie? Do you love cheesecake?
Planning holiday dessert menus and want a little of both? Looking for an alternative to pumpkin pie? Problem solved! Combine your two favorites into one Apple Pie Cheesecake!
I found this brilliant recipe for Apple Pie Cheesecake at Tasty in Kathryn Aubin’s feature 4 Pies to Bake With Your BFF. Just like any cheesecake, this takes some time to bake, but that’s it. The remainder of the process is easy, easy, easy. Seriously – a no-brainer easy. Apple Pie Cheesecake can be made the day before serving and kept cold in the refrigerator. In fact, it should be made the day before to allow the cheesecake to cool and set.
I strayed from Kathryn’s recipe only by omitting the nutmeg in the apple topping and using puff pastry for the top lattice rather than pie crust. I mean, who doesn’t love the puffy, buttery, lightness of puff pastry? I did sprinkle demerara sugar on top of the puff pastry after the egg wash. Demerara has big crystals and gives the crust a nice little crunch. I get lots of compliments every time I use demerara on pies, cookies or bars, If you play your cards right and your family insists on tradition, make the cheesecake with puff pastry topping and use the other pie crust for a pumpkin pie or any other single crust pie.
Oh, did I mention the crust is made from one refrigerated pie crust you will find in any grocery store’s refrigerator section? One of my college roommates bakes professionally. She makes lots of pies and uses refrigerated store-bought pie crust because it’s made with lard, not shortening or butter. Anyone who’s baked pies for a while understands the value of lard in pie crust dough. Lard makes the pastry tender, lighter and flakier. My mother and grandmother could whip up a lard pie crust in the blink of an eye. I’ve done that, too, not as fast as my predecessors I might add, but I prefer using 1/2 lard and 1/2 vegetable shortening. I find the dough to be more manageable that way.
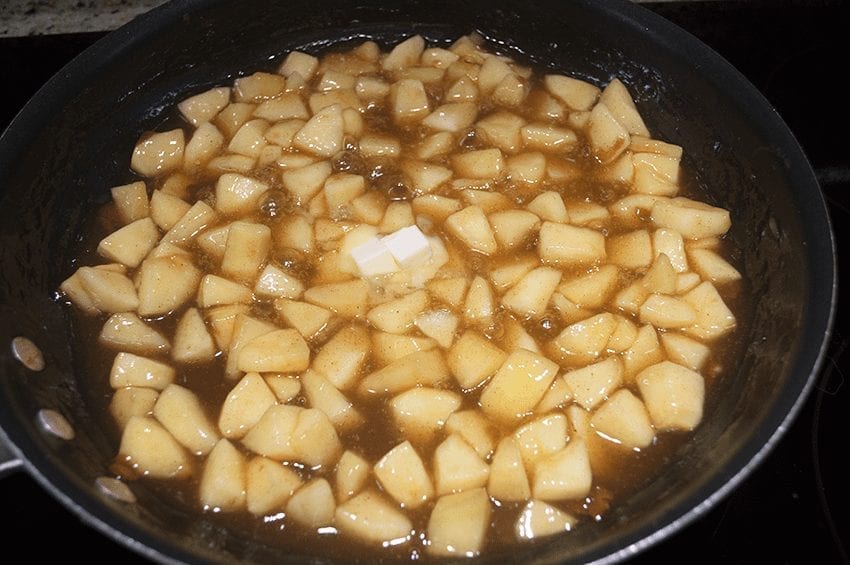
Forgive me, I did not take pictures of the springform pan or of mixing the cream cheese, sugar, eggs, etc. But here’s a pic of the apples simmering in water, sugar, cinnamon, and butter. Can it get any better than that? Wait – read the recipe.
Shall we bake an Apple Pie Cheesecake? YES!
Yield: 8 servings
Easy Apple Pie Cheesecake
I found this brilliant recipe for Apple Pie Cheesecake at Tasty in Kathryn Aubin's feature 4 Pies to Bake With Your BFF. Just like any cheesecake, this takes some time to bake, but that's it. The remainder of the process is easy, easy, easy. Seriously - a no-brainer easy. Apple Pie Cheesecake can be made the day before serving and kept cold in the refrigerator. In fact, it should be made the day before to allow the cheesecake to cool and set.
Prep Time20 minutes
Cook Time2 hours45 minutes
Total Time3 hours5 minutes
Ingredients
1 pie crust, premade refrigerated or homemade for a 9" pan
1 sheet frozen puff pastry
3-8oz bars cream cheese, room temperature
1 cup granulated sugar
1 cup sour cream or Greek yogurt
1 teaspoon vanilla extract
1/2 teaspoon ground cinnamon
1/2 teaspoon nutmeg, freshly grated (It's so much better! Get whole nutmegs and a Microplane)
Zest and juice of 1/2 lemon, if desired
1/4 teaspoon salt
3 eggs, large to jumbo, room temperature
3-4 medium sized apples, peeled and chopped into 1/2" pieces
2 Tablespoons corn starch
1 Tablespoon butter
1 egg for eggs wash plus 1 Tablespoon water
1 teaspoon demerara sugar, optional
Instructions
Preheat oven to 300F degrees.
Line a 10" springform pan with one pie crust. Press along the bottom and sides. Halfway up the sides of the pan is fine.
In the large bowl of a mixer with a paddle attachment, mix all the cream cheese and sugar until smooth.
Add sour cream, vanilla extract, lemon zest if using, cinnamon, and nutmeg. Mix until well blended.
Add eggs one at a time until well blended.
Pour cheese mixture into springform pan and bake for 1 hour 15 minutes. Afterward, turn oven off but let cheesecake sit in oven in the oven for another hour.
Apple Topping
While the cheesecake is baking, prepare the apple topping.
Peel and dice 3-4 medium size apples.into a medium only-ins replaceWithoutSep" id="125" data-gr-id="125">bowl I used gala apples. Dribble lemon juice from half a lemon over apples. Set aside.
In a large skillet over medium heat, add sugar, cinnamon, cornstarch and water over medium-low heat. Stir to incorporate.
Once simmering, add apples. Stir until apples are soft, about 10 minutes. Remove from heat, add 1 Tablespoon butter and let cool.
Once the cheesecake has baked, remove to a cooling rack. Increase oven temperature to 425F degrees.
Pour apple mixture over the cheesecake.
Cut thawed puff pastry into strips and weave over the top of the apple mixture.
Brush with egg wash (1 egg + 1 Tablespoon water)
Sprinkle with 1-2 teaspoons demerara sugar, if using.
Bake for 25-30 minutes until the crust is golden brown
Chill and serve
Notes
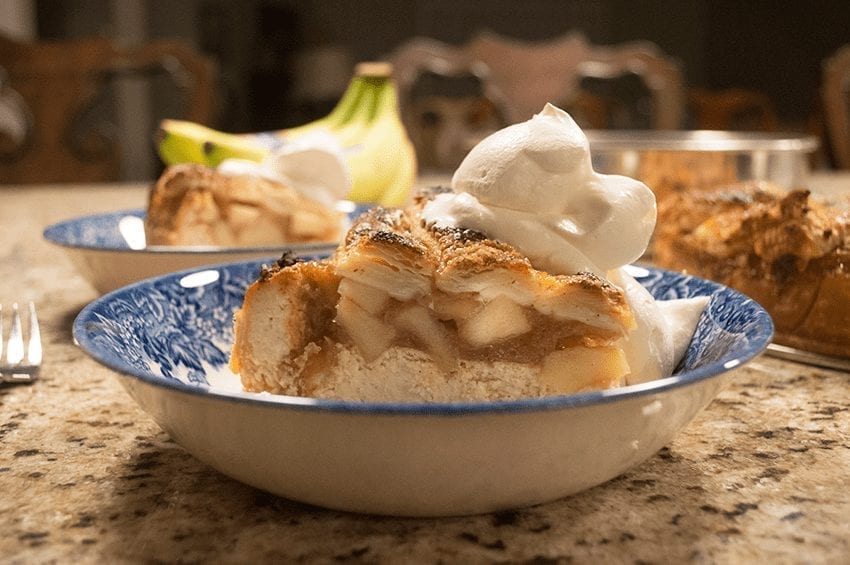
This is a great holiday cheesecake! Bake the day before serving and chill well in your refrigerator. Top with whipped cream or a scoop of vanilla ice cream or how about cinnamon ice cream.
Variations: Add 1/2 cup minced pecans to the cheesecake batter before baking. Or top with salted caramel sauce. YUM!
When my kids were growing up, we always made this fun dessert for 4th of July. I hadn’t made it for a while. But, now that I have a whole gaggle of new boys to spoil, it was time to retrieve my tried and true recipe.
There’s a sweet and crunchy graham cracker crust topped and layered with red, white and blue jello that’s mixed with canned fruit pie filling and a yummy lemony cream cheese layer in the middle. Patriotic Red, White, and Blue Jello Bars are an easy treat that’s quickly assembled. Cold and creamy, it’s the perfect end to any summer barbeque. I assemble the crust and jello layers in a 9″x13″ pan. This feeds a lot of folks – perfect for a family and friends get together.
I like to slice the jello into squares so everyone can see the layers. But, this year, my son-in-law scooped it up and served the dessert in old-fashioned soda glasses topped with whipped cream. Awesome! And the boys LOVED it! Don’t wait for another 4th of July holiday. Whip this up anytime you’re in the mood for a quick, cool, no-bake dessert.
Patriotic Red, White, and Blue Jello Bars is a scrumptious, crunchy sweet dessert suitable for any summer treat. No baking required. It's quickly assembled, feeds plenty, and is a sure hit for any summertime gathering.
Author: At Mimi's Table
Recipe type: Dessert
Cuisine: American
Serves: 12-16 servings
Ingredients
1 sleeve graham crackers made into crumbs in a Cuisinart, or substitute 2 cups of ground graham crackers
6 Tablespoons unsalted butter, melted
3 Tablespoons granulated sugar
Blue Layer:
1 3oz package of blueberry or blackberry jello
1 can blueberry pie filling
1 cup boiling water
White Layer:
1 8oz brick of cream cheese, softened
1 cup whipped cream or Cool Whip
1 3oz package lemon jello
1 cup boiling water
Red Layer:
1 3oz package cherry jello
1 can cherry pie filling
1 cup boiling water
Instructions
In a food processor, crumble one sleeve graham crackers. Add 3 Tablespoons granulated sugar. Whirl until combined. Add 6 Tablespoons melted butter. Whirl until combined. Pat graham cracker crust into the bottom of a 9"x13" baking dish. Chill in refrigerator while making the next layer.
In a medium-sized bowl, add the package of blueberry or blackberry jello. Pour in one cup of boiling water. Stir until gelatin is dissolved. Add one can blueberry or blackberry pie filling. Mix until combined. Remove graham cracker crust from refrigerator. Pour the blue mixture evenly over the top of the crust. Return to refrigerator until set - 15-20 minutes.
In a medium-sized bowl, cream softened cream cheese with a hand mixer until soft. Add package of lemon jello and one cup boiling water. Whisk or use hand mixer to completely incorporate. Add one cup whipped cream or Cool Whip. Mix until combined. Pour over the cold and set blueberry/blackberry layer. Return to the refrigerator until set - 15-20 minutes.
In a medium sized bowl, add the package of cherry jello. Add one cup boiling water. Whisk until gelatin is dissolved. Add canned cherry pie filling and stir until combined. Remove the pan from the refrigerator and pour the cherry mixture evenly over the lemon layer. Cover with plastic wrap and return to refrigerator for 1-2 hours until all layers are set.
At service, spread whipped cream or Cool Whip over the entire surface. Cut into squares or bars.
Notes
The jello dessert can be scooped up into a bowl or glass and topped with whipped cream or Cool Whip.
Macrina Bakery’s Lemon Sour Cherry Coffee Cake is one of the best cake recipes in my arsenal. The Macrina Bakery is in Seattle. I’ve not been there, but it is a well-loved bakery in the area. You know, like the Magnolia Bakery in New York. I’ve never been there either, but have their cookbook.
The original Macrina cake was presented upside down. The round edges of the bundt were hitting the plate, which made for a flat top. The glaze was poured over and pooled on top and dripped down the sides. Then garnished with rehydrated dried sour cherries on top. Lovely, very lovely.
However, I like my bundt cakes right side up. It’s easier to cut that way, right, but a fabulous presentation is theirs. I’ve also baked the cake in two large loaf pans, so we can eat one and freeze the other. I’ve taken this cake in its various forms everywhere. Ladies bridge (lame, but that’s the kind of Mimi I am), church pitch-ins, family gatherings – it’s perfect – loads of compliments!
This recipe makes a large batter. It fit perfectly in my 10-cup bundt pan but would work in a 12-cup pan, too. And little mini bundts or mini loaves – another idea for individual service – so cute!
Talk about CUTE! Take a look at this Nordic Ware Party Bundt pan. My lovely friend Beth and I talked about how much I coveted this bundt pan. Perfect slices. No more straddling between peaks and valleys in a traditional bundt. Then, for crying out loud, she gifted it to me at Christmas. It is perfect. Thanks, Beth!
Why do I love this recipe? It has lots of lemony flavor. Anything with sour cherries and lemon is a win-win in my book. And Greek yogurt is used in the recipe instead of sour cream. Yogurt can be used as a substitute for any recipe that calls for sour cream. Did you know that? I do substitute often to help cut down on fat in lots of different recipes, sweet and savory. But, I mean, it’s cake. The recipe calls for a cup of butter in addition to yogurt. Why am I cutting down on fat? I don’t know. It makes me feel righteous, I guess, and somehow health conscious. Whatever …
Isn’t this beautiful out of the pan? If you try this cake recipe, I’d love to hear your comments.
Shall we make a beautiful lemony-cherry cake?
I think so.
Macrina Bakery's Lemon Sour Cherry Coffee Cake is one of the best cake recipes in my arsenal. Perfectly moist with a balanced taste of lemon and sour cherry, this cake will become one of your favorites.
Recipe type: Cake
Cuisine: American
Serves: 24 slices
Ingredients
For the Cake
1½ cups dried tart cherries. I used dried Montmorency cherries from Trader Joe's.
4 cups unbleached flour
1 tablespoon baking powder
½ teaspoon baking soda
½ teaspoon salt
2 sticks unsalted butter, at room temperature
2¼ cups granulated sugar
3 Tablespoons freshly grated lemon zest
1 teaspoon lemon extract
5 eggs
¼ cup freshly squeezed lemon juice
1 cup plain yogurt
For the Glaze
1 cup confectioners’ sugar
2 teaspoons freshly grated lemon zest
2 tablespoons freshly squeezed lemon juice
Instructions
DIRECTIONS
Preheat oven to 325F.
Spray a 10-12-cup bundt pan with non-stick cooking spray.
Place the dried cherries in a medium bowl and cover with hot tap water.
Let the cherries soak for 10 minutes, then drain thoroughly and pat dry between two
sheets of paper toweling; set aside.
Sift the flour, baking powder, baking soda and salt into a large bowl; whisk and set aside.
Combine the butter, sugar and lemon zest in the bowl of a stand mixer.
Using the paddle attachment, mix on medium speed for 5 to 8 minutes, until the mixture
becomes smooth and pale in color.
Add the eggs one at a time, making sure each egg is fully incorporated before adding
another.
After all the eggs have been incorporated into the batter, slowly add the lemon juice, and mix for 1 more minute.
Scrape down the sides of the bowl, and mix for 30 more seconds.
Remove the bowl from the mixer and alternately add small amounts of the flour mixture and the yogurt to the batter, mixing with a wooden spoon or spatula until all dry ingredients are incorporated.
Set aside 10 – 12 cherries for garnish, then gently fold the remaining cherries into the batter. be careful not to overmix.
Pour the batter into the prepared bundt pan, filling two-thirds of the pan.
Bake on center rack of the oven for 1 hour and 10 minutes, or until the top of the cake is golden brown.
Check the center of the cake with a skewer; if it comes out clean, the cake is done.
Cool the cake on a wire rack for at least 20 minutes.
Invert the pan to remove the cake, and let it cool completely.
Sift the confectioners’ sugar into a medium bowl; add the lemon zest and lemon juice.
Mix with a spoon until smooth, then drizzle over the cooled coffee cake.
Top with the reserved plump cherries.
Notes
Macrina Bakery gets all the credit for this recipe. I added 1 teaspoon lemon extract, but the rest is theirs. Please read about the Macrina Bakery and visit their website. Enjoy!