I am a noodle fanatic. I love all types. And if you take a look around my blog, you’ll find several noodle recipes. I prefer noodles to rice with Asian dishes. There’s something so satisfying about every saucy bite. Richard bought me a pasta attachment for my mixer a couple of years ago. I made homemade egg noodles for soup and beef & noodles in no time flat. Before that, I had a Marcato pasta maker and I’d hand crank them out or make sheets of pasta for ravioli. There’s nothing like homemade noodles. And there are so many shapes of dried pasta available at the store, too. I’ve been known to loiter in the pasta aisle at the grocery just to look and see what’s new. It’s my favorite grocery aisle.
One noodle I’ve not served before were Asian rice noodles. No, I did not make them – some things are worth paying for. I’ve made dishes with udon, eaten my fair share of lo mein, and everyone’s had ramen at some point in life. But rice noodles didn’t appeal to me for some reason. They looked wimpy. They’re translucent. They looked brittle and fragile. I just wasn’t sure if rice noodles would have the same toothy bite as pasta and egg noodles. Well, I was wrong. They do. As an added bonus, rice noodles are gluten-free.
One day I was perusing one of my favorite food blogs Half Baked Harvest. Tieghan posted her recipe for Saucy Garlic Butter Shrimp with Coconut Milk and Rice Noodles. I was smitten. There was something about her rice noodles swimming in a garlicky, coconut milk, butter sauce surrounded by perfectly cooked shrimp that pushed me over the edge. I had to try rice noodles.
Before I dived into Tieghan’s recipe, I wanted to cook something simple with rice noodles first just to get the hang of preparing them and to test the texture. I hopped over to my favorite Asian market where they have the best noodle aisles. Not just one aisle, but two. Yeah, I was there for a while.
A simple pad thai recipe was the way to go for my experiment. I found this great bag of pad thai noodles that were the perfect width – not too wide and not too skinny. And I found a quick and easy chicken pad thai recipe over at Tasty – One-Pot Pad Thai. Believe it or not, I have a good supply of Asian cooking ingredients in my pantry. Really, the noodles were the only ingredient I needed to buy.
Let’s talk a minute about cooking rice noodles.
The package instructions were worthless for someone who’s taking the rice noodle maiden voyage. Something like “cook in boiling water until done.” Hmmm.
And I wasn’t quite sure about Tasty’s boiling instructions. Again, “cook noodles in boiling water following package directions.” Hmmm.
I finally landed on very simple instructions on the Internet. “Put noodles in a large bowl. Pour boiling water over the noodles. Stir until they’re done.” Hmmm – but that’s the way I went. I figured I could check for noodle doneness without overcooking, which the instructions said would ruin any pad thai dish. The process took about 8 minutes for the width of my noodles, just a little short of al dente.
One-Pot Chicken Pad Thai is categorized as “gluten-free.” Soy sauce is made with fermented wheat. Be sure to use tamari or soy labeled as “gluten-free in this recipe if you have a gluten allergy or sensitivity
Any stir fry dish comes together quickly. Once you begin the cooking process, plan to be committed until the dish is finished. I don’t think the cooking part took more than 20 minutes. I get all my slicing and dicing and make the pad thai noodle sauce in advance of going to the stove.
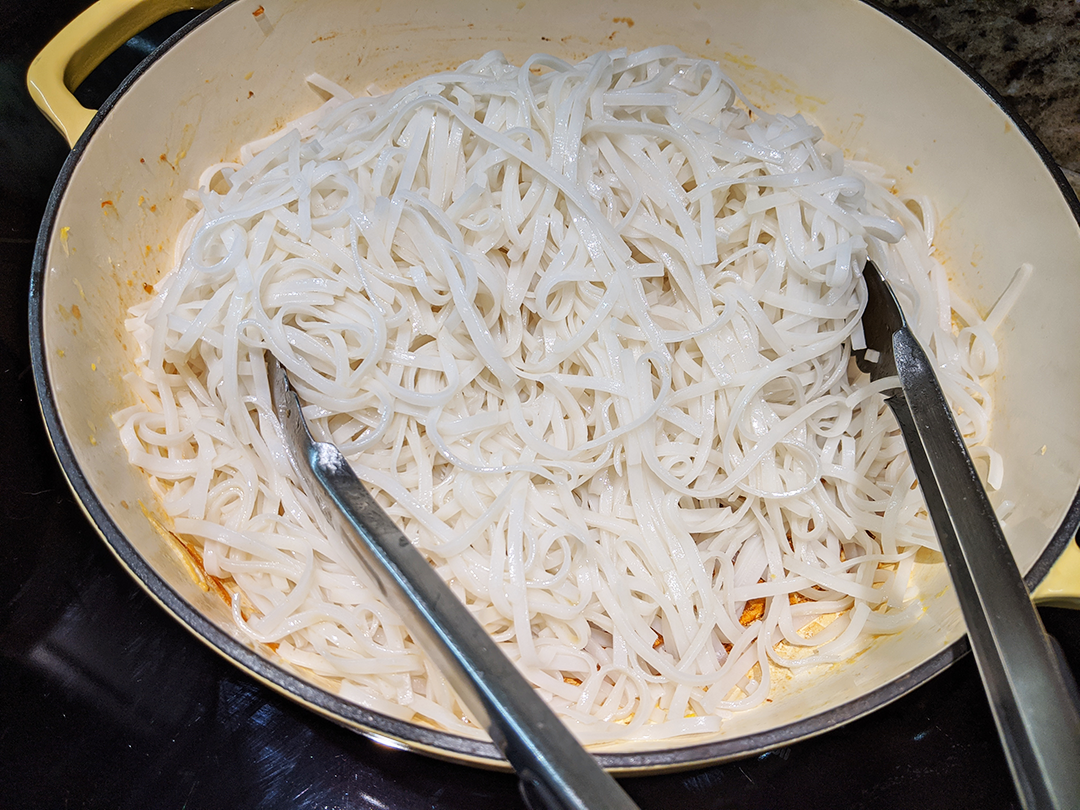
First, boil four quarts of water. Place dry noodles in a large bowl. Pour the boiling water over the noodles and stir around with tongs to make sure the noodles are submerged. Every once in a while, stir the noodles to make sure they aren’t sticking together. After 6 minutes, start checking for doneness. Finished noodles for pad thai should be slightly short of al dente. Drain the noodles in a colander, rinse with cold tap water to stop the cooking, and run your fingers through the noodles to make sure it’s all cooled down nicely. Shake the colander to remove as much water as you can. Pour one Tablespoon toasted sesame oil over the noodles. And using tongs, toss them until they’re coated with oil so they don’t stick together. Set aside.
PREP:
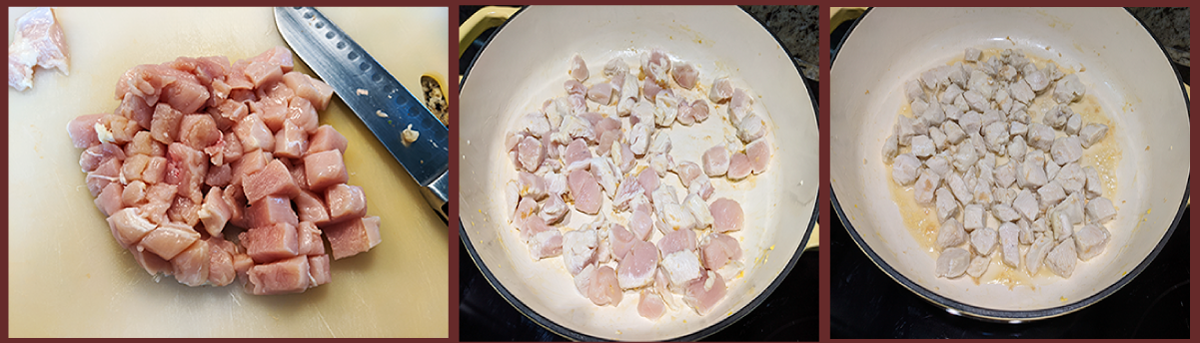
Cut one large chicken breast in half horizontally, slice into strips and dice into 1″ cubes. Set aside.
Crack two eggs into a small bowl and lightly whisk. Set aside.
Slice 1/3 cup of shallots or one large shallot into thin rounds. Set aside. (In a pinch, I’d sub red or sweet yellow onion.)
Seed one medium fresh red chile. Cut into thin slivers. Set aside.
Slice 3-4 green onions into 1″ pieces. Set aside.
Rough chop 1/2 cup fresh cilantro. Set aside.
In a 2-cup measure mix 3 Tablespoons each fish sauce, rice vinegar, gluten-free soy sauce or tamari, brown sugar, lime juice, sriracha. Mix and set aside.
OK – you’re ready – let’s go! Time to tell your people to wash their hands, set the table, and get a beverage. Your saucy hot pad thai will be ready in minutes. In my beloved family, that process takes at least 20 minutes – just enough time to pull everything together.
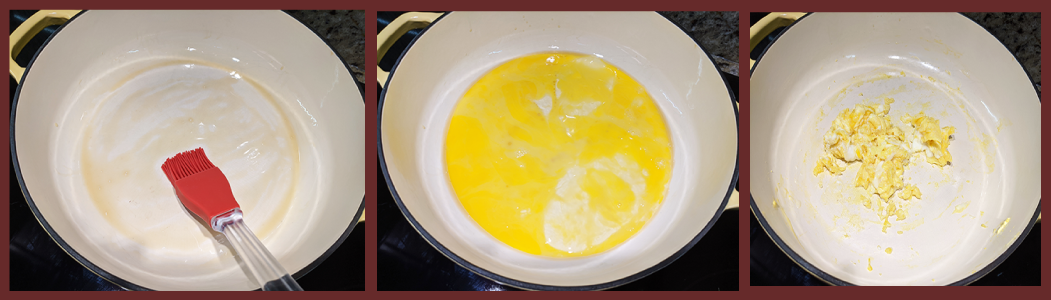
Heat a 12″ skillet over medium-high heat. Brush with 1/2 Tablespoon toasted sesame oil. Add lightly beaten eggs to the skillet. Scramble until very lightly browned. Remove to a bowl. Return skillet to the cooktop.
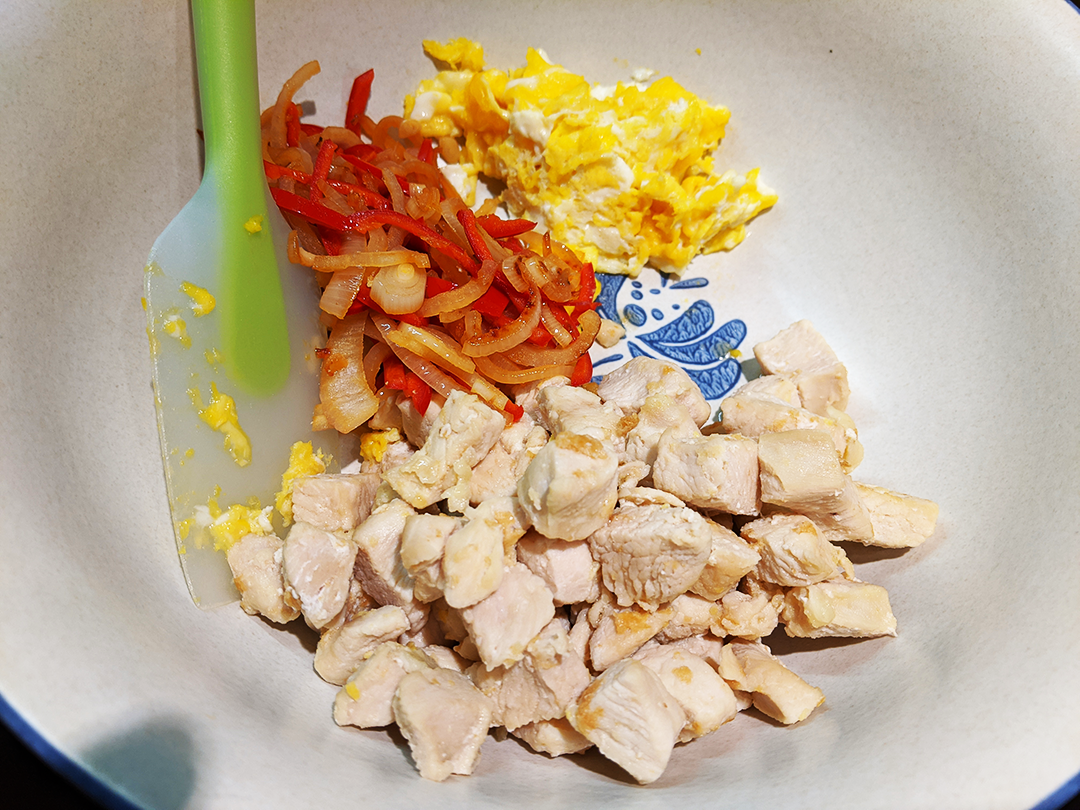
One large chicken breast will make four servings. I sliced the breast in half and cubed it into 1″ pieces. Over medium-high heat, brush the skillet with 1/2 Tablespoon toasted sesame seed oil. Add the chicken cubes, stir, and saute until there’s no more pink in the middle. Remove cooked chicken to a bowl with the cooked eggs. Return skillet to the cooktop.
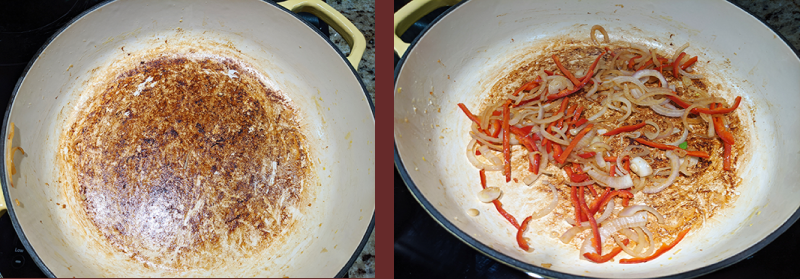
Right now your skillet is pretty hot. You can see the beautiful brown bits of flavor leftover from browning the chicken. Reduce heat to medium. Add the shallots and peppers. Quickly saute for 1-2 minutes. Add to bowl with chicken and egg. Set aside.
Here’s what your lovely reserve bowl should look like after all that quick stir-frying. Time to move on to the star of the show.
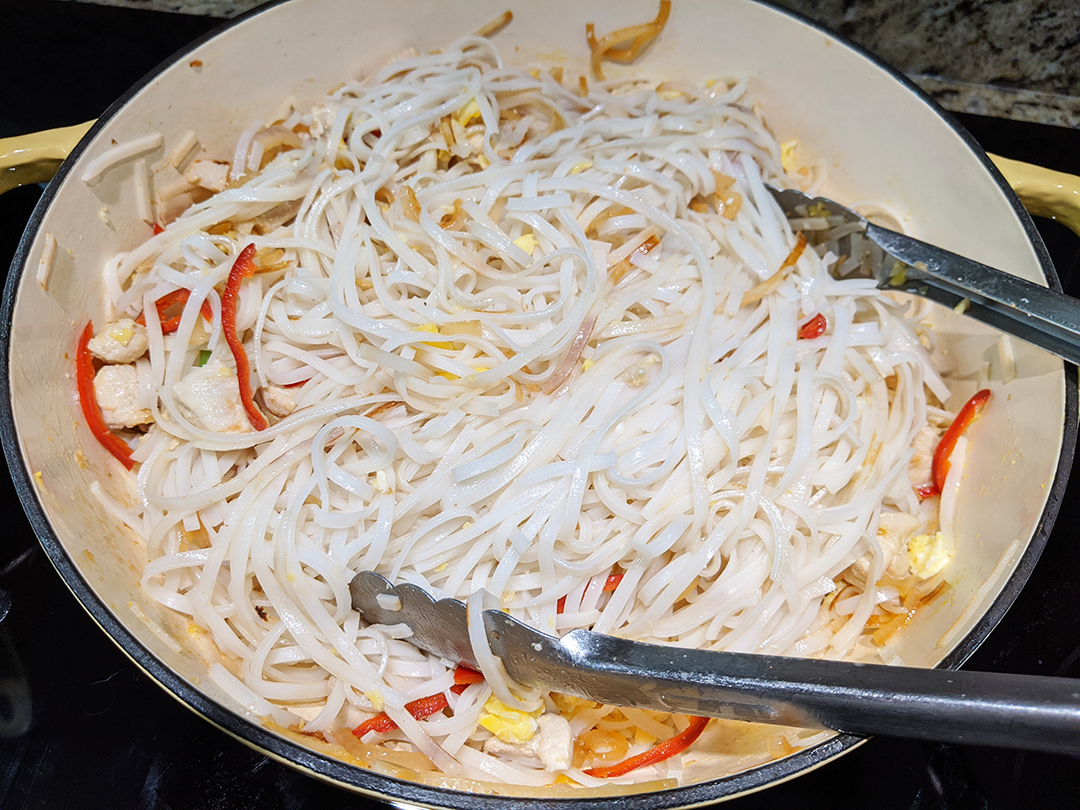
Add cooked rice noodles to skillet. Remember – your noodles are coated with toasted sesame oil – don’t worry immediately about sticking to the bottom of your pan. Using tongs, toss noodles in the skillet.
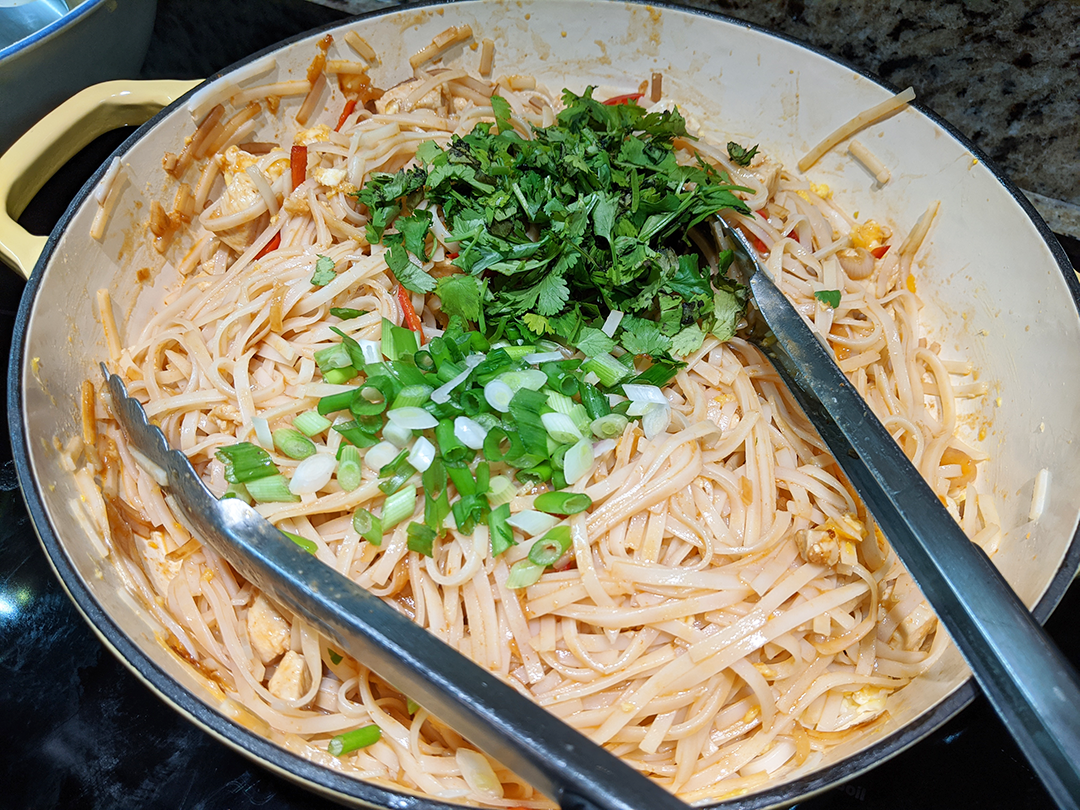
Return the chicken, veggies, and scrambled egg to the skillet. Continue to toss with tongs until all is incorporated.
Pour sauce into the skillet and toss to coat
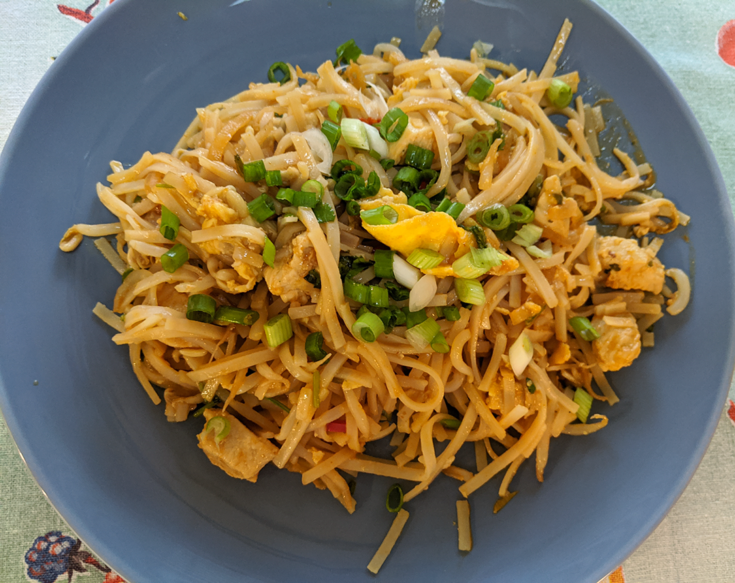
Add cilantro, green onions, crushed peanuts, and bean sprouts. Toss to combine. Divide onto individual plates or bowls and garnish with crushed peanuts, green onions, and cilantro. Enjoy!
One-Pot Chicken Pad Thai
One-Pot Chicken Pad Thai is an easy and quick stir fry recipe with favorite Asian flavors and a nice sauce with a bite of heat. Crushed peanuts add a nice crunch.
Prep Time15 minutes
Cook Time20 minutes
Total Time35 minutes
Ingredients
4 SERVINGS
8 oz pad thai rice noodles
2 eggs, lightly beaten
1 large chicken breast, cut into 1" chunks
1/3 cup or 1 large shallot, thinly sliced into rounds
1 red chili, stem and seeds removed and cut into slivers
1-15oz can bean sprouts, drained OR 2 cups fresh bean sprouts
1/2 cup peanuts, crushed
3-4 green onions, cut into 1" pieces
1/3 cup fresh cilantro, roughly chopped
For the Sauce
3 Tablespoons each fish sauce, rice vinegar, gluten-free soy sauce or tamari, brown sugar, lime juice, sriracha
Instructions
Prepare rice noodles Place uncooked noodles in a large bowl. Pour 3-4 quarts of boiling water over the noodles. Toss lightly with tongs to make sure noodles are submerged. Let steep for 6 minutes, tossing occasionally to keep noodles from sticking together. Check for doneness - noodles should be just short of al dente - maybe 1-2 minutes more. Drain in a colander. Rinse noodles with cold water to stop cooking and shake to remove excess water. Return to bowl and add 1 Tablespoon toasted sesame oil. Toss until noodles are coated. Set aside.
Over medium-high heat, brush the inside of a 12" skillet with 1/2 Tablespoon toasted sesame oil. Add beaten eggs. Scramble until set. Remove to a bowl. Set aside.
Brush the skillet again with 1/2 Tablespoon toasted sesame oil. Add peppers and shallots. Stir fry for 1 minute. Remove to bowl with eggs. Set aside.
Brush the skillet with 1/2 Tablespoon toasted sesame oil. Add chicken and stir fry until the meat is no longer pink in the middle. Remove to bowl with eggs, peppers, and shallots. Set aside.
Reduce heat to medium. Add noodles and toss just to warm.
Add reserved chicken, eggs, peppers, and shallots. Toss to combine.
Add sauce. Toss to coat.
Add bean sprouts, crushed peanuts, green onions, and cilantro. Toss to combine.
Divide into individual servings. Garnish with extra crushed peanuts, green onions, and cilantro.
Notes
One-Pot Chicken Pad Thai is categorized as "gluten-free." If you have gluten allergy or sensitivity, please be sure to use "gluten-free" soy sauce or tamari.
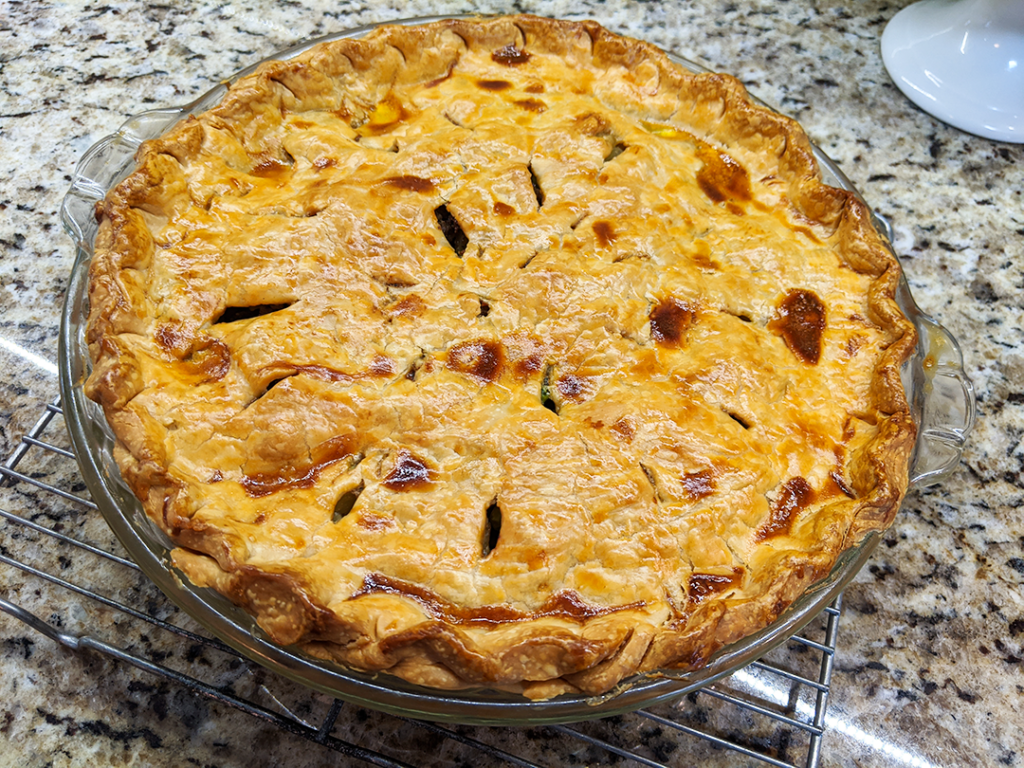
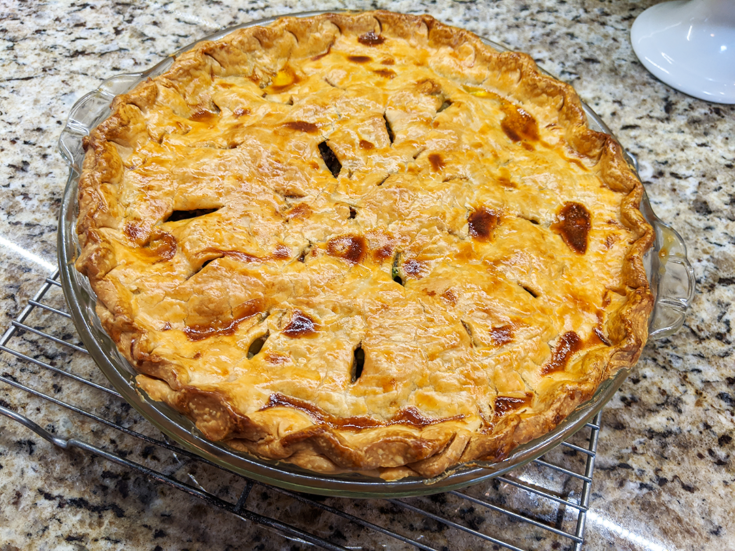
My mother, Shirley, was a pie master. She could mix up crust for a double-crust pie in a matter of seconds. It was always the same recipe: 2 cups all-purpose flour mixed with 1 teaspoon salt and 2 tablespoons granulated sugar (sugar if she was making a sweet pie); 2/3 cup Crisco; and 3-4 tablespoons ice-cold water. Her’s was always perfect. Perfectly flavored, perfectly crimped, and perfectly browned. Mom didn’t make savory pies often, but this recipe was one of our favorites.
Three reasons why you should bake up this delicious ground beef pot pie and keep it in your recipe box:
This isn’t a store-bought frozen one heated up in the oven. It’s one you make and bake with all the love I know you put into every dish.
Shirley’s Ground Beef Pot Pie is quick and soooo easy to prepare and is inexpensive to make.
Everyone LOVES pot pies!
What makes this pot pie so easy?
Except for the browned ground beef, you can make this entirely with pre-made ingredients.
All pot pies need a crust. I like to buy pre-made pie crusts from the grocery because I lack my mother’s skill. I store them in the freezer until I want to make any sort of pie. Of course, you can make your own crust – good for you! But having pre-made ones at the ready is a real time-saver. I find boxes of double pre-made pie crusts in the grocery refrigerator section for $1.79 – that’s a pretty economical time-saver and perfect for savory or sweet pie applications. Or you might try building the crust out of phyllo sheets like this Chicken Pot Pie in Phyllo Crust.
For this pot pie recipe, I cubed fresh carrots and potatoes and completed the filling with frozen peas. But you can substitute frozen carrots and peas – you know the combo bags sold in grocery store freezer sections. And cubed frozen hash brown potatoes – another staple in my freezer. And for a real simple prep, you can use frozen chopped onions for those days you just don’t feel like chopping an onion. I periodically have those days.
I am not a big fan of canned vegetables. Frozen is the way to go for me if I’m not using fresh veggies.
Frozen vegetables taste fresher and maintain a crunch, although not as perfect as fresh vegetables but better than canned. I know canned vegetables are less expensive than frozen. Please consider this – when you drain off the canning fluid from canned vegetables, what are you left with? A 15oz can of vegetables yields less than a 12oz package of frozen vegetables. And then there’s the added salt in canned vegetables that I try to avoid at all costs for health reasons.
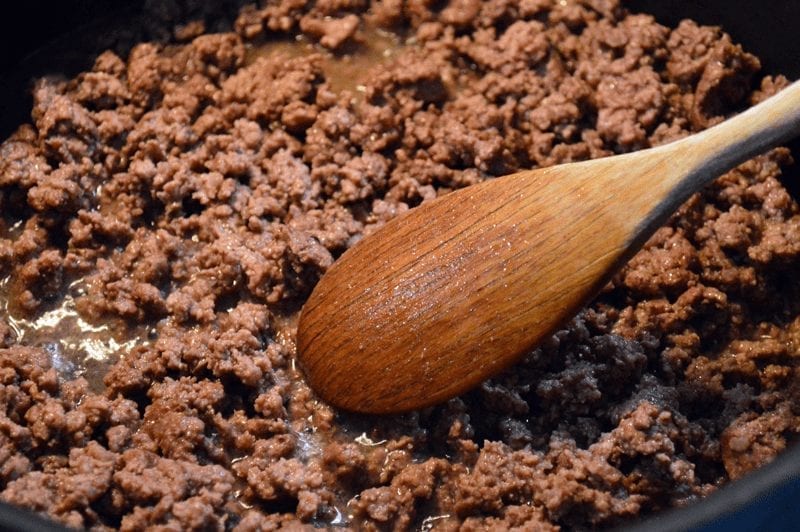
Add one Tablespoon olive oil in a 12″ skillet over medium-high heat. Brown 1½ – 2 pounds of ground beef or ground turkey. Once the meat is browned, drain off the fat in a colander and set aside.
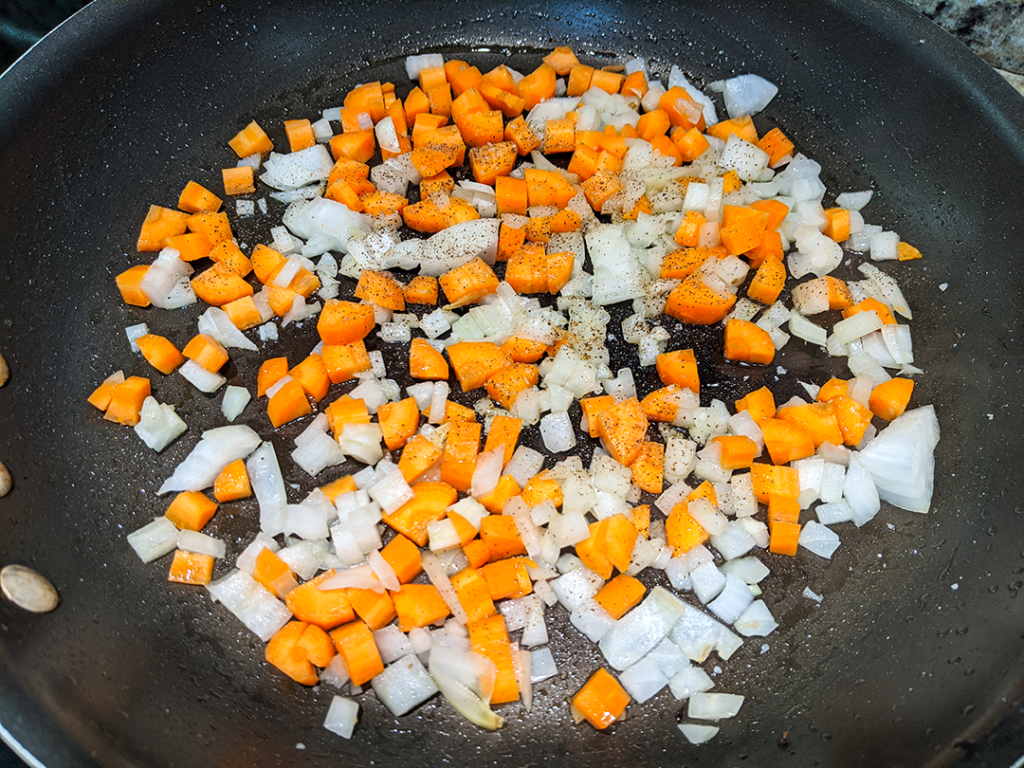
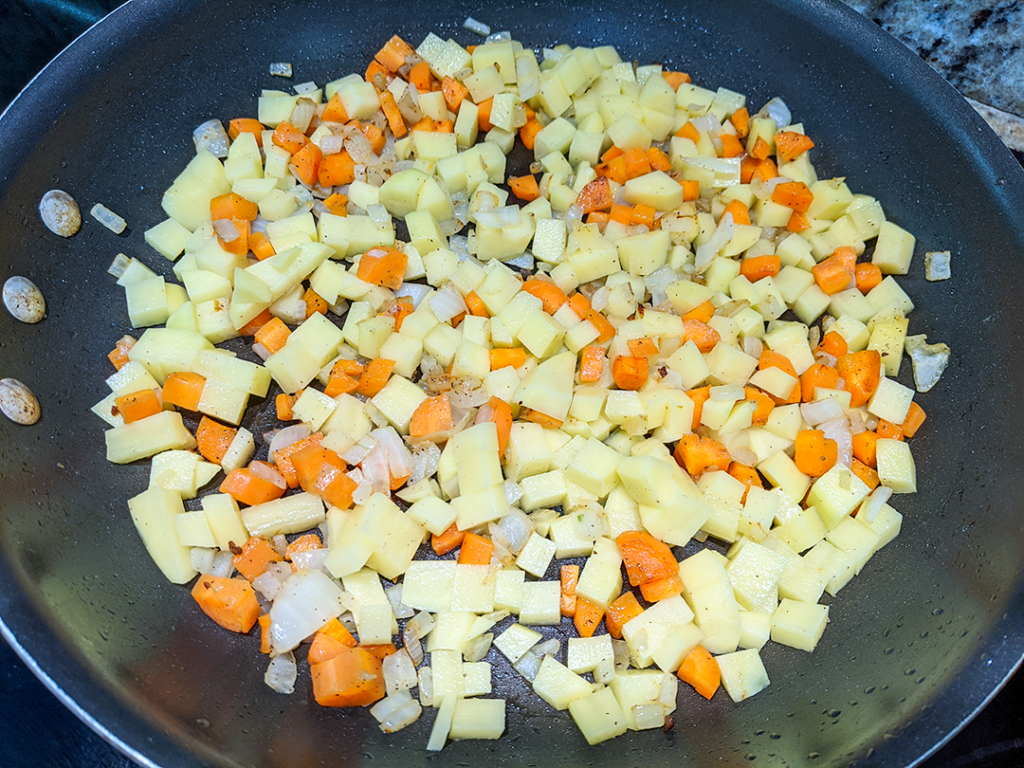
Return the skillet to the cooktop. Add one tablespoon olive oil and heat over medium-high heat. Add chopped onion and diced carrots, stir, and quickly saute until the onions become translucent.
Add diced potatoes and minced garlic. Stir and cook for one minute. Add 3/4 cup of beef stock. Stir scraping up the brown bits at the bottom of the skillet.
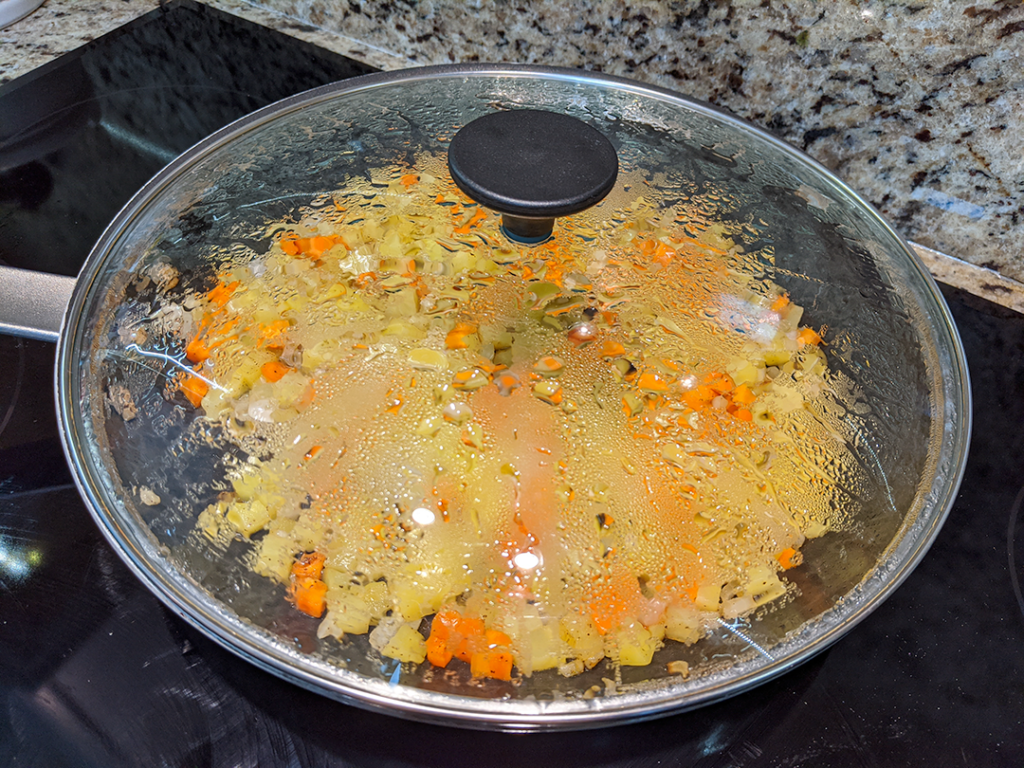
Turn the heat down to medium-low. Put a lid on the skillet and steam the vegetables for 10 minutes.
While the veggies are steaming, it’s time to get the pie crust ready. If you’re using packaged, it’s just a matter of bringing the crusts to room temperature. Even though pre-made crusts are 9″ in diameter, I like to roll mine out to make them a bit larger and thinner. If you’ve decided to make your own crust, you should follow your recipe and refrigerate for 30 minutes before rolling. I’d make the crust before starting the recipe so your crust has time to rest.
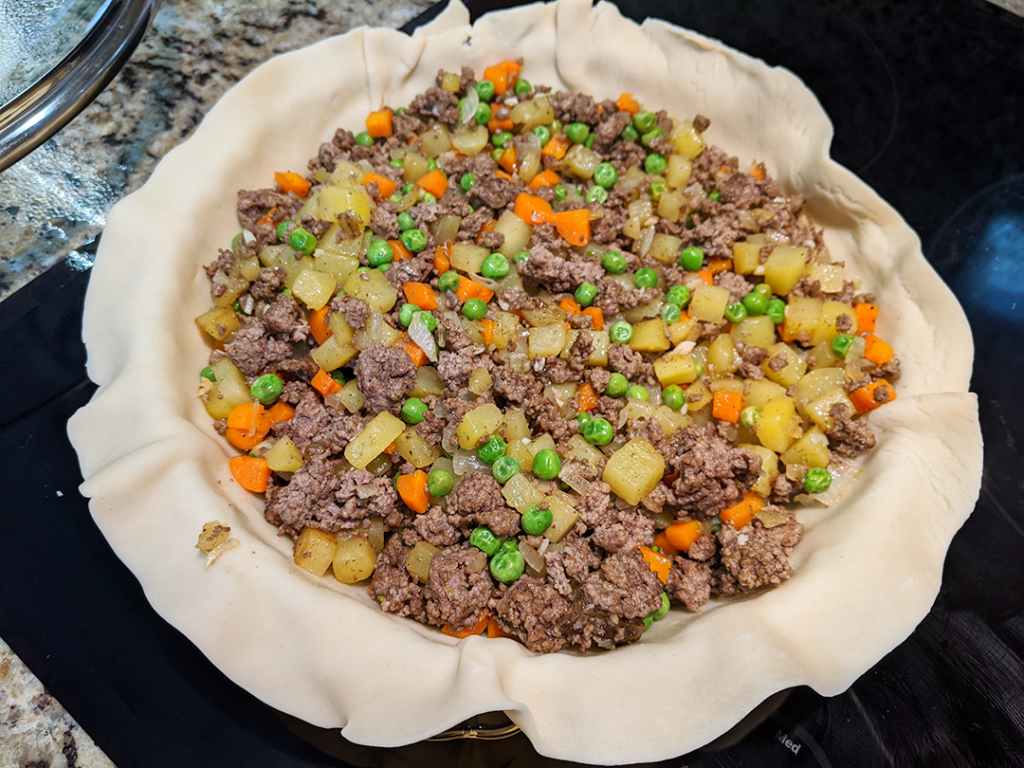
Fit pie crust into a 9″ deep-dish pie pan. Return to the cooktop, remove the lid from the skillet, and add the cooked ground beef and frozen peas. Stir until combined and spoon the ground beef filling into the crust. Roll out a crust for the top and put it on top of the filling.
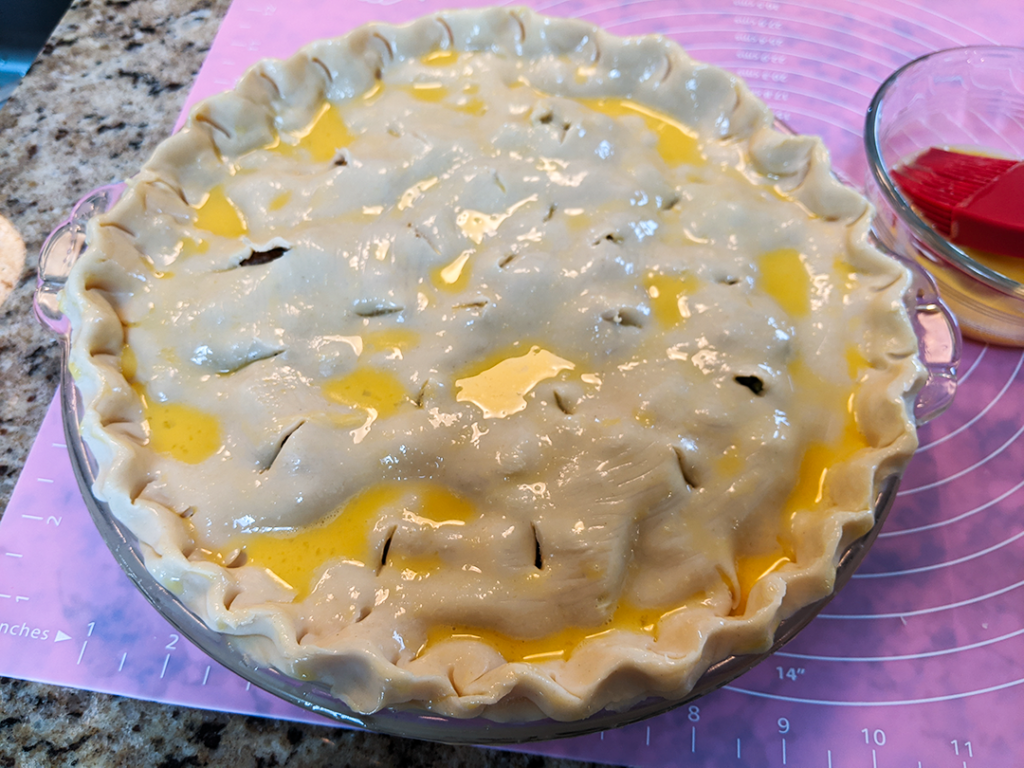
Next, crimp the edges to seal both crust layers and cut slits over the top crust. Mix one egg with one tablespoon water and whisk with a fork to make an egg wash. Brush the egg wash over the top of the pie. At this point, you can sprinkle the top of your pie with flaky salt and/or coarsely ground black pepper.
Pop your pot pie into a pre-heated 425°F oven. Bake for 30 minutes or until the crust is flaky and nicely browned. Remove to a cooling rack and allow to rest for 10 minutes before serving.
While the pie is resting, you can whip together a quick and simple brown gravy to ladle over the hot pot pie slices.
In the same skillet you used to prepare the vegetables and over medium heat melt 2 tablespoons butter. Add 2 tablespoons all-purpose flour. Whisk until combined which forms a roux.
Add 2 cups of warmed beef broth. Whisk until combined.
Continue to cook and lightly whisk for a few minutes until the sauce begins to thicken. Check the seasoning – add salt and pepper if needed. You may want to add dried herbs to the sauce to kick the flavor up a notch.
And there you have it! A nice green salad or a bowl of fresh fruit would go well with your extremely flaky and delicious beef pot pie.
Please Note: There is no binder in the meat pie filling. Part of this is because adding more liquid to the filling can make the bottom crust soggy. I like the ground beef pot pie to be dryer with a flaky crust. That’s why I suggested making a side beef gravy. However, you might add one cup of shredded cheese just before spooning the filling into the pie crust. You can even make the pot pie Southwestern by adding a can of drained chopped chilies and shredded Monterey Jack cheese to the filling, too, served with a lovely salsa with shredded lettuce, sour cream and/or guacamole. It’s really up to you.
Yield: 6
Shirley's Ground Beef Pot Pie
My mother, Shirley, was a pie master. She could mix up crust for a double-crust pie in a matter of seconds. It was always the same recipe: 2 cups all-purpose flour mixed with 1 teaspoon salt and 2 tablespoons granulated sugar (sugar if she was making a sweet pie); 2/3 cup Crisco; and 3-4 tablespoons ice-cold water. Her's was always perfect. Perfectly flavored, perfectly crimped, and perfectly browned. Mom didn't make savory pies often, but this recipe was one of our favorites.
Prep Time20 minutes
Cook Time30 minutes
Total Time50 minutes
Ingredients
1 1/2 - 2 pounds ground beef (80-20 or leaner) OR ground turkey
1 medium onion, diced OR 1/2 bag frozen chopped onions
2 large russet potatoes, diced OR 2 cups frozen diced hash brown potatoes
3 carrots, diced
1 cup frozen peas
OR 1-12oz bag of frozen peas and carrots
2 cloves garlic, minced
3/4 cup low sodium beef broth
Olive oil
Salt & Pepper
Crust for one 9" double-crust pie
1 egg
1 Tablespoon water
Instructions
Preheat oven to 425F degrees.
In 12" skillet, brown ground meat until pinkness is gone. Drain ground meat in a colander and set aside.
Return skillet to the cooktop. Over medium-high heat, add 1 Tablespoon olive oil. Add onions and carrots. Stir and saute until onions are translucent.
Add potatoes and garlic. Stir and cook for 1-2 minutes.
Add broth to skillet. Reduce heat to medium-low. Cover with a lid. Steam vegetables for 10 minutes.
Remove lid and add frozen peas and cooked ground meat. Stir to combine Turn off heat and set skillet aside.
Fit a 9" deep-dish pie pan with one pie crust. Spoon in the meat filling.
Place the second pie crust over the top. Crimp the edges to seal both crusts. Using a sharp knife, cut slits into the crust.
Make egg wash with one egg and 1 Tablespoon water. Brush the top crust with egg wash.
Bake for 30 minutes or until the pie is nicely golden brown.
Remove pie to a cooling rack and let rest for 10 minutes before serving.
Notes
You can make a simple beef sauce to serve. In the same skillet used to cook the vegetables over medium heat, melt 2 Tablespoons butter. Add 2 Tablespoons all-purpose flour. Mix to form a roux. Add 2 cups warmed beef broth. Stir and continue to cook until the sauce begins to thicken. Check for seasoning - add salt and/or pepper if needed. You can also add dried herbs to the sauce to kick up the flavor.
Please see additional notes in the body of my post for other suggestions.
Richard and I love chicken wings. I mean, who doesn’t? Hot, crispy, juicy and slathered in your favorite hot sauce or dipped in any variety of dressings and sauces on-the-side, chicken wings are the perfect finger food. And Mimi’s Fried Chicken Wings deliver just that!
I’ve had the good fortune over the last few shopping trips finding chicken pieces of all types at great prices. Since the COVID-19 pandemic, delis at my local grocery store have had to purge the chicken parts they normally use for deli fried and barbecued chicken. As the story goes, they’ve not sold nearly as many ready-to-eat meals as they did before the virus struck. The result – I got a large 5-pound package of chicken wing drummies and flats for the unheard price of 59 cents/pound! And there were several packages available. I resisted the urge to buy 2-3 packages. My freezer, both of them, are already filled with other packages of chicken I purchased earlier at unheard of prices. And I did not want to deny others this great deal. During the lockdown days of the coronavirus, wings are a fabulous and novel treat for families to enjoy and Mimi’s Fried Chicken Wings are easy to make.
I’m going to digress a bit. For a moment, step into the “Wayback Machine.” In the good old days, chicken wings weren’t the big culinary deal they are now. If we didn’t fry them with Sunday’s chicken, we’d freeze them to make stock. You could find chicken wings at the grocery for 19-29 cents/pound. Then along came Hooters in 1983 and the national wing frenzy was born. Why? Because wings are delicious and, at that time, cheap. Wings were eaten long before then in Buffalo, NY, a frugal community that knows good food and a good bargain and boasts to be “The Chicken Wing Capital of the World.” Who would have believed wings would become so coveted and come to cost more than boneless, skinless chicken breasts or whole chickens for that matter? Not me. So finding wings at a great price made my heart leap!
A Word About Deep Frying
I’ve learned a couple of things about deep frying food over the years.
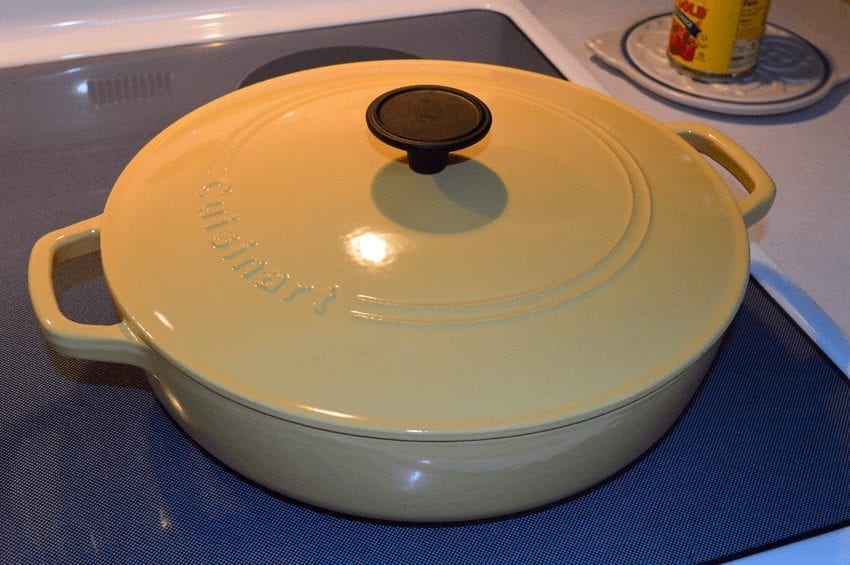
Make sure you use a large heavy skillet, like a cast-iron skillet or an enameled cast-iron skillet. Your skillet should be large enough to submerge food into the hot oil so the food can swim around – don’t overcrowd the pan. I’ve got this great 12″ Cuisinart skillet that I use for lots and lots of food prep, including deep frying. It’s perfect for the job.
Use an oil with a high smoke point like peanut or canola oil. I prefer peanut oil. My mother used Crisco exclusively and I did for many years, too – then switched to peanut oil because of its high smoke point.
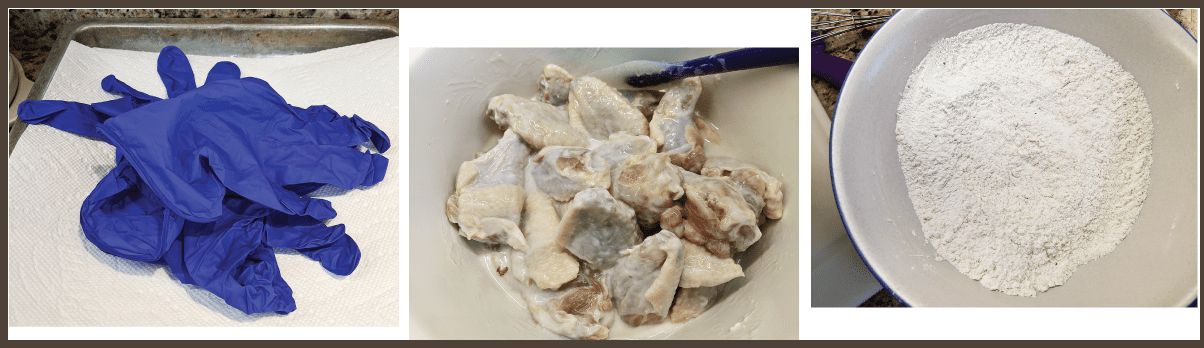
Make sure whatever you decide to fry is patted dry before putting it in buttermilk, as in this recipe, or any other pre-fry prep like breading. There’s so much liquid in a tray or bag full of thawed chicken parts. So I line a half-sheet pan with paper towels, put the food on the toweling, and put another layer of paper towels on top and gently pat it all dry. I do this for fish, shrimp, and pork, too.
Invest in a good thermometer. You can use a candy thermometer, but I find they’re too tall. It sticks out of a skillet like the Statue of Liberty. I found this CIA one, I don’t know where many years ago. It clips onto the edge of the pan and is easy to read. It reads to only 400° but for most deep frying, you won’t need to go higher than that.
Put the wings into a deep bowl and pour over 1½ cups of buttermilk. Let stand for at least 30 minutes and not more than 8 hours in the refrigerator. When you’re ready to fry, bring the wings out and allow them to come to room temperature.
Pour 3″ of oil into your skillet. Skillets come in lots of different sizes so rather than give a liquid measure amount, you’ll want to pour until you reach a 3″ depth of oil. Clip your thermometer to the lip of the skillet and over medium-high heat, warm the oil to 350°. I don’t like to rush this step. It takes some time for the oil to come to temperature. I like to give it 20 minutes or so.
Essential to any breaded deep fry cooking is a pair of plastic gloves. They help your hands from getting gummy from removing wet wings into the flour dredge. I leave my gloves on for the whole frying process washing my gloved hands after I’ve dropped each batch into the oil. My manicure stays perfect.
In a separate bowl, make a dredge with flour, salt, pepper, paprika, garlic powder, onion powder, cayenne pepper, and baking powder.
There’s no need to drain buttermilk from the wings. Simply take one piece of chicken, dredge it in flour mixture, and drop in the skillet. I start with a small batch to keep the oil temp from dropping too much. Keep your eye on the temperature to try to maintain a steady 350° by adjusting the heat as needed. I wouldn’t put in more than 6-8 pieces per batch.
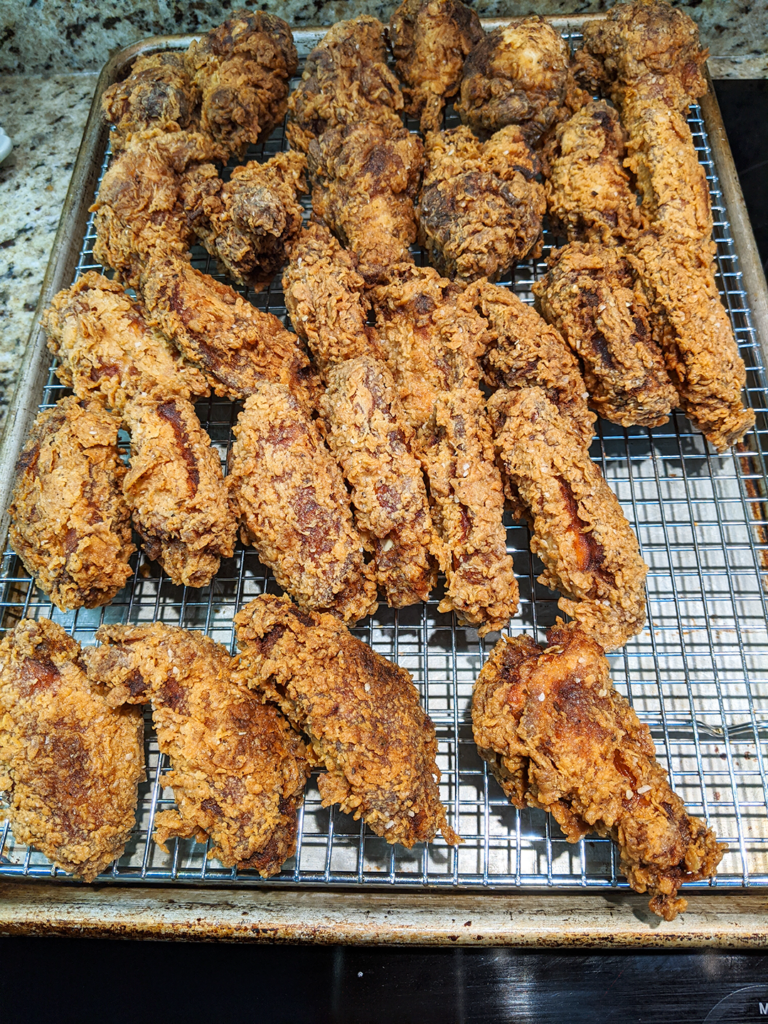
Fry the wings on one side for 3-4 minutes. Turn and continue to fry for another 3-4 minutes. They should be golden brown.
Remove to a half-sheet pan fitted with a rack and keep them warm in a 250°F oven until ready to serve.
If you want to serve your wings tossed in sauce, get a large, preferably stainless steel bowl because they’re lightweight. Pour sauce into the pan and toss the wings until they’re coated.
Here’s the sound of heaven in the deep fry world.
And here’s the finished product! This recipe is so simple – no muss, no fuss. Extremely crispy, golden brown, and delicious.
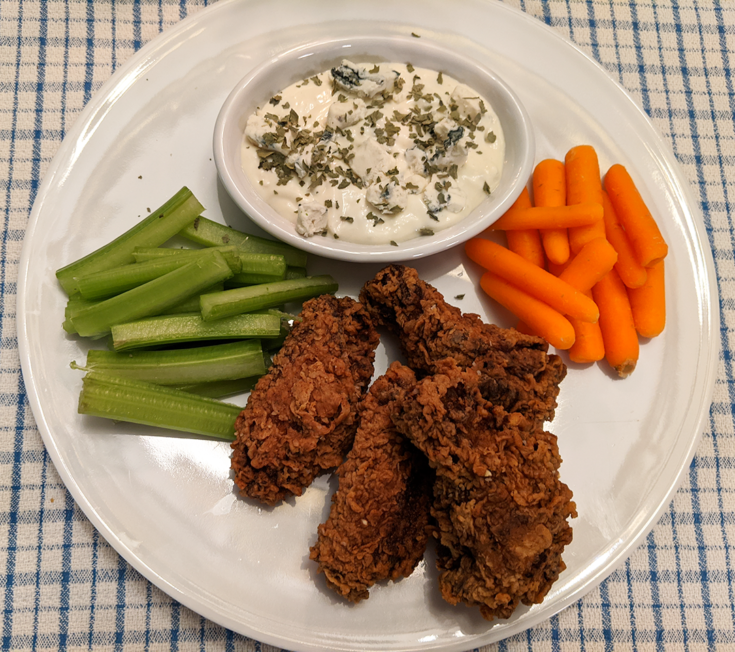
This is the way we’ve always eaten our wings. I figure the carrots and celery are the healthy part of this meal. Who can resist bleu cheese dressing with extra bleu cheese! Richard got out Frank’s Hot Sauce to dunk his along with the dressing.
Remember, the deep fry technique can be used with any fried food – chicken, fish, shrimp or breaded green beans, carrots, onion rings – go for it!
Yield: 6-8
Mimi's Fried Chicken Wings
We love chicken wings. I mean, who doesn't? Hot, crispy, juicy and slathered in your favorite hot sauce or dipped in any variety of dressings and sauces on-the-side, chicken wings are the perfect finger food. And Mimi's Fried Chicken Wings deliver all that you'd expect.
Prep Time30 minutes
Cook Time45 minutes
Total Time1 hour15 minutes
Ingredients
5 pounds of chicken wings cut into drumettes and flats
1 1/2 cups buttermilk
[u]For The Flour Dredge[/u]
2 cups all-purpose flour
3 teaspoons Kosher salt
1 teaspoon black pepper
1/2 teaspoon paprika
1/2 teaspoon cayenne pepper
1/2 teaspoon garlic powder, not garlic salt
1/2 teaspoon onion powder, not onion salt
1/2 teaspoon baking powder
Peanut or Canola Oil for frying
Instructions
Place wings and buttermilk in a large bowl. Stir to coat all pieces. Set aside in the refrigerator for at least 30 minutes or up to 8 hours.
In another bowl, mix flour, salt, pepper, paprika, garlic and onion powders, cayenne, and baking powder. Mix until combined. Set aside.
When ready to deep fry, pour oil into a heavy skillet to the depth of 3". Heat oil over medium-high heat. Using a thermometer, heat oil to 350F degrees.
One piece at a time, lift a wing part out of the buttermilk and dredge in the flour mixture. Shake off excess flour and immediately drop chicken in hot oil.
Fry wings for 3-4 minutes. Turn to brown the other side for another 3-4 minutes. Cook 6-8 wings in one batch.
Remove cooked wings to a sheet pan fitted with a rack. Keep warm in a 250F degree oven while finishing the remainder.
Notes
5 pounds of chicken wings is a lot but great for a party. Half the recipe if you wish. Cooked wings can be tossed with your favorite sauce at service OR serve wings with dipping sauces on the side - bleu cheese or ranch dressing, hot sauce or whatever you prefer.
I watched Ree Drummond, aka “The Pioneer Woman,” make this recipe “Steakhouse Pasta” on the Food Network Channel. Quite literally, my mouth was watering. I strayed from Ree’s recipe a wee bit based on ingredients I had on hand.
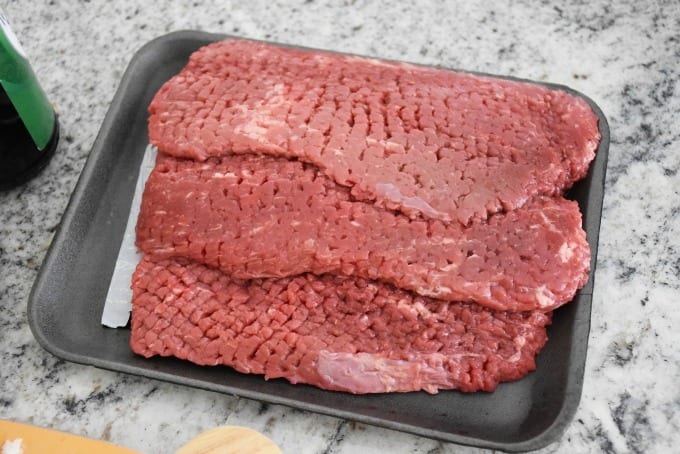
Rather than skirt steak, I had a package of chuck steak in the fridge waiting to be transformed. The steaks were only $3.69/pound at the grocery and Richard loves chuck steaks although I rarely buy them. In the “Wayback Days”, my dad used to buy chuck steak not for a family meal, but for his cherished buddy, Harry, his dog. Harry was spoiled and happy.
I also added some fresh mushrooms and used frozen chopped spinach instead of fresh. Ree’s recipe calls for crumbled blue cheese. I opted for freshly grated Parmesan and cream cheese. The Pioneer Woman was shooting for a steakhouse-like pasta dish, thus the blue cheese, spinach, and horseradish – all steakhouse classics. And she uses pappardelle, which is a wide pasta – wider than fettuccine. I had linguine on hand so that’s what I used.
I must say that this was an easy and delicious dish. Plenty of creamy, cheesy sauce punched with a flavorful variety of veggies for the pasta. And the grilled steak that goes with it is perfect, even if it was chuck steak which turned out to be flavorful and tender. No wonder Harry was so happy!
Let’s Make Some, Shall We?
First thing, fill a large pot with water, cover, and bring to a boil. This is for the pasta. Be sure to save 1-2 cups of the pasta water after cooking to use for the sauce. Prepare the pasta while you’re cooking the sauce. If you’re using frozen spinach, thaw it in the microwave for 45 seconds, drain it, and squeeze it dry using paper towels.
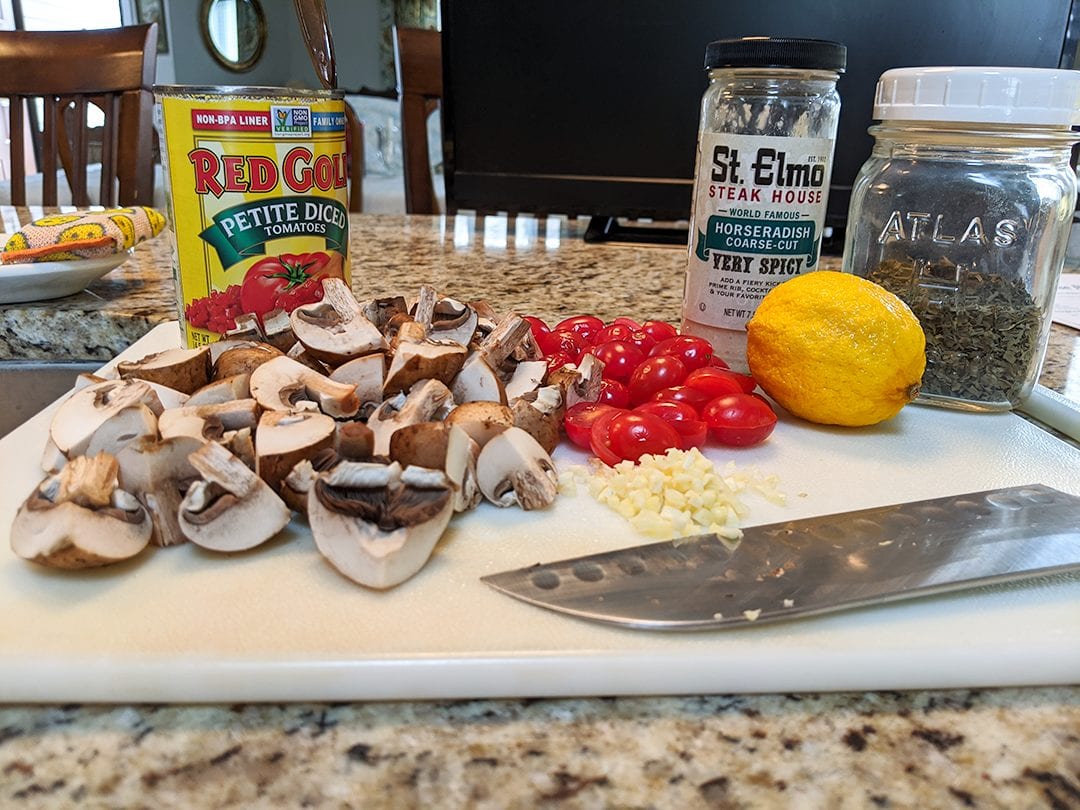
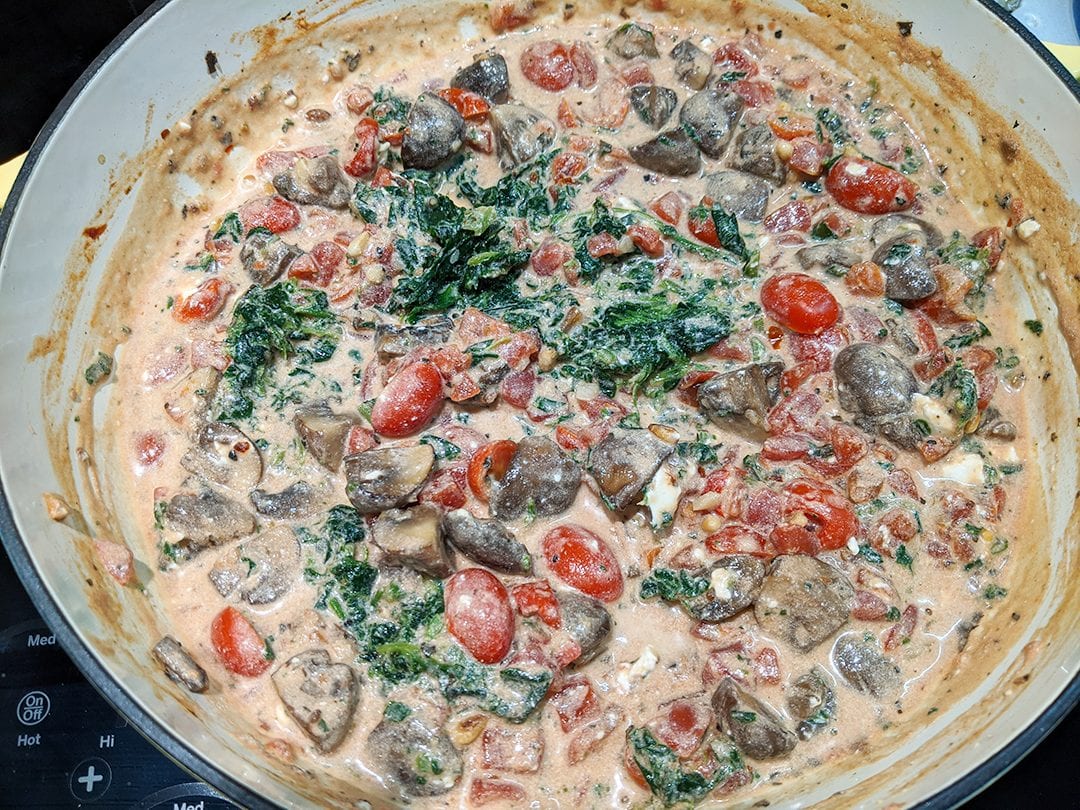
Here are all my lovely assembled ingredients for the sauce except the heavy cream and half-n-half. I had a partial container of cherry tomatoes in the fridge, so I halved them and threw them in with the canned tomatoes. I quartered baby portobello mushrooms – I use portobellos because I think they have more flavor than white buttons. Notice there are no onions used in this sauce. However, I wouldn’t judge you if you threw in 1/2 a diced or sliced onion.
I love horseradish and its addition gives the sauce a nice kick without an overpowering flavor. The horseradish I use is from St. Elmo’s Steak House, an Indianapolis institution. St. Elmo’s is famous for their shrimp cocktail served with a memorable eye-watering, sinus-clearing, breath-stopping cocktail sauce. Their sauce is HEAVY with freshly grated horseradish they prepare every day. It’s legendary. St. Elmo’s sells their cocktail sauce and horseradish commercially and it’s now easy to find in grocery stores. Theirs is the only horseradish I use. There’s little horseradish in this recipe – don’t be afraid. If you hate horseradish, leave it out.
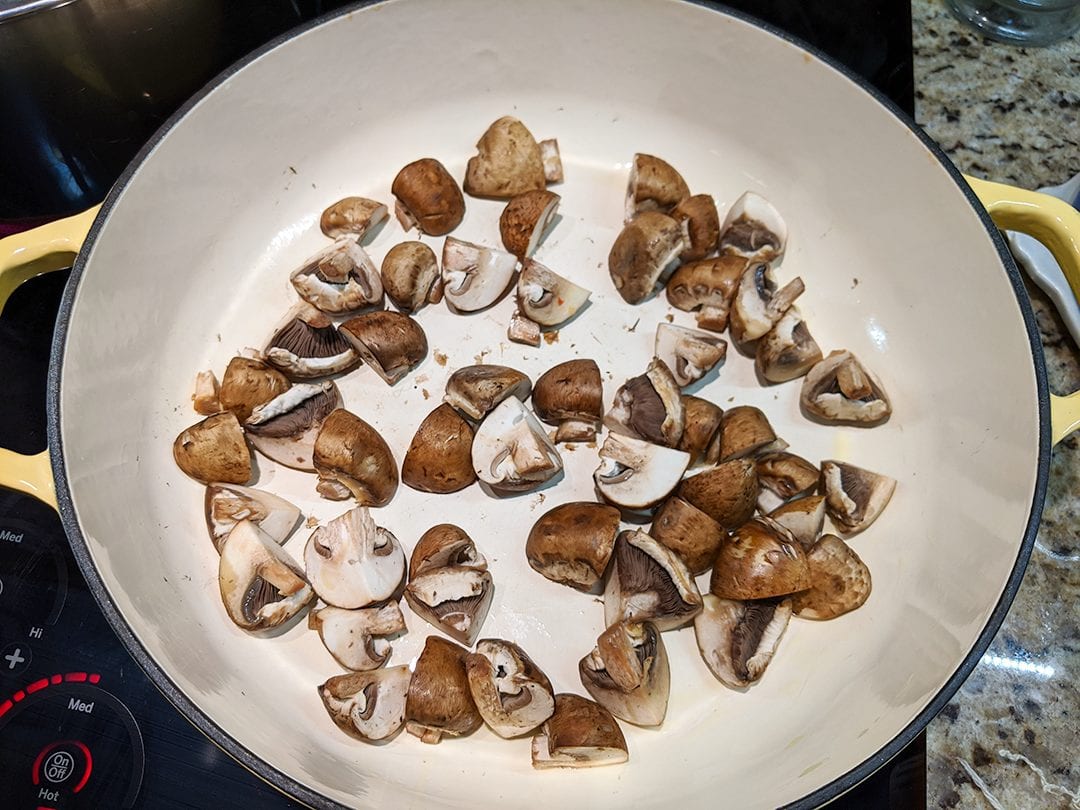
Next, in a 12″ heavy-bottomed skillet over medium heat add one Tablespoon olive oil and the mushrooms. Stir the mushrooms around for 5 minutes or so until they begin to soften and brown. I don’t use lots of oil when I brown mushrooms. I like to heat them up so they release their liquid and the liquid reduces a bit. I think it adds a little umami to a dish. Mushrooms are perfect to add subtle flavor.
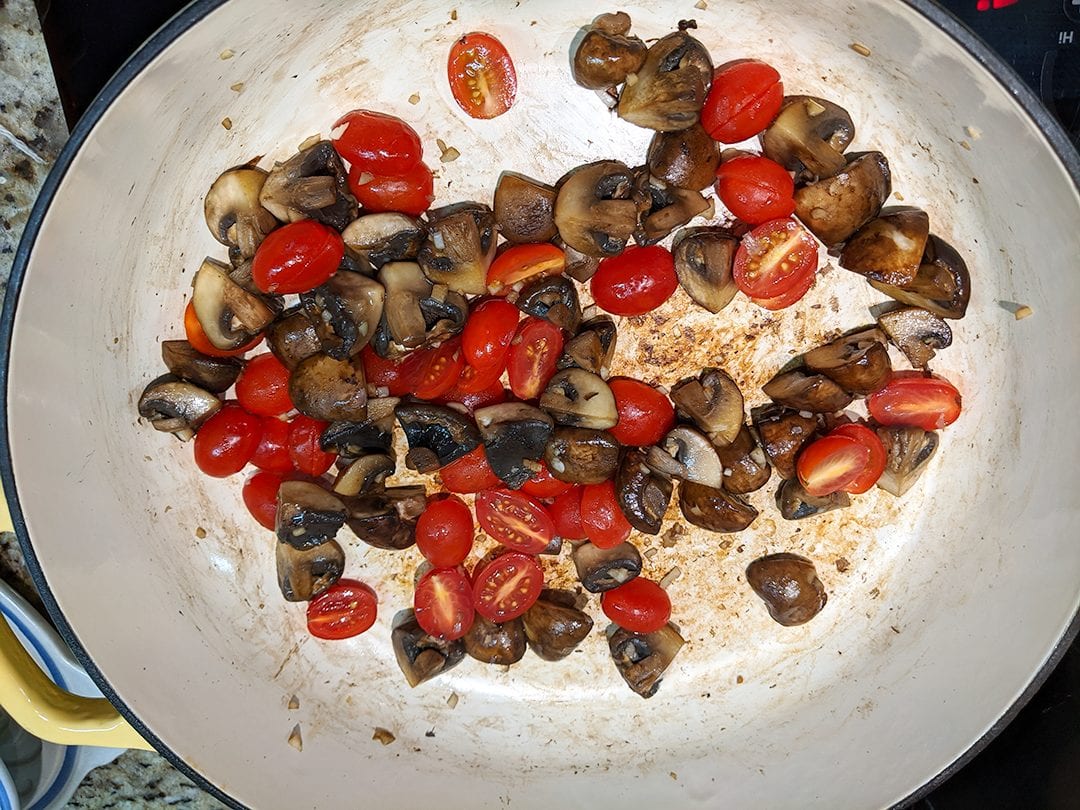
Add the minced garlic to the mushrooms and stir for one minute or less until the garlic becomes fragrant.
See how the mushrooms cooked down and left flavorful browned bits at the bottom of the skillet? Lovely. Add the halved cherry tomatoes, if using. Stir and cook until the tomatoes just begin to wilt. Then stir in 1/2 cup of white wine or chicken stock. Bring to a gentle simmer and continue to cook until the liquid is reduced by half. Quick – 2-3 minutes.
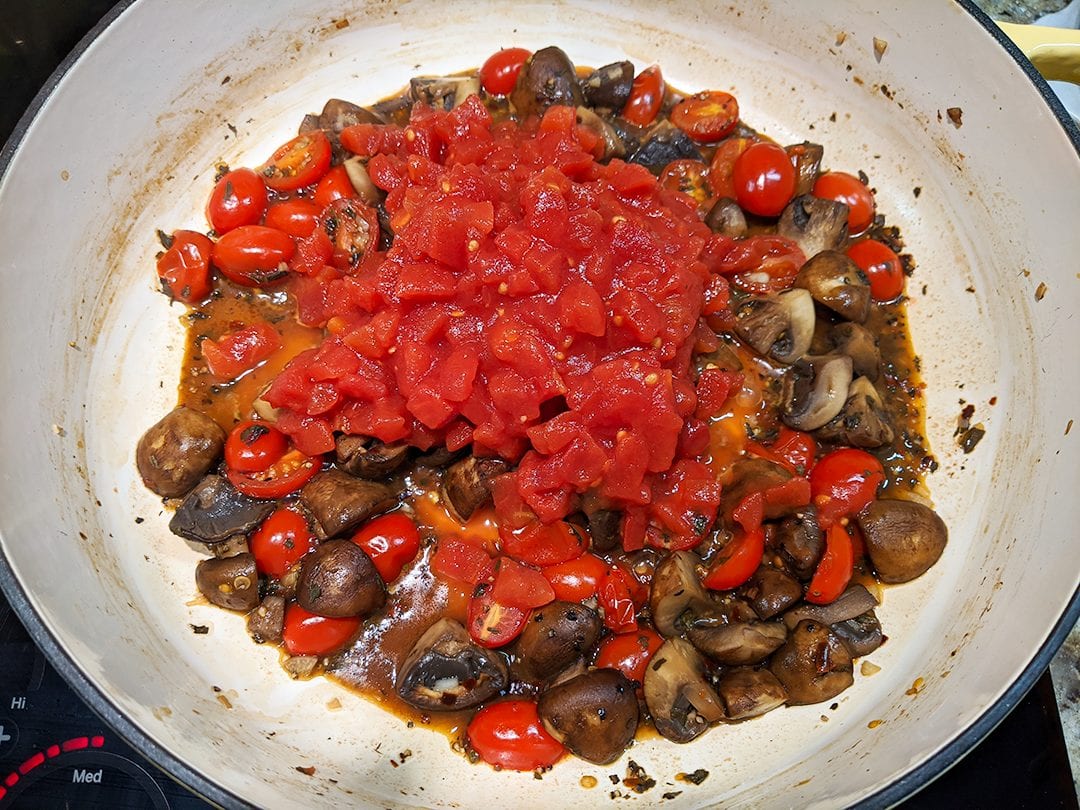
Add canned petite diced tomatoes with their liquid along with 1/2 Tablespoon dried basil, 1/2 teaspoon granulated sugar, and 1/4 teaspoon crushed red pepper. Bring to a gentle simmer and continue to cook for 10 minutes or so stirring every once in a while.
While the sauce is cooking, it’s time to get the steak ready for the grill. My chuck steak was thin enough, 1/2″, that I cooked it quickly on our gas grill, but you can easily use a grill pan or large skillet on top of the stove. Sprinkle the meat with a little salt and pepper on both sides. When your grill or skillet is hot, sear the meat for 3-4 minutes on both sides for medium-rare. When done, remove from heat to a plate and loosely cover with foil until you’re ready to serve.
Here’s the finished beautiful sauce and how to make it:
Reduce the heat to low under the tomato and mushroom mixture.
Add 1/2 cup of heavy cream and 1/2 cup of half-n-half. If you don’t have heavy cream, use all half-n-half. Stir until it’s all incorporated.
Stir in 2-3 oz of cream cheese. Stir until the cheese has melted into the mixture.
Add 1 Tablespoon horseradish, if using. Stir.
Add 3/4 cup of freshly grated Parmesan cheese. Stir until it’s all incorporated.
Add 3 cups of fresh spinach OR run a knife through the thawed and dried frozen spinach to break up the clumps. Stir until incorporated
I had 1/4 cup or so of roasted pine nuts hanging around on the kitchen counter, so they went into the sauce, too.
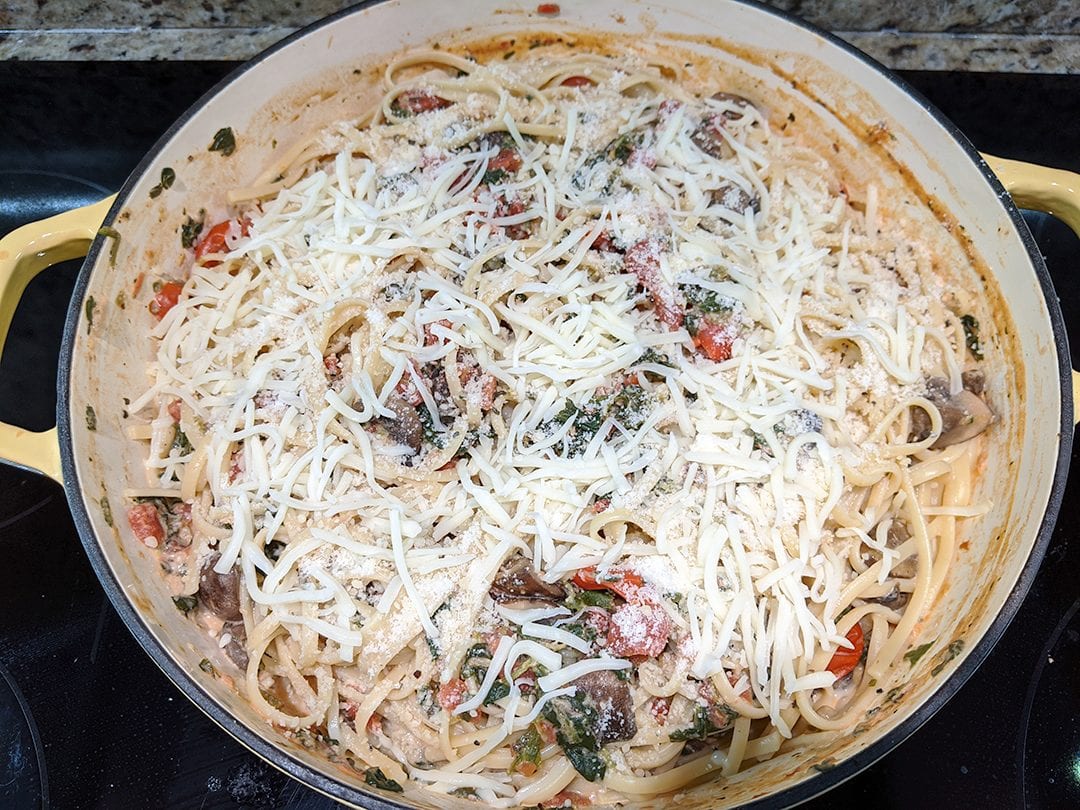
Add the cooked, drained pasta. Using tongs, toss everything together until the pasta is well coated. You may have to add some of the pasta cooking water to help loosen the pasta – I find doing so actually makes the pasta sauce creamier. I topped my finished pasta with shredded mozzarella cheese – why not?
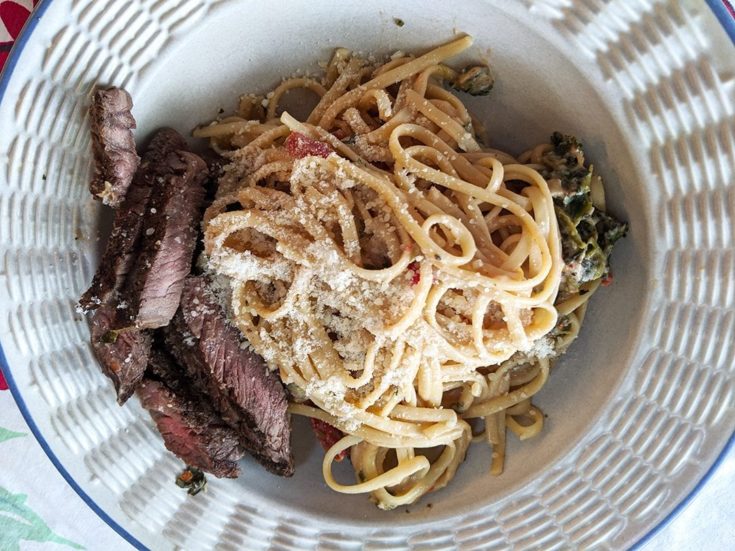
Slice your steak into strips and serve on top of the pasta or serve into individual pasta bowls with steak on the side like I did here and top with more freshly grated Parmesean at service.
And there you have it! This dish is filled with flavor from all the vegetables and cheese, and so satisfying.
Thanks, Ree, for your inspiration! This recipe is going on my regular menu rotation!
Yield: 6
Steak with Creamy, Cheesy Pasta, Tomatoes & Mushrooms
This dish is inspired by The Pioneer Woman's Steakhouse Pasta. It's filled with flavor from all the vegetables and a creamy, cheesy sauce perfect for pasta. Delicious and so satisfying!
Prep Time15 minutes
Cook Time30 minutes
Total Time45 minutes
Ingredients
1 1/2 pounds dried pasta, I used linguine but pappardelle or fettuccine works, too
1 Tablespoon olive oil
8oz baby portobello mushrooms, quartered
3 cloves garlic, minced
1 cup cherry tomatoes, halved, optional
1 15oz can petite diced tomatoes
1/2 cup dry white wine or chicken stock
1/2 teaspoon granulated sugar
1/4 teaspoon crushed red pepper flakes
1/2 Tablespoon dried basil
1/2 cup heavy cream
1/2 cup half-n-half
2-3 oz cream cheese at room temperature and cut into chunks
3/4 cup freshly grated Parmesan cheese + more for serving
1 Tablespoon prepared horseradish
1 box frozen spinach, thawed, drained and squeezed dry with paper towels and chopped again to break up clumps OR 3 cups fresh spinach
1-2 cups reserved pasta cooking water
1 pound chuck steak OR skirt steak, flank steak - any thin steak that will grill quickly
Instructions
Fill a large pot with water, cover with a lid, and bring to a boil. While waiting for the water to boil, make the pasta sauce.
Heat a 12" heavy-bottomed skillet over medium heat. Add 1 Tablespoon olive oil. Add mushrooms and saute for 5 minutes or so until the mushrooms begin to brown and release their liquid.
Add minced garlic, stir, and saute for 1 minute or less until the garlic becomes fragrant.
Add white wine, stir scraping the brown bits on the bottom of the skillet and gently simmer until the liquid is reduced by half.
Add cherry tomatoes, if using, stir and cook until the tomatoes are just softened.
Add petite diced tomatoes and dried basil, stir. Gently simmer, uncovered, for 10 minutes.
Get steak ready for the grill. Sprinkle lightly with salt and pepper on both sides. Grill for 3-4 minutes on each side for medium-rare. Or use a grill pan or large skillet on the stovetop. Remove to a plate and cover loosely with foil. Allow to rest until service.
Cook pasta according to package directions. Reserve 1-2 cups of pasta cooking water. Drain cooked pasta. Set aside.
Reduce heat under tomato sauce to low. Add heavy cream, half-n-half, and horseradish. Stir until warmed.
Add cream cheese and stir until melted.
Add Parmesan and stir.
Add spinach and stir. If using fresh spinach, cook until it begins to wilt.
Add the cooked, drained pasta. Using tongs, lift the pasta until coated with sauce. You may need to use the reserved pasta water to thin the sauce so it coats evenly.
Cut steak into 1/2" strips and serve on top or along side the pasta.
Notes
Feel free to substitute 1/2 cup grated fontina cheese for cream cheese. You may use 1 cup half-n-half in place of 1/2 heavy cream and 1/2 cup of half-n-half.
I love any main dish that incorporates beef and tomatoes. There’s just something so magical about the melding of flavors that shouts out “comfort food” to me. Like Best Spaghetti and Awesome Meatballs. Or Chuck Roast with Peppers, Tomatoes and Cheese Grits. My mother used to make a rump roast in an oven bag with only a can of cream of tomato soup, dried basil, salt, and pepper. The gravy was fabulous used to assemble roast beef manhattans and mashed potatoes. Old Fashioned Cube Steak with Tomato Gravy is an old-timey dish inspired by Mom’s roast beef recipe minus the soup. I’m also paying homage to my Midwestern roots where hearty meals are a staple.
I don’t remember when I started to use cube steak. Maybe because I cooked a lot of breaded cubed pork tenderloin over the years. The beef version looked similar so, I think I simply decided to give this meat cut a try.
Cube steak is cut from the beef top round or top sirloin – not normally tender cuts of meat. So butchers run the pieces through an electric meat tenderizer a couple of times that gives the finished steak patty a distinctly dimpled look. The resulting “cubes” running over the surface of the meat patty is how cube steak got its name. Of course, you could “cube” your own steaks using a meat mallet and a strong arm – a great way to relieve situational frustration. I prefer to let the butcher work his magic. Cubing tenderizes and flattens the meat, so it cooks quicker than a chuck roast. Cube steak is pretty lean, so it doesn’t benefit from marbling that would make the cooked steak as tender as real steaks – don’t expect “melt-in-your-mouth” tender. As beef goes, it’s relatively inexpensive. And cube steak is essential for chicken fried steak and cream gravy – YUM!
Let’s see how Old Fashioned Cube Steak and Tomato Gravy comes together, shall we?
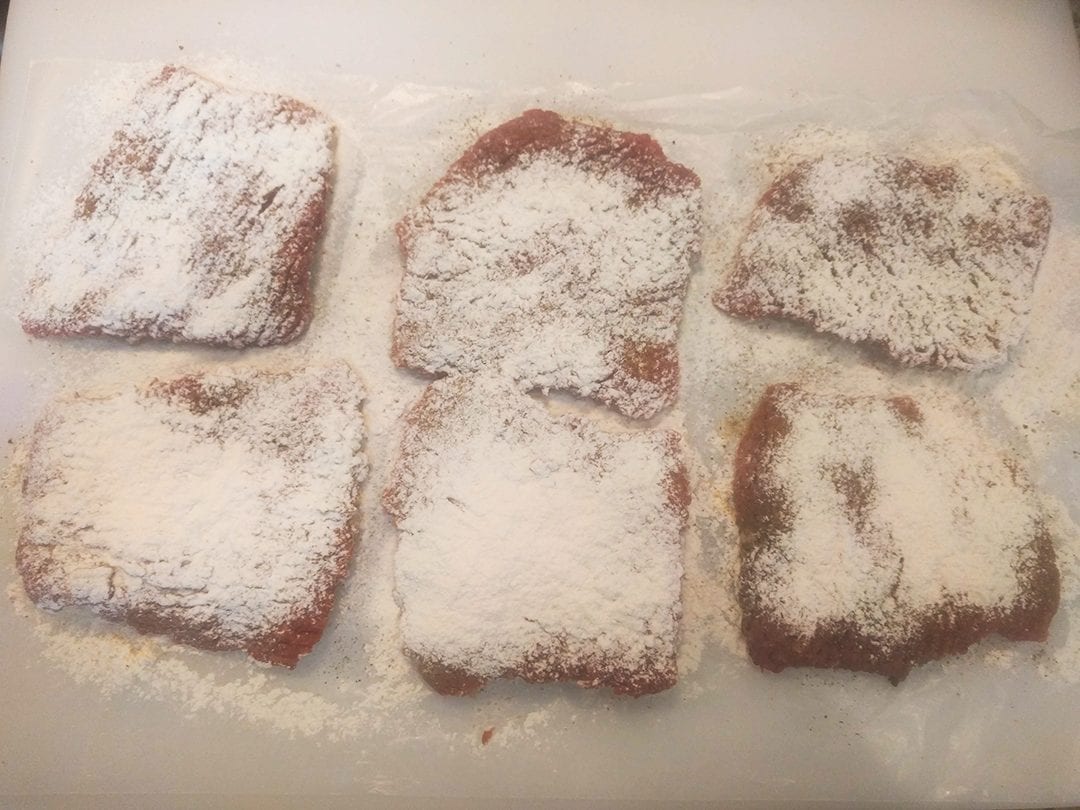
First, dry off the meat patties with a paper towel. Sprinkle with salt and pepper, and lightly sprinkle the patties with flour. The flour helps to form a nice crusty exterior as the meat browns.
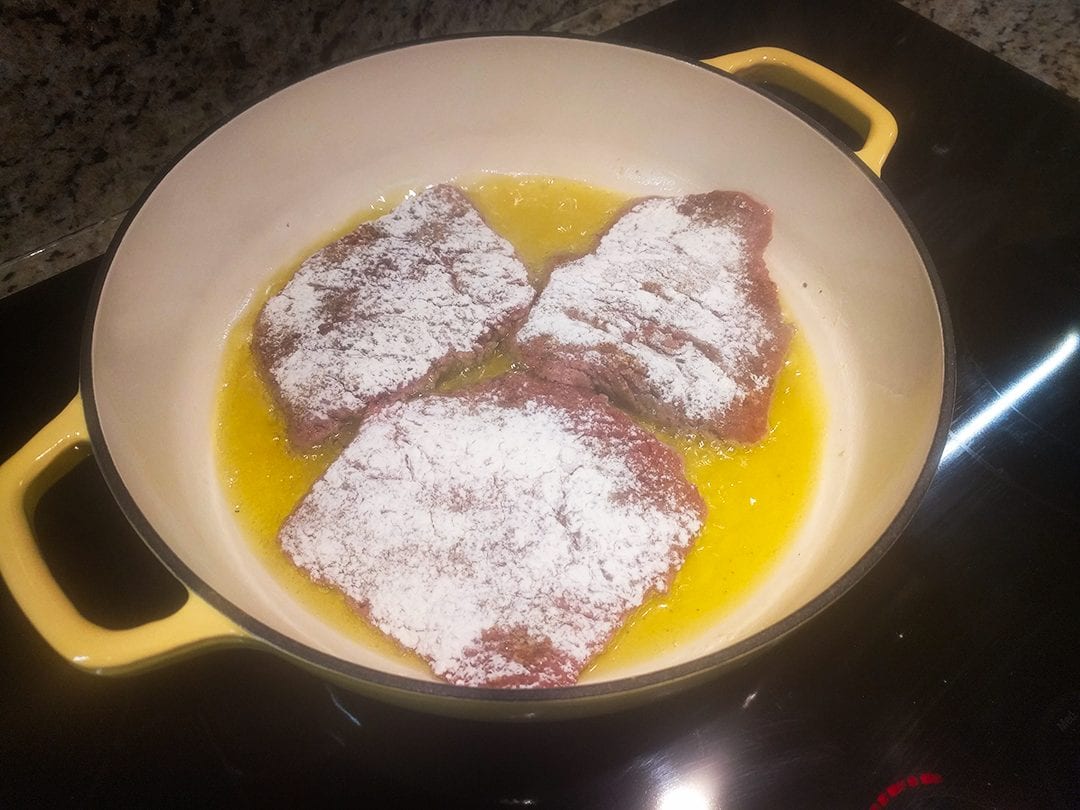
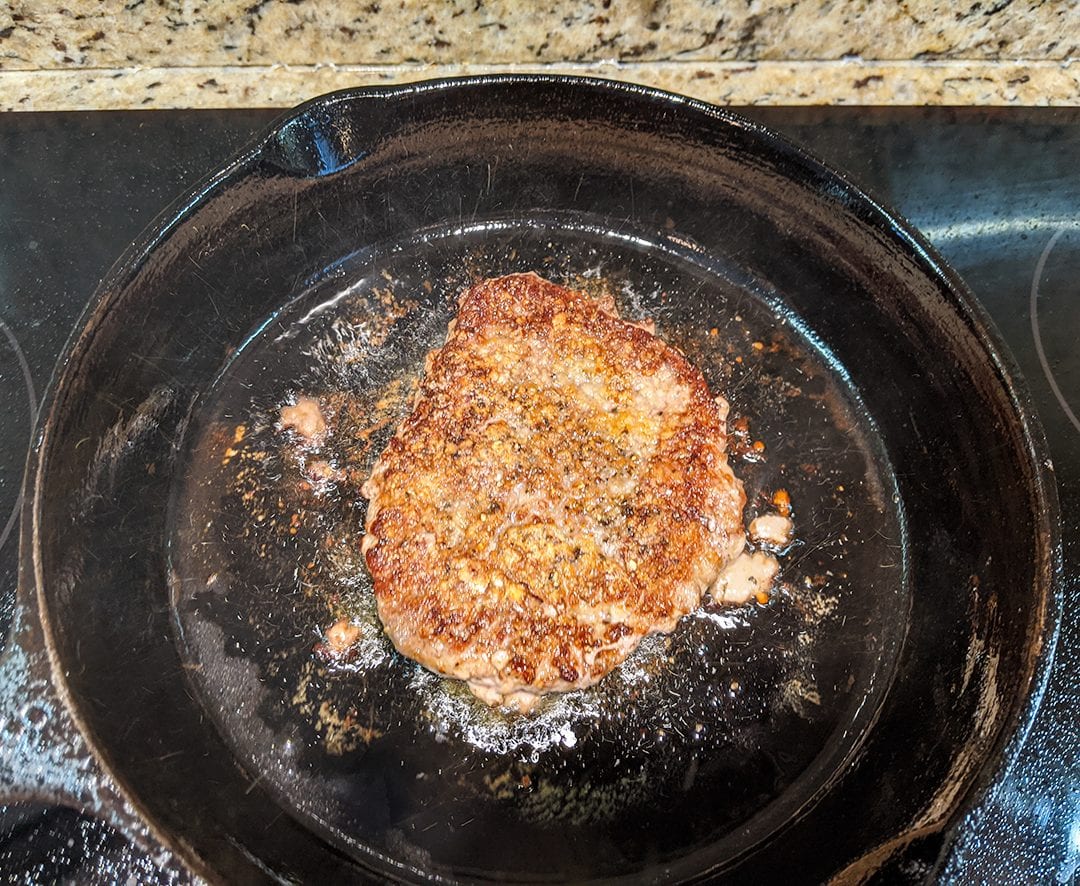
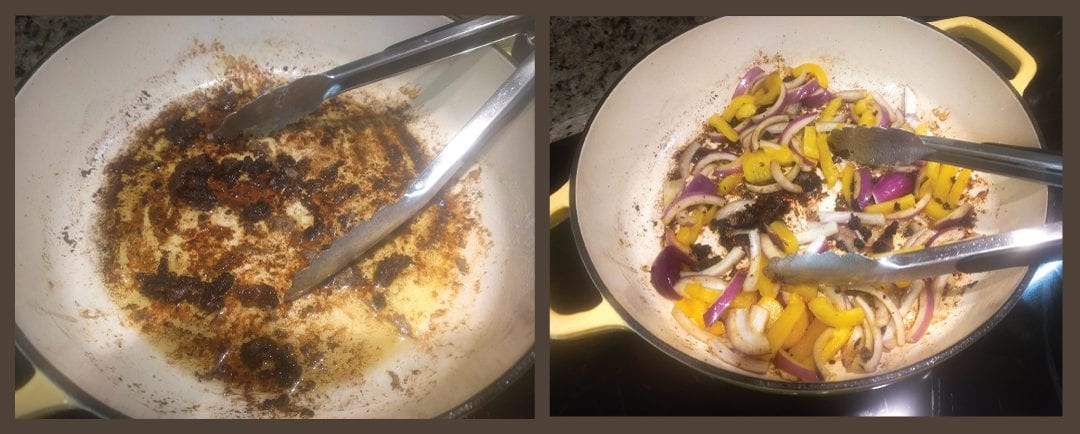
In a heavy 12″ skillet, heat 2 tablespoons of olive oil over medium-high heat. Once the oil is hot, add the meat patties and brown on both sides. Be sure not to crowd the pan – cook the meat in batches so the patties brown and don’t steam.
This is a picture from another cube steak meal. I like how the browned steak looks in this one. Definitely the desired goal. The meat should not be cooked through – simply nicely golden brown.
As the cube steaks are browned, I put them aside in the inverted pan lid. Meat juices will accumulate and you’ll want to add those back into the pan. Read on . . .
OK – now you have all kinds of tiny brown bits packed full of flavor in your skillet. Reduce the heat to medium and add one large sliced onion and one large sliced yellow, red, or green pepper along with 2-3 cloves of minced garlic. Season with a bit of salt and pepper and 1/4 teaspoon crushed red pepper. Saute the vegetables for 5 minutes, stirring occasionally to make sure they don’t stick and burn.
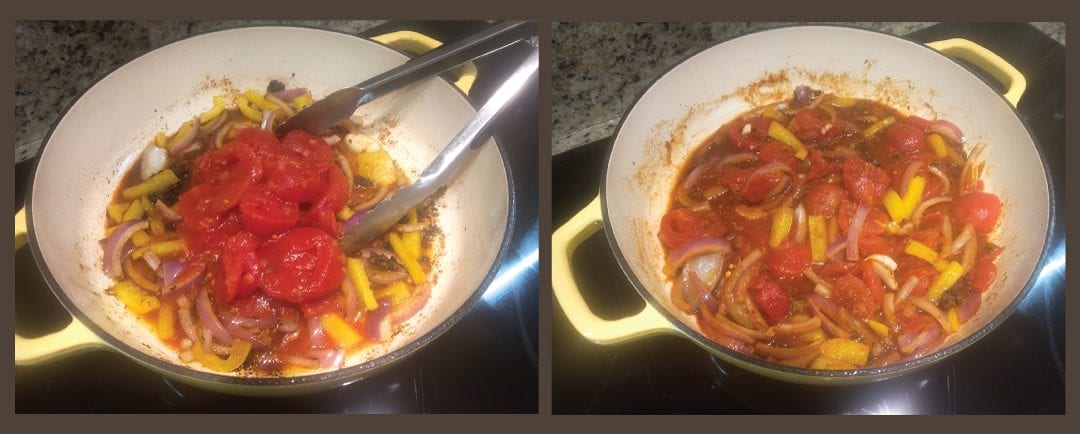
Add one 15oz can of stewed tomatoes and their juices. Add one beef bouillon cube and one cup of water OR one cup of reduced-sodium beef stock to the pan. And one teaspoon dried basil. Stir to distribute everything. Allow to simmer for 5-10 minutes or until the tomatoes soften.
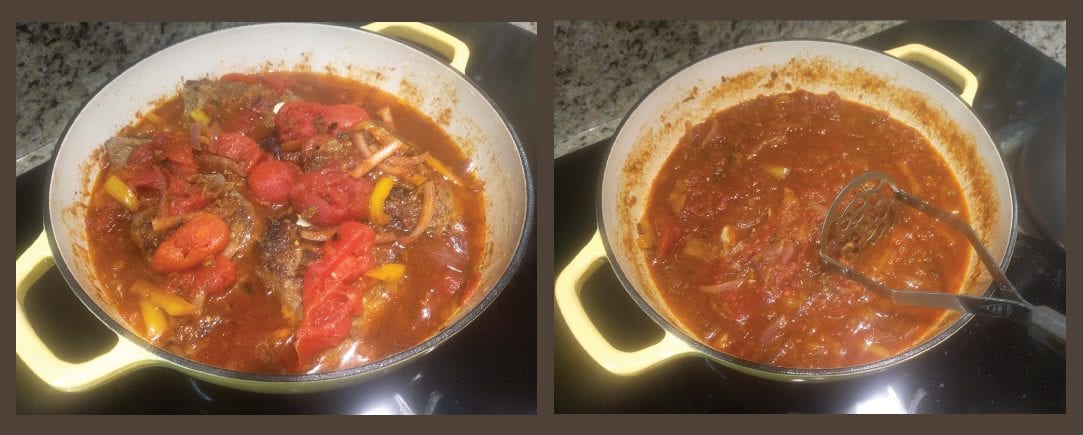
Return the browned cube steaks to the pan with the tomatoes and vegetables along with the accumulated meat juices. Ladle some of the pan juices and vegetables over the tops of the meat. Bring to a slow simmer. Cover the pan with a lid and continue to simmer for 30 minutes or so. Once cooking is done, I like to remove the meat to a platter and mash the pan juices and vegetables so it looks more like gravy. If the gravy is too thin, bring up the heat and cook a little longer until you get the right consistency. It shouldn’t take more than a couple of minutes.
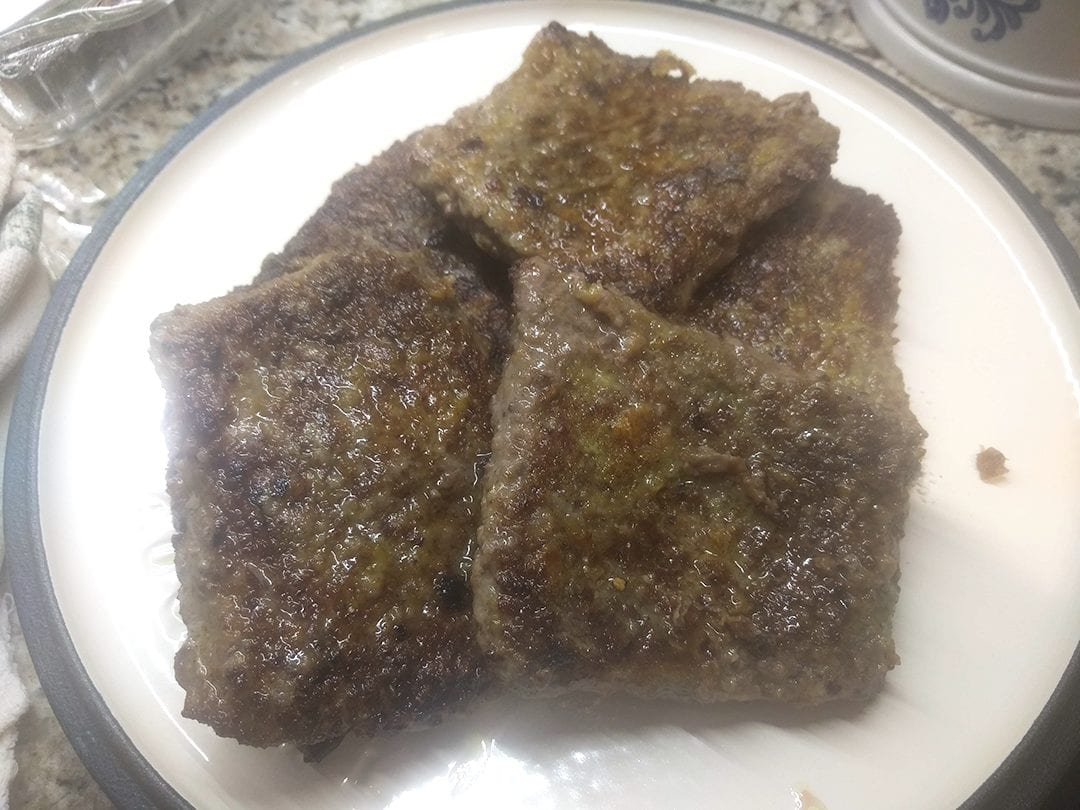
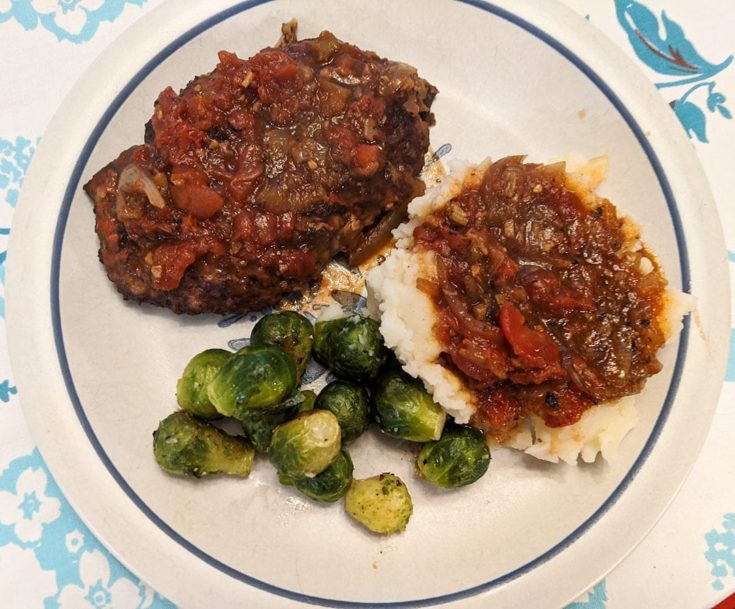
Your reward is revealed! My family loves this dish served with lots of mashed potatoes slathered with tomato gravy. But you could serve cooked rice or egg noodles.
I considered using a slow cooker. With as much prep cooking and only a final 30-minute simmer, I opted for the stovetop. However, you certainly could finish cooking in a slow cooker. I’d advise putting the browned meat patties in the bottom of the slow cooker, and then add the gravy ingredients over the cube steak. Probably 2 hours on high or 4 hours on low would work. Your gravy may be a little thinner, but there’s nothing wrong with that.
Here’s the recipe!
Yield: 4
Old Fashioned Beef Cube Steak with Tomato Gravy
Old Fashioned Cube Steak with Tomato Gravy is an old-timey dish inspired by Mom's roast beef recipe. I'm also paying homage to my Midwestern roots where hearty meals are a staple. A family favorite served with lots of mashed potatoes.
Prep Time30 minutes
Cook Time30 minutes
Total Time1 hour
Ingredients
2 pounds cube steak, four pieces
1 large onion, cut into slices
1 large yellow, red, or green pepper, cut into strips
2-3 cloves garlic, minced
1 15oz can stewed tomatoes
1 beef bouillon cube plus one cup water OR 1 cup reduced-sodium beef stock
2 Tablespoons olive oil
1/2 teaspoon crushed red pepper
1 teaspoon dried basil
Flour
Salt & Pepper
Instructions
Pat dry cube steaks with a paper towel. Sprinkle with salt & pepper on both sides. Dust with flour on both sides.
Add 2 Tablespoon olive oil to a 12" heavy-bottomed skillet. Bring to heat over medium-high heat.
Add cube steaks to the skillet, two at a time, and brown. As the meat browns, remove to a plate or to the skillet's inverted lid.
Once all the meat is browned, reduce skillet heat to medium. Add onion, sliced pepper, crushed red pepper and garlic. Stir and saute for 5 minutes.
Add stewed tomatoes, bouillon cube, and water OR beef stock, and dried basil. Bring to simmer and cook for 5-10 minutes until tomatoes are soft.
Return cube steaks to the skillet along with accumulated meat juices. Ladle the tomato/vegetable mixture over the meat. Reduce to slow simmer. Cover with lid. Cook for 30 minutes.
Remove meat to a platter. (Optional: Mash vegetables and gravy.) Pour tomato gravy over cube steak OR plate individually and ladle tomato gravy over meat.
Serve with plenty of mashed potatoes and any green vegetable.
Notes
For Slow Cooker: Place browned cube steaks in bottom. Pour tomatoes, vegetables, and pan juices over the meat. Cook on high for 2 hours or on low for 4 hours.


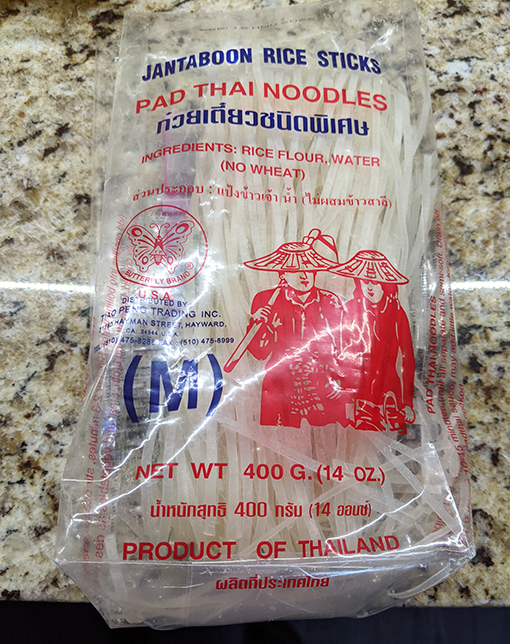 Before I dived into Tieghan’s recipe, I wanted to cook something simple with rice noodles first just to get the hang of preparing them and to test the texture. I hopped over to my favorite Asian market where they have the best noodle aisles. Not just one aisle, but two. Yeah, I was there for a while.
 Let’s talk a minute about cooking rice noodles.
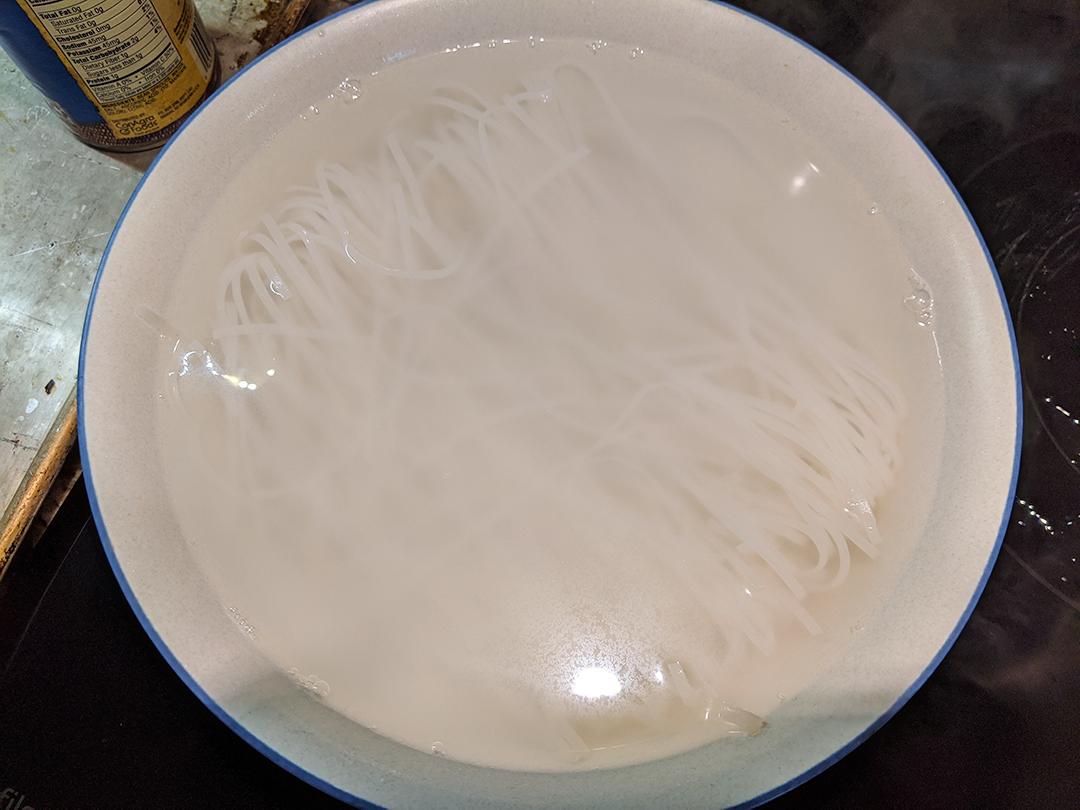


 A Word About Deep Frying