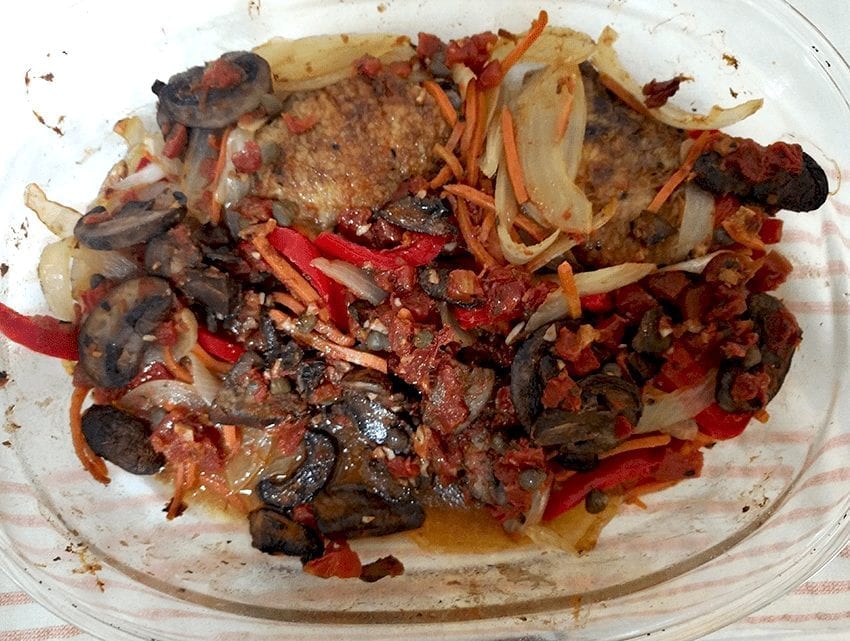
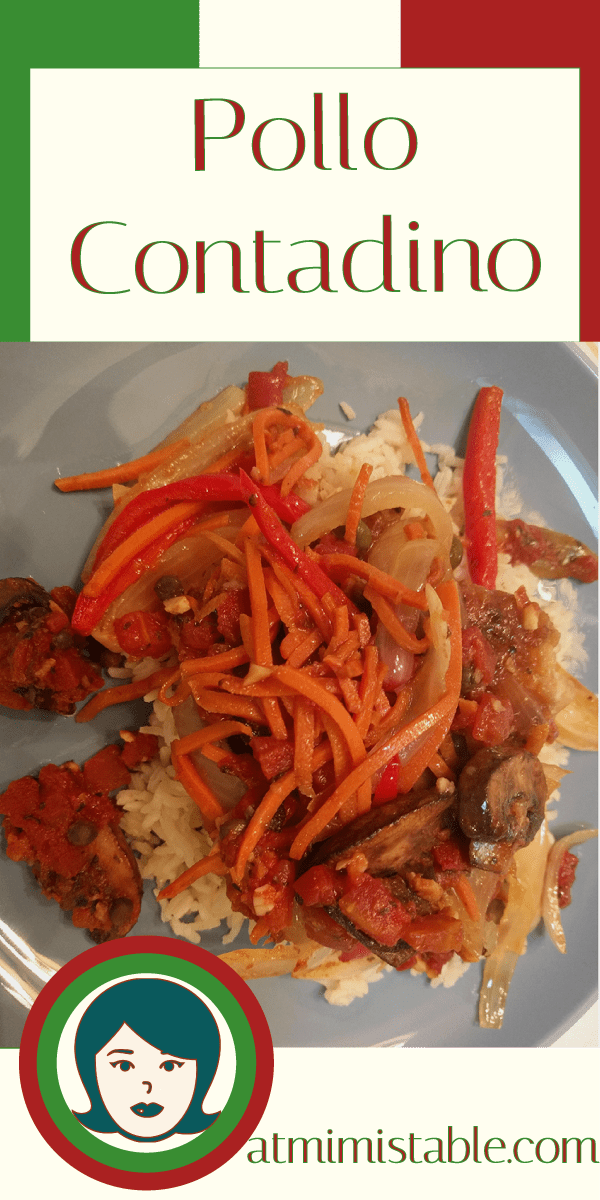
Pollo Contadino is an outstanding casserole of Italian comfort food. I’ve made this dish several times over many years. Each time I lift a forkful to my mouth, I wonder why I don’t make it more often. Such an arousing smell of tender, juicy chicken thighs roasted with onions, carrots, sweet red bell peppers, tomatoes, mushrooms, capers, and rosemary served with its juices over a fluffy bed of hot rice.
Yep, Pollo Contadino is a perfect meal for cozy cold weather days. You know those rainy cold days that make you want to curl up under a blanket to get all snuggly and warm? And if you want to smell the casserole cooking all day, put the ingredients in a crockpot and let it simmer until you can’t stand it anymore.
This recipe was published in “The Frugal Gourmet Cooks Italian” in 1993. I bought Jeff Smith’s cookbook a few weeks ago just for this recipe. ($6 used from Amazon). Money well spent. I can’t wait to sift through the pages for other Italian treats.
Here’s how it works
Pollo Contadino takes a little time to put together but is well worth the effort. I used bone-in, skin-on chicken thighs because we like dark meat and skin helps to keep the meat moist. Drumsticks would be a good substitute. But it can also be made with boneless, skinless chicken breasts if that’s what you prefer. There’s no hard and fast rule.
Don’t leave out any of the vegetables. They all play well together. And be sure to add the capers that add a nice vinegary taste and smell to the finished dish. I can’t imagine the casserole without capers!
The last time I made Pollo Contadino, I didn’t have rosemary in my spice pantry. So, I used a few shakes of pasta sprinkle which is a combination of rosemary, basil, parsley. It worked just fine!
Let’s make some, shall we?
Pollo Contadino, Italian Roasted Chicken Farmer Style
Tender and juicy chicken roasted with onions, carrots, tomatoes, and capers served over a bed of hot fluffy rice. Cibo di comodità - true Italian comfort food.
Author: The Frugal Gourmet, Jeff Smith
Recipe type: Main Dish
Cuisine: Italian
Serves: 4
Ingredients
4 large chicken thighs, skin-on, bone-in 1-1/2 pounds OR 4 boneless, skinless chicken breasts
½ cup all-purpose flour
½ cup extra virgin olive oil
2 medium carrots, peeled and julienned OR use 1 cup of julienned carrots from the store
1 - 2 large sweet red bell peppers, julienned
1 large yellow onion, peeled and julienned
2-3 cloves garlic, minced
6 large baby portobello mushrooms, cut into thick slices OR 1-8oz package of sliced mushrooms from the store
1-2 teaspoons capers
6 ripe plum tomatoes, diced, OR 1-15oz can petite diced tomatoes
1 Tablespoon fresh rosemary OR 1 teaspoon dried rosemary
¼ cup dry white wine
Instructions
Heat oven to 400F degrees.
Remove chicken pieces to paper towels and pat dry. Season lightly with salt and pepper.
Heat ¼ cup olive oil in a large skillet over medium-high heat.
Put flour in a medium-sized bowl. Dredge the chicken pieces one-at-a-time, shake off any excess flour and place in the oil in the skillet.
Brown the chicken on all sides. Remove to a 2-3 quart roasting pan, like Pyrex, a cast iron skillet, or an enameled cast iron pan or pot
Drain off the oil in the frying pan. Return to the stove. Add the remaining ¼ cup olive oil over medium-high heat.
Add the carrots and sautee for 3 minutes.
Add the red pepper and onion. Sautee until the onions are barely translucent.
Add the garlic, stir. Sautee just until you can smell garlic. Be sure not to let it burn.
Place the vegetables over the chicken in the roasting pan.
Return the frying pan to the stove. Over medium-high heat, add the mushrooms, capers and tomatoes, rosemary and wine. Bring to a simmer and cook gently for 5 minutes. Pour over the chicken and vegetables in the roasting pan.
Cover roasting pan with aluminum foil. Roast in the oven for 20 minutes.
Remove the foil and return to oven for 15 minutes.
Serve over fluffy hot cooked rice or spaghetti.
Notes
Pollo Contadino is a comfort food best served on colder days. You can also put ingredients, in order on the recipe, in a crockpot on low for 3-4 hours or high for 2-3 hours. You can use boneless, skinless chicken breasts, or drumsticks or any combination of chicken pieces.
Jeff Smith included 12 medium black Italian or Greek olives, and one green pepper and one red pepper to compliment the colors of the Italian flag. I changed it up just a wee bit.
3.5.3251
Here’s an image to PIN!
Copyright, At Mimi’s Table 2013-2018, All Rights Reserved
Along with cooler temperatures, brightly colored leaves, pumpkins, and Indian corn, football arrives.
Which is what prompted me to share this lovely lady cheerleader. Gee, do you remember saddle shoes? Catch the gingham lining of this gal’s skirt. Very classy.
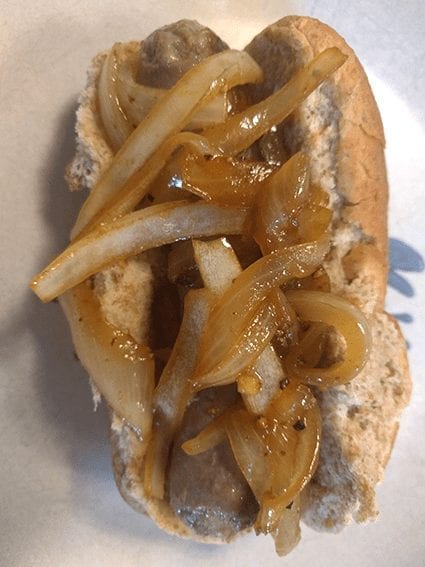
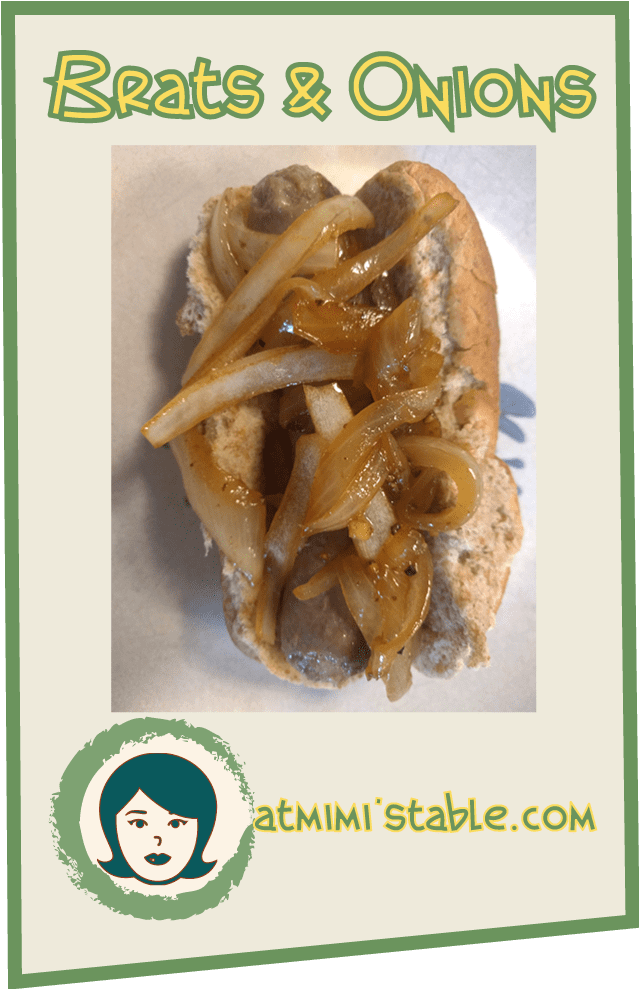
I don’t think it’s possible to watch your favorite team battle it out on the gridiron without Bratwurst & Onions. It is the quintessential tailgating sandwich. Richard and I love them. But at our homestead, there’s only two of us. We’re also past the tailgating phase of our lives. No reason to fire up the grill, so I make ours in a cast iron skillet.
Preparation is quick and belies the juicy, peppery deliciousness soon to be served. Carmelized onions, sauerkraut, mustard! Yes!!
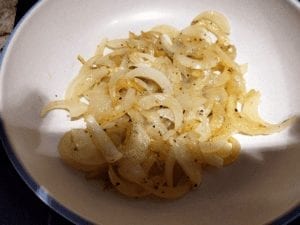
The first thing I do is carmelize a whole onion or two. Slice the onion in half, lay the cut side down on the cutting board, and slice into slivers – the opposite of cutting rings, or half rings in this case.
In a skillet over medium-high heat, add one Tablespoon unsalted butter and one Tablespoon olive oil. Add the onions. Sprinkle with a little salt, and let them saute.
Stir every once in a while with a wooden spoon to make sure they all become nicely browned.
Keep an eye on the skillet. You may have to turn the heat down a bit as the onions cook so they don’t burn.
Remove your perfectly browned onions to a bowl. Set aside while you fry up the brats.
Use the same skillet to cook up the sausages so they soak up the oniony goodness.
Cook over medium heat until brown. Flip them over and brown the other side. The brats are not cooked through at this point, so cover with a lid or a piece of foil and continue to cook for another 10 minutes or so. You might even flip them halfway through cooking to keep one side from getting overly brown.
And there you have it. So basic. So juicy and delicious. Put a brat in a bun. Top with cooked onions. And whatever else you want: sauerkraut, German-style mustard. But no ketchup – these are not hot dogs.
Here’s an image to Pin!
Copyright, At Mimi’s Table 2013-2018, All Rights Reserved
A Little Trip Through Southeastern Indiana in search of grits
A few weeks ago Richard and I rambled around southeastern Indiana through Batesville, Oldenburg, Metamora, and Rushville.
Oldenburg, also known as the “Village of Spires,” was settled in 1817 and is one of the oldest communities in the state. It’s a charming little town with a strong German immigrant history. All the streets signs are written in English and German. The city-center is beautifully groomed. Residents keep their yards immaculate; a clear demonstration of community pride. There are some truly spectacular churches in this tiny town of fewer than 600 people.
Then we traveled on State Road 229 to another historic landmark, Metamora, settled in 1838. Metamora is home to the Whitewater Canal State Historic Site. The Duck Creek Aqueduct is believed to be the only wooden covered bridge aqueduct still in operation in the United States. Metamora hosts a working grist mill, where is I bought the grits for Mimi’s Shrimp and Cheesy Grits. It is a nice little part of rural Indiana. The drive along SR 229 was awesome. I wanted to share our little adventure with you. A very cool trip.
All of this has little to do with the recipe that follows. Sometimes you just have to know where your food comes from. Anyway, the Metamora miller told us he’d ground the grits earlier that morning. Wow! I was sold. They sell white and yellow cornmeal, and white corn grits, too. I prefer yellow, so that’s what I bought. Below is a short video about the Metamora Grist Mill from the Indiana State Museum in case you’re interested. What impressed me was all the machinery needed to mill dried corn. A complex series of belts that power the millstones, and a waterwheel to supply power. It’s not a speedy process which made me appreciate my little bag of yellow grits all the more.
Let’s talk about food!
I’ve blogged about my new found food love, grits. Growing up in Northern Indiana and around few southern cooks, the sound of them simply did not appeal to me. Once or twice while traveling south of the Mason-Dixon Line, I tried some at breakfast. Ugh – no thanks – pasty white looking with no flavor.
I broadened my pallet a year or so ago when I walked on the wildside and paired a recipe for cheesy grits with a leftover pot roast for dinner one night.
Grits are not polenta. Grits are not cornmeal mush. Grits are in a beloved class of their own. Creamy, buttery, cheesy, sweet or savory; whatever you wish. And grits are gluten-free! But it’s the butter, cream, and cheese that will kill you. Well, you only live once. Right?
Once the grits are done, this recipe goes pretty quick. And I would recommend cooking the grits and keep them warm before cooking the shrimp. I used very simple ingredients to prepare the shrimp. Butter, 2-3 cloves of minced garlic, lemon, and fresh chopped parsley.
I lined a half baking sheet pan with paper toweling. Shelled and deveined one pound of raw shrimp (21-25 count). Rinsed the shrimp in a collander and placed them on a paper towel lined baking sheet. Top with another sheet of paper toweling and gently pat the shrimp dry. You want the shrimp at room temperature and as dry as possible so they saute quickly and become lightly browned in a hot skillet. If the shrimp is not patted dry, it will steam, and that’s not what you want for a perfect shrimpy bite.
Heat a 12″ skillet to medium-high heat. (I use a cast iron skillet.) Spray the shrimp with cooking spray and season with salt and pepper. If you like a little heat, you can sprinkle some crushed red dried pepper over the shrimp. Once in the skillet, cook shrimp 1-2 minutes per side. Just enough heat so they’re pink and beginning to slightly curl. Remove shrimp to a plate and loosley cover with foil. Lower the temperature to medium. I usually take my skillet completely off the heat and let it cool a bit before putting back on the burner, so the olive oil and butter don’t brown because the skillet is too hot.
Put the skillet on burner over medium heat. Add 2 Tablespoons olive oil and 1 Tablespoon butter. Add minced garlic and saute 30 seconds to a minute until you can smell the garlic. Add 1/2 cup dry white wine and juice of one lemon. Allow the sauce to simmer until slightly reduced. Add one more tablsepoon of butter and remove the skillet from the heat.
Ladle the grits into four individual serving bowls. Top with shrimp. Spoon sauce over the shrimp and sprinkle with lightly chopped fresh Italian parsley. Have some freshly grated Parmesan cheese ready, too, in case you like a little extra cheesy flavor. And maybe some hot sauce – tobasco? I know. Do Parm and tobasco go together? Why not??
Oh, my mouth is watering! Shall we cook up a batch?
Full bodied, creamy, cheesy with the just the perfect garlicky, shrimpy bite.
Author: Mimi
Recipe type: Main Dish
Cuisine: American
Serves: 4 servings
Ingredients
For the Grits:
¾ cup grits You can substitute instant grits, but the texture will be different. Regular grits have a better tooth, I think. And regular grits don't take that much longer to prepare, based on my experience for this recipe.
1 Tablespoons unsalted butter
1 cup chicken broth
1 cup half-n-half or whole milk
1 cup water
¼ - ½ cup freshly grated Parmesan cheese
Salt and Pepper to taste
For the Shrimp:
1 pound raw shrimp, 21-25 count, peeled and deveined, rinsed and patted dry
2 Tablespoons olive oil
1 Tablespoon unsalted butter
2-3 cloves garlic, minced
½ cup dry white wine
½-1 lemon, juiced
2 Tablespoons fresh Italian parsley, roughly chopped
Instructions
For the Grits:
In a heavy saucepan, add chicken broth, half-n-half, and water. Bring liquid to a boil over medium-high heat. As the liquid begins to boil, slowly whisk in grits, 1 teaspoon salt, and ½ teaspoon black pepper. Reduce heat to medium-low. Cook and stir occasionally until grits are thickened. Remove grits from heat and add Parmesan cheese and 1 Tablespoon butter. Stir to incorporate. Put a lid on the pan to keep warm while preparing shrimp.
For the Shrimp:
Peel and devein shrimp. Using a colander, rinse under cool running water. Remove shrimp to a baking sheet lined with paper toweling. Cover with a second sheet of paper toweling. Pat dry.
Set shrimp aside while preparing grits.
In a 3-quart heavy saucepan, bring chicken stock, half-n-half, and water to a gentle boil. Stir in the grits. Or follow cooking directions for the grits if you use instant grits.
Reduce heat to medium-low. Cook stirring occasionally until thickened.
Remove from heat. Add Parmesan cheese and 1 Tablespoon unsalted butter.
Check for seasoning adding salt and/or pepper to taste.
Put a lid on the saucepan and keep grits warm off heat while preparing shrimp.
Spray shrimp with cooking spray. Season with salt & pepper. May sprinkle with dried crushed red pepper for additional heat, if desired.
Heat a 12" cast iron skillet over medium-high heat. Put 1 Tablespoon olive oil and 1 Tablespoon butter into the skillet. When the oil is hot, add shrimp in a single layer. Don't overcrowd the shrimp - you may have to cook shrimp in 2 batches.
Cook shrimp 1-2 minutes per side until they're slightly pink and beginning to curl and lightly brown. Remove shrimp to a plate.
In the skillet, add 1 Tablespoon butter. Add minced garlic and saute for approximately one minute until you can smell it.
Add white wine and lemon juice. Simmer the sauce until slightly thickened.
To Serve:
Divide grits between 4 large individual bowls.
Top with cooked shrimp. Spoon garlic/lemon sauce over shrimp. Sprinkle with roughly chopped fresh Italian parsley.
Notes
Serve with extra grated Parmesan cheese and/or a few dollops of Tobasco. Yum!
It doesn’t get any easier than this. Lemon Pasta is inexpensive to make, easy and quick to prepare, and is a delicious lemony, cheesy pasta delight. Lemon Pasta is a perfect main dish or as a side dish served alongside any lightly grilled protein.
I discovered this recipe watching Hoda and Kathie Lee while I was getting a mani/pedi. Devine intervention. I love lemon, in whatever form it comes. Lemon has such a pleasing and uplifting scent. Any lemon carcasses are put through the garbage disposal for a lingering, fresh-smelling aroma. Take a look at a lemon-sour cherry coffee cake I love to bake: Macrina Bakery Lemon Sour Cherry Coffee Cake. Seriously delicious.
The ladies were cooking up dishes made with lemons and the Alberti twins, John & Tony. While downing shots of Limoncello between bites of pasta and Limoncello cake. Looked like a very happy show! Then, Huda and Kathie Lee always have a happy show.
Anyway, I can’t take credit for Lemon Pasta. John Alberti gets all the credit. (As well as the photo.) It’s such an easy and basic recipe. I’m certain every Italian nonna around the world has made something very similar, if not the exact recipe. Don’t leave out the fresh basil. In addition to lemon, I love the flavor and smell of basil – a refreshing and sensory herb. A girlfriend of mine sent me home with a hunk from her garden that I used here. Thanks, Cindy!
I prepared half the recipe for us served with a leftover salmon filet and a big green salad. No garlic bread, unless you love your carbs. There are plenty of carbs in the pasta. (I love carbs, but we need to watch our dietary intake. Garlic bread is now on our “I have to have now it or I’ll die” list.) Or it can be made with low-carb pasta or pasta made from quinoa or whole wheat. There are so many options available now.
Get out the olive oil, lemon juice and zest, basil, and linguine. Buon appetito!
It doesn't get any easier than this. Lemon Pasta is inexpensive to make, easy and quick to prepare, and is a delicious lemony, cheesy pasta delight. Lemon Pasta is a perfect main dish with a big green salad, or as a side dish served alongside any lightly grilled protein.
Author: John Alberti
Recipe type: Main
Cuisine: Italian
Serves: 4-6 servings
Ingredients
1 pound linguini
⅔ cup extra-virgin olive oil
½ cup freshly grated Parmigiano Reggiano cheese
½ cup freshly squeezed lemon juice
1 Tablespoon lemon zest
⅓ cup chopped fresh basil, plus more for garnish
Salt & Pepper as needed
Instructions
Bring a large pot of salted water to a boil. Cook linguini according to package directions to slightly less than "al dente."
While the pasta is cooking, whisk the olive oil, lemon juice, lemon zest, and basil in a large saute pan. Heat over medium heat.
With tongs, lift the cooked pasta out of the pot and into the saute pan with the lemon sauce. Use tongs to integrate the sauce and pasta. Remove the saute pan from the heat.
Add grated Parmigiano Reggiano. Lift with tongs until incorporated. Add the fresh basil, and toss again to incorporate.
Serve with extra grated Parmigiano Reggiano and fresh basil.
Notes
Lemon Pasta may be served as a main dish with a big green salad, or as a side dish for lightly grilled fish or meat. Substitute any pasta alternative for linguine: quinoa, bean, gluten-free, whole wheat. Cook according to package directions.
3.5.3251
Copyright, At Mimi’s Table 2013-2018, All Rights Reserved
Simply put: This is one of the most delicious taco recipes ever! Jessica and I made this for “Cinco de Mayo.” Marinated and grilled shrimp offers up the perfect shrimpy bite. And I mean PERFECT! These shrimp tacos are an amazing combination of flavors and textures. They’re refreshing, too. Do I sound excited? Oh, my mouth is watering!
And a Negra Modelo. Doesn’t get any better. Truly! My son-in-law introduced me to Negra Modelo a long time ago when he and my daughter went to a late lunch. So good and flavorful – it’s the perfect beverage with good Mexican food.
When Richard and I vacationed in Mexico a few years ago, I ordered Negra Modelo. The beer was delivered in a tumbler-sized glass filled with ice. Lime juice freshly squeezed over the ice, and a healthy portion or lime juice. The Modelo was served alongside to pour over the ice and lime juice. Oh, so refreshing!
The cooked shrimp are placed in warmed corn tortillas, doubled, so two tortillas for each ta top. Then a layer of finely shredded cabbage for a nice crunch topped with this amazing sauce from Indian chef Aarti Sequeira at the Food Network. I didn’t have banana peppers, but if you like a tangy bite with a little heat, I’d put a few of those on, too, before digging in.
In fact, this is Arati’s Fish Taco recipe. I substituted shrimp and added the guac. I’ve made this dish with fish, too, and it’s equally delicious. Thanks, Arati!
Zachy Endorsed
If you try your hand at Shrimp Tacos, I’d love to know what you think!
These Shrimp Tacos are a delicious bite of heaven. Quick and satisfying. Serve with a chilled Negra Modelo for a perfect meal.
Author: Arati Sequeira, Food Network
Cuisine: Mexican
Serves: 3-4 servings
Ingredients
For The Shrimp
2 lbs raw large shrimp (21-25/pound count), peeled and deveined
¼ cup extra-virgin olive oil
2 teaspoons ground coriander
2 teaspoons ancho chile powder
Pinch cinnamon
Kosher salt and freshly ground black pepper
For The Sauce
½ cup mayonnaise
1 clove garlic, minced
2 teaspoons ground cumin
1 teaspoon ancho chili powder
1 lime, juiced, plus extra if necessary
Kosher salt and pepper
At Service
24-6" corn tortillas, wrapped in foil and warmed in the oven at 225 degrees for 10-15 minutes
Finely shredded cabbage or angel hair coleslaw mix
Pickled banana peppers
1-2 fresh limes cut into wedges
Instructions
Rinse shrimp in a colander under cool running water. Line a baking sheet with a double thickness of paper towels. Put the shrimp on top and cover with another layer of double paper toweling. Pat dry.
In a large bowl, mix the marinade ingredients. Add shrimp and toss until it's well coated. Cover with plastic wrap and set aside for 30 minutes.
In a small bowl, mix the sauce ingredients. Cover with plastic wrap and chill in the refrigerator to let the flavors blend.
If you're serving homemade guacamole, now's the time to put that together. Keep in the refrigerator until ready to serve.
Divide tortillas into two stacks. Wrap tortillas with aluminum foil and set inside a 225F degree oven to warm.
On the stove, heat a grill pan over medium-high heat. Begin to grill the shrimp in batches making sure not to overcrowd the pan. Grill for two minutes on each side, or until the shrimp turn pink. Be sure not to overcook the shrimp, because they will become tough.
As the shrimp cook, remove them to a bowl covered with aluminum foil.
To Serve
Set out warm tortillas, cooked shrimp, shredded cabbage, guacamole, sauce, and banana peppers buffet-style. Let everyone assemble their own tacos with whatever they like.
Notes
Shrimp Tacos may be served with refried beans, Mexican rice, or a salad. I've never cooked seafood on an outdoor grill, so I can't comment, but they certainly could be grilled. Enjoy!


 The first thing I do is carmelize a whole onion or two. Slice the onion in half, lay the cut side down on the cutting board, and slice into slivers – the opposite of cutting rings, or half rings in this case.
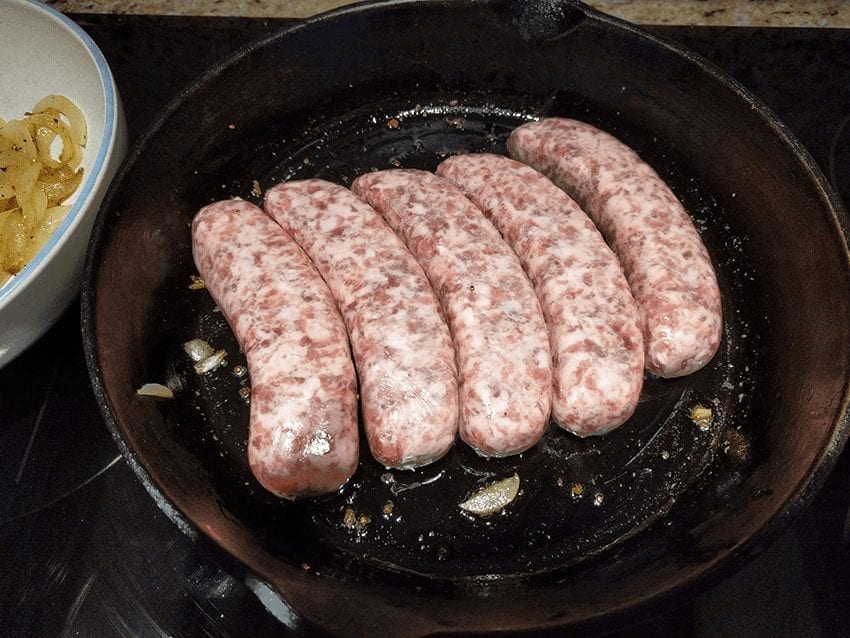


 Then we traveled on State Road 229 to another historic landmark, Metamora, settled in 1838. Metamora is home to the Whitewater Canal State Historic Site. The Duck Creek Aqueduct is believed to be the only wooden covered bridge aqueduct still in operation in the United States. Metamora hosts a working grist mill, where is I bought the grits for Mimi’s Shrimp and Cheesy Grits. It is a nice little part of rural Indiana. The drive along SR 229 was awesome. I wanted to share our little adventure with you. A very cool trip.
 I’ve blogged about my new found food love, grits. Growing up in Northern Indiana and around few southern cooks, the sound of them simply did not appeal to me. Once or twice while traveling south of the Mason-Dixon Line, I tried some at breakfast. Ugh – no thanks – pasty white looking with no flavor.

 Garlic bread is now on our “I have to have now it or I’ll die” list.) Or it can be made with low-carb pasta or pasta made from quinoa or whole wheat. There are so many options available now.


