Cauliflower Cake with Pecorino and Basil is one fabulous side dish recipe. I found it while browsing one of my favorite Italian food blogs, Ciao Chow Bambina from ANNIE SAGEER. Annie’s blog is an excellent source for classic and new Italian recipes, and her photography makes my mouth water. I always leave inspired after I’ve “window shopped” her blog. If you want to learn to make homemade pasta, her tutorial is excellent. Annie makes it look so easy! I’ve tried her Simple Barilotti with Peas, Ham and Cream to rave reviews – it’s a simple, quick, that falls into the “comfort food” category. Lemon Zeppole with Homemade Whipped Cream, a sweet little Italian doughnut, is definitely on my bucket list.
The other night, Richard and I decided to grill a steak for dinner. Any kind of potatoes and salad are always excellent side choices, but I wanted to serve something different. A new side for us to try. We loved it! The cauliflower cake comes together quickly. And it truly has the density of a cake! It slices into wedges like a dream. Because it’s just me and Richard, I heated some up in the microwave the next day for lunch – out of this world!
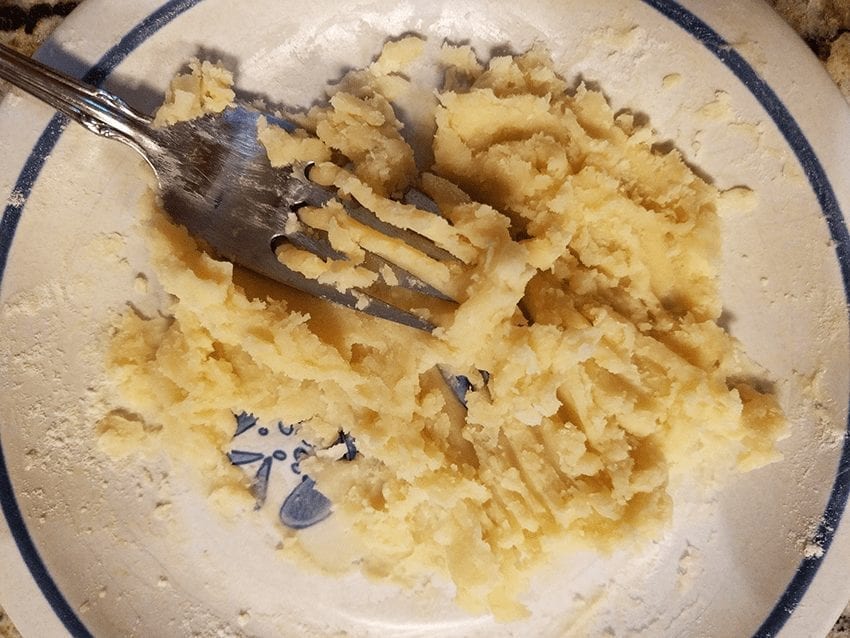
And it’s SO pretty! I followed Anne’s instructions to butter the inside of a springform pan and sprinkle a mixture of black and white sesame seeds along the inside of the pan. I’m not sure the sesame seeds added much to the taste, but they added a nice visual. Pecorino Romano cheese is the perfect ingredient for the cauliflower cake – it compliments the vegetable and eggs so nicely. Pecorino has a stronger flavor than parmesan, or you might use a combination of both kinds of cheese if you like that idea. Save some extra grated cheese to sprinkle on top of each slice when you serve.
Here’s a little tip. If you have frozen packages of cauliflower, you can use those instead – you’ll probably need two to substitute for the medium-sized head called for in the recipe. Or you might use cauliflower rice or packaged raw florets from your grocery store’s produce section. I also used an 8″ high-sided springform pan. This cake has a nice rise.
Yield: 6-8
Cauliflower Cake with Pecorino and Basil
This is a fabulous, quick and easy side dish. Serve Cauliflower Cake with Pecorino and Basil as a side dish with any protein or on it's own with a salad. Slices are fabulous warmed in the microwave the next day for lunch.
Prep Time30 minutes
Cook Time45 minutes
Total Time1 hour15 minutes
Ingredients
I medium cauliflower, outer leaves removed and broken into florets
1 medium red onion, 1/3 into thin slices, the rest diced
5 Tablespoons olive oil
1/2 teaspoon dried rosemary, chopped
6 eggs
1 cup all-purpose flour
1 1/2 teaspoon baking powder
1 1/2 cups Pecorino Romano cheese, grated
2-3 teaspoons dried sweet basil OR 1/2 cup fresh basil, chopped
3 Tablespoons butter, melted
1 Tablespoon white sesame seeds
1 Tablespoon black sesame seeds
Salt & Ground Pepper
Instructions
Preheat oven to 400F degrees.
Brush the sides and bottom of an 8" springform pan with melted butter. Place an 8" circle of parchment paper in the bottom and sprinkle the sides with the white & black sesame seed mixture. Set aside.
Place cauliflower in a medium saucepan. Add 1/2 cup of water. Bring the water to a boil. Cover with a lid. Reduce heat to simmer and cook for 15 minutes until the florets are soft. Drain in a colander. Set aside.
In a medium-sized skillet over medium-high heat, add olive oil and chopped red onion. Add rosemary. Reduce heat, stir and saute for 15 minutes until the onion is soft but not burned. Set aside to cool.
Add the cooled onion mixture to a medium-sized bowl. Add eggs and whisk well until combined. Add 1 1/4 cups of grated cheese, flour, baking powder, basil, salt and pepper to the egg mixture. Stir to combine.
Slightly mash the cooked and cooled cauliflower florets. Add to the egg mixture along with the basil.. Gently stir to combine.
Pour the mixture into prepared pan. Top with sliced red onions.
Bake for 40-45 minutes until a knife inserted in the center comes out clean.
Remove from oven and allow to cool for 15 minutes.
Cut into wedges and serve sprinkled with grated Pecorino Romano.
YUM!
Notes
Cauliflower Cake with Pecorino and Basil is a fantastic leftover warmed in the microwave. Served with a big salad and some crusty bread for another meal. It's a great dish to take for lunch the next day.
Feel free to substitute frozen cauliflower florets - you'll need 2-12oz packages - follow package directions to prepare for the recipe. Or sub fresh florets or cauliflower rice from the produce department.
If you love squash and chili, you’re going to love this recipe from the Half Baked Harvest blog. Tieghan Gerard has done it again!
Cincinnati Chili Stuffed Spaghetti Squash is best served on a beautiful fall or winter day, whether it’s cool, downright cold, rainy, or snowy, Tieghan’s dish is only one of her phenomenal comfort food offerings. Sweet and stringy spaghetti squash topped with a mild chili flavored with cinnamon and allspice is a yummy pairing of flavors. Tieghan has several recipes where she uses cooked spaghetti squash as the vessel for a wide variety of cheesy and meaty toppings. Like this one for Spanakopita Stuffed Spaghetti Squash. You must check out her blog.
I started cooking spaghetti squash several years ago. I like that it’s not pasta. It has a slightly sweet flavor with a stringy bite. Most times I baked it, scraped the beautiful flesh into a serving bowl, tossed with butter, salt, pepper, and a little Parmesan cheese, and served it as a side dish. But I like the idea of serving the squash strands in their skins, little boats, topped with great stuff. I’m serving this more and more as I’m looking for lower-calorie meals. Yeah, there’s meat and cheese and stuff, but count the squash as a low-calorie alternative to pasta, and you won’t feel guilty at all about the calorie-filled toppings. And think about carbs – there are practically no carbs! Spaghetti squash is gluten-free! Hail, hail to the lovely spaghetti squash!
Spaghetti squash is the perfect side or main for children and grandchildren. (Heck, I think it’s fun!) Wouldn’t you love to watch them drag their forks across the flesh and watch the magic happen? It’s fun! Besides, spaghetti squash is filled with vitamin C, vitamin B6, niacin, potassium, manganese, and even some calcium. There are only 42 calories per cup. Seriously, spaghetti squash is a nutritional no-brainer!
Spaghetti squash is also very easy to grow. I planted a couple of plants in my Billings garden one year and had wheelbarrows full to share with neighbors. If you have garden space and enthusiastic friends, be sure to include a plant in the spring.
Are you curious? Are you hopeful? Are you HUNGRY??
Make Cincinnati Chili – OH, Yes!
Put together ingredients for Cincinnati chili. Skyline Chili in Cincinnati is a food icon and this chili recipe pays homage to that recipe, perfectly done. Yes, it should simmer for 3 hours, stovetop or CrockPot. I made the full chili recipe, served half, and froze the other half for Coney dogs or traditionally served over spaghetti with lots of cheese on top. I’ve visited Skyline Chili in Cincinnati. Eaten their Coney’s – two of the cutest little hot dogs in buns topped with lots of chili, chopped onion, and tons of finely shredded cheddar cheese. I’ve ordered their chili over spaghetti topped with lots of cheddar cheese. This stuff is addicting. Tieghan’s mother’s recipe is spot on!
Make the chili with ground turkey or ground chicken instead of ground beef. Add a can of drained and rinsed pinto beans or light kidney beans in place of or along with the ground meat, if that’s the way you roll.
When I pick spaghetti squash, I go big or go home. I made this recipe with one large squash. Richard & I ate half for dinner and had leftovers the next night. It’s the perfect dish served for 2 people with enthusiastic appetites.
Bake Your Spaghetti Squash
Cut the squash in half and remove seeds. Place the halves on a parchment-lined baking sheet. Brush the inside lightly with olive and sprinkle salt and pepper. Turn the halves over and repeat. Bake skin side up in a 350°F oven for 45-50 minutes. Remove and allow to slightly cool.
OK – I hear you. “Mimi, 3 hours for chili and 1 hour to bake the squash? Are you nuts?” Yes, I am but it’s so worth it!
Return to oven/broiler to melt the cheese. I chose the broiler.
I need to pay more attention to showing my dishes at serving. I’m just so excited about eating that I don’t pay too much attention to photography once dinner is ready and I’m hungry! HA! You can serve with sour cream, extra cheese, mashed avocado, salsa.
Cincinnati Chili Stuffed Spaghetti Squash is best served on a beautiful fall or winter day, whether it's cool, downright cold, rainy, or snowy, Tieghan's dish is only one of her phenomenal comfort food offerings. Sweet and stringy spaghetti squash topped with a mild chili flavored with cinnamon is a yummy pairing of flavors. Tieghan has several recipes where she uses cooked spaghetti squash as the vessel for a wide variety of cheesy and meaty toppings. Like this one for Spanakopita Stuffed Spaghetti Squash. You must check out her blog.
1 Tablespoon unsweetened cocoa powder, dark or regular
2 teaspoons cumin
1½ teaspoon allspice
1½ teaspoon Kosher salt
1½ teaspoon cinnamon
1 teaspoon cayenne
½ teaspoon garlic powder, not garlic salt
2 cups chicken broth
1-28oz can crushed tomatoes
2-8oz cans tomato paste
1½ teaspoons vinegar (I used cider vinegar)
1 Tablespoon Worchestershire sauce
2 bay leaves
2 small or 4 large spaghetti squash
Olive Oil
Salt & Pepper
2-3 cups shredded sharp cheddar cheese
Instructions
Set a large heavy bottom soup pot over medium heat. Add olive oil then onion and cook for 5 minutes.
Add the ground meat to the pot, breaking it up with a spatula as it browns.
Add the next nine ingredients. Stir and briefly cook until the spices become fragrant.
Add chicken broth, tomatoes, tomato paste, vinegar, Worchestershire sauce and bay leaves.
Stir and simmer over low heat or in a CrockPot for at least 3 hours.
About an hour before you're ready to eat, heat the oven to 350F.
Cut the squash in half, remove the seeds, and set the ovals flesh side up on a parchment lined baking sheet.
Brush the inside with olive oil. Sprinkle with salt and pepper.
Turn the halves over, skin side up, and repeat.
Bake for 45-50 minutes. If your squash is small, 30-40 minutes.
When done, flip the squash over into a shallow bowl and begin to scrap the insides with a fork to reveal the lovely squash strands.
Ladle chili over the squash inside the cavity. Liberally sprinkle with shredded cheddar cheese.
Place under the broiler for 5-7 minutes until the cheese is melted and slightly browned.
Notes
Cincinnati-Style chili is mild and has a slightly sweet flavor from the cinnamon and allspice in the recipe. Feel free to serve with your favorite chili toppings - sour cream, mashed avocado, extra cheese, crackers, hot sauce. You can use cans of drained and rinsed pinto or light red kidney beans in addition to or to replace part or all the ground meat.
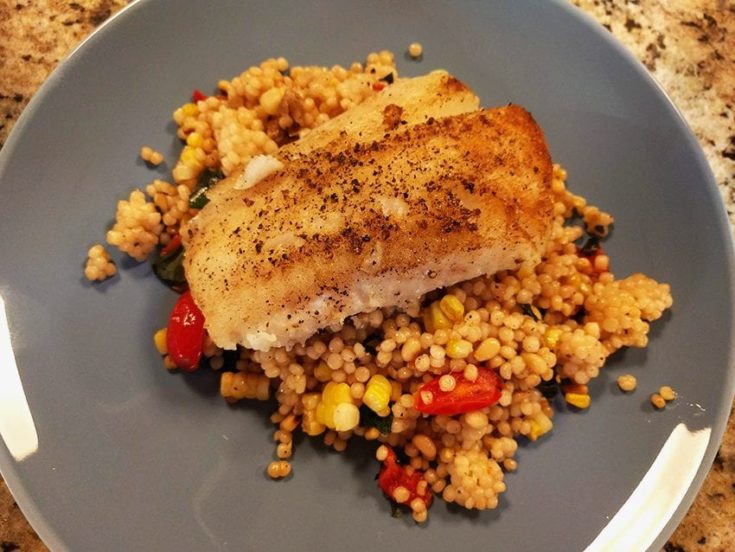
Bursting with fresh flavors from a summer garden, Pan-Seared Cod Filet with tomatoes, corn, and basil-infused Israeli couscous will become a fabulous, flavorful favorite in your quick fix menu rotation.
Fresh seafood, like these cod filets, is quick and easy to prepare. Almost any thick, white, flaky fish filet will cook in the blink of an eye. I’ve found cod filets to be very budget-friendly. Flavorful and meaty, this cod filet is the centerpiece of the dish, nestled on top of a bed of Israeli couscous mixed with a variety of fresh and healthy summer vegetables and herbs. Lots of clean flavors.
Have you ever used Israeli couscous? It is substantially larger than regular couscous. I love its chewy, pearly mouth feel. In fact, some packers actually call it “pearl” couscous. Israeli couscous cooks quicker than rice, about 10 minutes from start to finish. I like to cook mine in chicken stock, but water or beef stock would work, too.
Israeli Couscous, Giant Couscous, Pearl Couscous
Israeli couscous came onto the culinary scene in the 1950s. It’s actually pasta – don’t mistake it for quinoa – made with semolina and water. Israeli couscous was introduced by then Prime Minister David Ben Gurion to feed the influx of immigrants coming to Israel. It comes in regular form and you can find whole-wheat versions as well or tri-colored where tomato and peas lend color to the finished product. And couscous can be served cold or at room temperature, like in a salad, or warm just like any starchy side. Master Class Articles “What Is Israeli Couscous?”
I use Israeli couscous in another recipe Shrimp and Scallop Stew with Israeli Pilaf. A great recipe from Martha Stewart’s kitchen. I like to use Bob’s Red Mill brand that comes as traditional and tri-color. But any commercially available Israeli couscous will do. Common Mediterranean couscous looks almost like polenta or coarsely ground cornmeal, so you’ll easily notice the difference.
A Tip for Searing Fish Filets
I always, always blot any sort of seafood folded in between layers of paper toweling. You want the seafood patted as dry as possible in order to get it ready for a nice sear. If you don’t, there’s too much water in the fish and the filets will steam rather than brown. I do this with shrimp or scallops, too, whether the seafood is fresh or frozen. This step is especially important if you want to dredge, bread, and fry seafood, or else the coating won’t stick to the meat and the dredge or batter will fall away as it’s fried and there goes your beautiful breading burning at the bottom of the fryer. The goal here is for a well-prepared fish that will have a nice brown crust, but a moist flaky inside whether it’s seared or fried – just the way you want it. So, how hot should the pan be? I’ve found somewhere between medium and medium-high is best – not too hot. I like to warm my cast iron skillet for 5 minutes or so to make sure the skillet is properly pre-heated.
An Ode to Basil
I love, unabashedly love, basil – probably not an ode, but it’s the best I’ve got. Every summer I grow a big potful on my front porch. I run my fingers through the leaves just to come away with one of the best culinary smells of summer. Some like to use oregano or rosemary or thyme – my go-to is always basil. I prefer the distinctive almost anise-like taste and smell – fresh or dried – to just about any other herb. Personally, I think thyme is over-rated. Parsley is just so, well, bland. I can’t imagine making any pesto with parsley – not my thing. Of course, basil in spaghetti sauce is a must. And my mother used to roast a rump roast in an oven-baking baking bag simply seasoned with salt, pepper, and dried basil mixed with a can of tomato soup – out-of-this-world gravy to pour over mashed potatoes! Basil simply makes me happy.
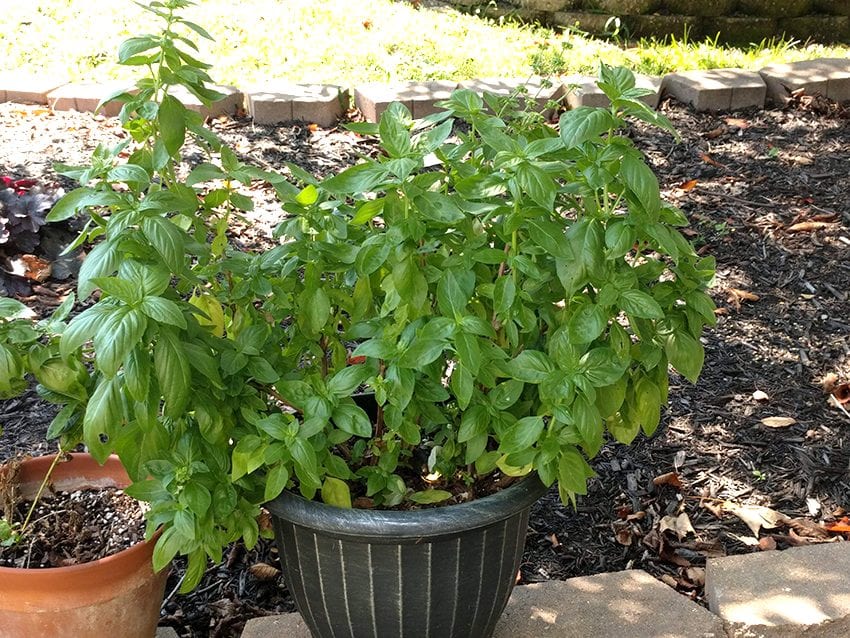
I just got a motherload of fresh pine nuts delivered to me by my friend, Cindy, from Nut-tos in West Seneca, NY.? Nut-tos is a beloved roasted nut distributor in the Buffalo area. You know what I’ve been dreaming about – PESTO!
Three basil plants in a 14″ pot. I moved the plant to a semi-sunny area of my garden in August, and out of the stressful heat of the late summer sunshine. My plant really likes its new location – big healthy leaves of goodness.
So, while I’m high on basil, let’s look at why it’s such a healthy herb. Basil is a powerful antioxidant. It’s a good source of magnesium which promotes good blood flow, is high in Vitamin A for good eyesight, and has been shown to be a good anti-inflammatory. As part of an aromatherapy routine, basil is beneficial to relieve tension, melancholy, depression and mental fatigue. Gee, no wonder I’m so head-over-heels in love with basil. Maybe it’s what my body craves – along with chocolate, wine, and anything in a pie crust.
Yield: 4
Pan-Seared Cod Filet with Tomato, Corn and Basil Couscous
Bursting with fresh flavors from a summer garden, Pan-Seared Cod Filet with Tomatoes, Corn, and Basil-infused Israeli couscous will become a fabulous, flavorful favorite in your quick fix summer-time menu rotation. Delicious and so easy and quick to prepare!
Prep Time10 minutes
Cook Time25 minutes
Total Time35 minutes
Ingredients
2 lbs thick cod filets, fresh or frozen and thawed, cut into 4 equat portions
2 Tablespoons olive oil
2 cups Israeli couscous
21/2 cups of chicken stock or water
1 pint cherry tomatoes, cut in half
3-4 ears of fresh corn, steamed and cut from the cob; or 2 cups frozen corn
1/2 - 1 cup fresh basil, shredded into pieces or julienned
1/2 cup toasted pine nuts or toasted slivered almonds
Salt & Pepper
Instructions
Line a baking sheet with paper toweling. Place the fish on top, and use more paper toweling to pat dry the fish surface. Spray the filets lightly with cooking spray. Sprinkle with salt & pepper. Turn the fish over and repeat.
Start the couscous. In a 3-quart pot, add chicken stock or water, and couscous. Over medium-high heat, bring to a boil, then immeiately reduce to a simmer. Cover and simmer for 10 minutes. Once done, fluff with a fork, cover, and set aside.
In a 12" cast iron skillet, heat the olive oil over medium-high heat. Place the filets in the hot skillet. Sear for 5 minutes per side. Be sure not to crowd the skillet - you may have to cook in 2 batches. You want to sear the fish, not steam it. Each side should form a nice lightly-browned crust. Remove cooked filets to a plate, cover lightly with aluminum foil, and set aside.
Add pine nuts or almonds to the hot skillet. Pan toast, stirring frequently, until the nuts are lightly browned. Remove to a plate and set aside.
In the same skillet, reduce heat to medium or medium-low add the couscous, tomatoes, corn, and nuts. Toss gently until everything is well combined. Add basil and toss. Check seasoning.
To Assemble the Dish: Place one cup of the warm couscous mixture in the middle of a plate. Top with one cod filet. Sprinkle the fish with fresh lemon juice. Serve.
Notes
Cod filets come in all shapes and sizes. Prefer the thicker filet sections for this recipe. The flatter parts of the filet are excellent for making fish & chips. Toasted garlic bread would be a great side or any tossed salad.
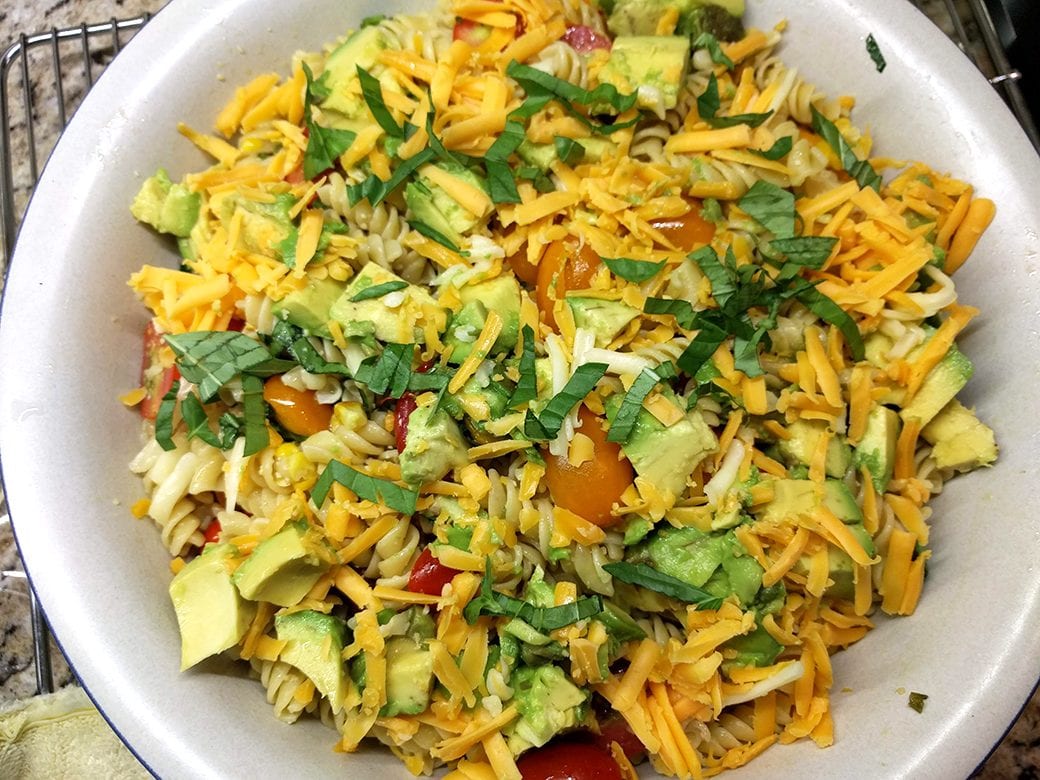
Summertime Tomato, Avocado, Roasted Corn,Basil Pasta Salad is a salad bowl to behold! This salad is the perfect side or main dish for the height of summer’s flavorful bounty. In August, we can find all these ingredients readily available at the height of their freshness. This is what summer eating is all about, without a doubt!
My inspiration for this recipe came from Teighan Gerard, the spirited, adventurous, creative energy behind Half Baked Harvest. I’ve followed Teighan for several years now, and subscribe to her blog. Every Sunday she emails her subscribers her “Nine Favorite Things” post. There are even more great photos in the post of her family, her home in Colorado which is a converted barn. When I need a pick me up, I saunter on up to her blog and allow my eyes and brain to rest. Her food photography is absolutely stunning. This is one talented and down-to-earth young woman. Here’s a link to Teighan’s fabulous pasta recipe.
This is such a cinch to quickly put together, especially during these last sultry summer days. I had fresh ears of corn that I grilled in their husks. A lovely pint of fresh sweet cherry tomatoes. An avocado that had to be eaten – such a chore! A hunk of the sharpest cheddar cheese in the refrigerator. My basil produced very well this season, so I grabbed a bunch of that, too.
I think when you approach recipes like this one, feel free to transform it into anything you wish or have on hand. Here are a couple of change-ups you might enjoy:
A Tex-Mex version with a can of drained black beans, corn, tomatoes, avocado, and cilantro with a dressing made with olive oil, lime juice, a squirt of sriracha mixed with a sprinkling of cumin;
A French-inspired version made with a couple of drained cans of tuna, chopped cornichons, finely diced red onion, and capers with a lemon/mayo/thyme based dressing;
Add a cup or two of diced cooked chicken to the original recipe for a great dinner salad.
Any way you decide, you’ll have a fabulous summer side or main dish salad.
Yield: 4-6 servings
Summertime Tomato, Avocado, Roasted Corn, Basil Pasta Salad
The perfect salad for the last sultry days of summer. All ingredients are at their peak flavor. You'll have a nice side dish in no time at all!
Prep Time15 minutes
Cook Time15 minutes
Total Time30 minutes
Ingredients
1 lb rotini or Gemelli pasta
1 cup fresh basil, roughly chopped
1 cup sharp cheddar cheese, shredded
1/3 cup olive oil
1/4 cup grated parmesan or pecorino cheese
2-3 Tablespoons fresh-squeezed lemon juice
1 teaspoon dijon mustard
1 Tablespoon fresh chives, chopped
Pinch crushed red pepper flakes
1 teaspoon Kosher salt
1/2 teaspoon black pepper
4 ears fresh corn, steamed or grilled in their husks.
2 cups or 1-pint cherry tomatoes, cut in half
1 avocado, diced
Instructions
Cook the pasta according to package directions for al dente pasta.
While the pot of water is coming to a boil, start to make the salad dressing and prepare the vegetables.
In the bottom of a large salad bowl, mix together dressing ingredients: olive oil, parmesan or pecorino cheese, lemon juice, dijon mustard, red pepper flakes, salt and ground pepper. Whisk together until well combined and the dressing thickens a little. (Or put dressing ingredients in a pint canning jar and shake until mixed and slightly thickened.)
Add the chives to the dressing and whisk until distributed. Set salad bowl aside.
Cut corn kernels from the cob, set aside.
Cut tomatoes in half, set aside.
Dice avocado set aside.
Drain the cooked pasta and run under cool water to stop cooking. Shake the colander to release more water.
Add pasta to the salad bowl with dressing. Toss until dressing evenly coats the pasta.
Top pasta with corn, tomatoes, avocado, cheese, and basil. Toss until well combined.
Check for seasoning and serve!
Notes
I added more salt and pepper to the dressing. I added 1 teaspoon dijon mustard. If you have leftover cooked chicken, dice the meat and add to the salad for more of a dinner salad.
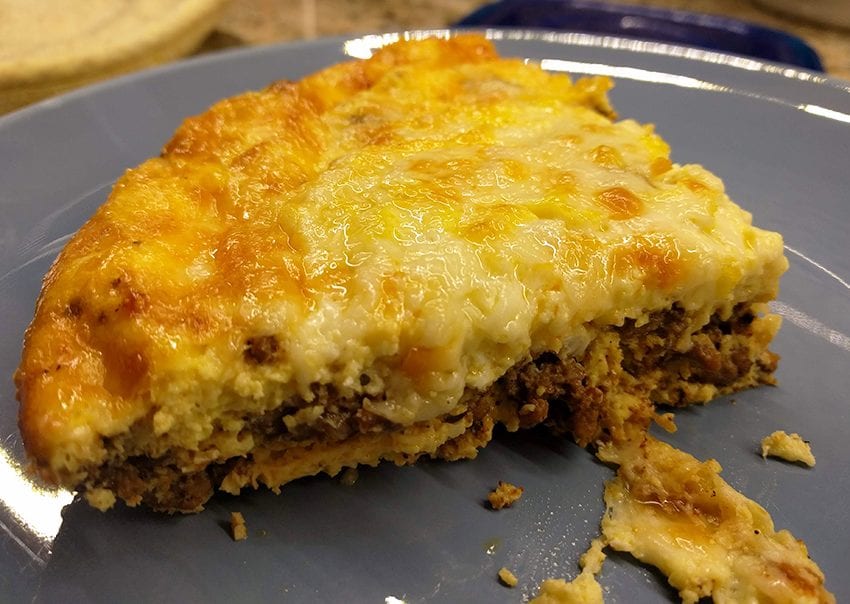
We all need a quick and easy meal like this one in our arsenal. And everyone likely has a pantry and freezer with the ingredient staples on hand. Easy Crustless Taco Pie is not only delicious but gluten-free, low carb and keto-friendly. And did I mention this taco pie is kid-friendly, too? A win-win in my book of tricks.
There’s nothing special that you need. Ground beef or ground turkey, eggs, cheddar cheese, taco seasoning are the staples here.
Serve with a dollop of full-fat sour cream (keto-friendly), guacamole, spicy salsa and a simple shredded lettuce salad on the side with diced tomatoes.
Here’s a tip! I like to buy ground beef in multi-pound packages from a big box store. The meat is usually leaner, 85-15% fat and I find it is cheaper per pound than buying ground meat in the grocery. When you make this recipe, why not brown 2-3 pounds at a time. Then separate the cooked meat into equal portions, load a freezer bag or two and store in the freezer. You’ll have cooked ground meat at the ready for another recipe Sloppy Joe’s or quick meat spaghetti sauce or tacos. Looking for even leaner meat? Use ground turkey instead. I’ve found ground turkey may be substituted for ground beef in most recipes.
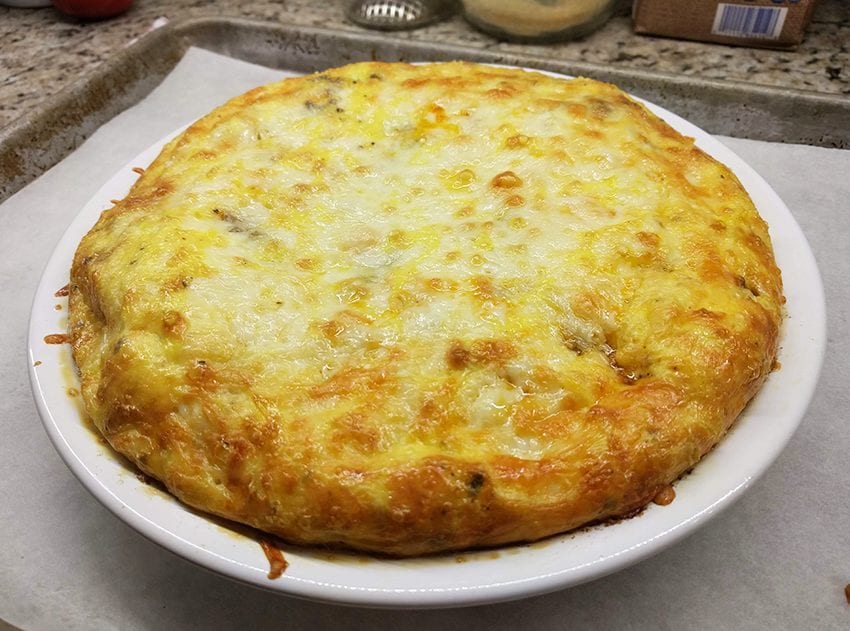
I had to share this recipe if only to show the beautiful rise from the eggs. Yes, the dish deflates a little while it cools. But look! Isn’t it pretty out of the oven?
You’re happy! Your kids are happy! Everyone’s happy!
Yield: 4
Quick and Easy, Crustless Taco Pie - Gluten Free & Low Carb!
We all need a quick, simple, and easy meal like this one in our arsenal. And everyone likely has a pantry and freezer with the ingredient staples on hand. Quick and Easy Crustless Taco Pie is not only delicious but gluten-free and low carb. And did I mention kid friendly? A win-win in my book of tricks.
Prep Time20 minutes
Cook Time35 minutes
Total Time55 minutes
Ingredients
In a small bowl combine:
2 Tablespoons chili powder
1 Tablespoon paprika
1 Tablespoon kosher salt
1 Tablespoon ground black pepper
2 teaspoons ground cumin
1 teaspoon garlic powder
1 teaspoon onion powder
1 Mexican oregano
1/4 - 1/2 cayenne pepper, if desired
For Meat Filling
1 pound ground beef or turkey
1 medium onion, diced
2 cloves garlic, minced
3 Tablespoons taco seasoning, above
6 large eggs
1 cup heavy cream or half-n-half
4-6 oz shredded cheddar cheese, or Monterey Jack, or Monterey Pepper Jack depending on your pepper heat
Instructions
Taco Pie Assembly
Preheat oven to 350F degrees.
Spray 9" pie dish with cooking spray. Set aside.
In a 12" skillet, brown ground meat over medium-high heat until cooked through and no pink is showing.
Add diced onion and minced garlic. Saute for 1 minute.
Add 3 Tablespoons (or one package) of taco seasoning to the browned meat. Continue to cook for 2 minutes until the mix becomes fragrant.
Spread the meat filling into the prepared pie dish.
In a large bowl, whisk the eggs, cream or half-n-half. Pour slowly over meat mixture in the pie pan.
Sprinkle with shredded cheese. Bake for 30 minutes or until the center has nicely risen and begins to brown. 30-40 minutes.
Remove taco pie to a cooling rack for 5 minutes. Cut into wedges and serve with accompaniments, if desired.
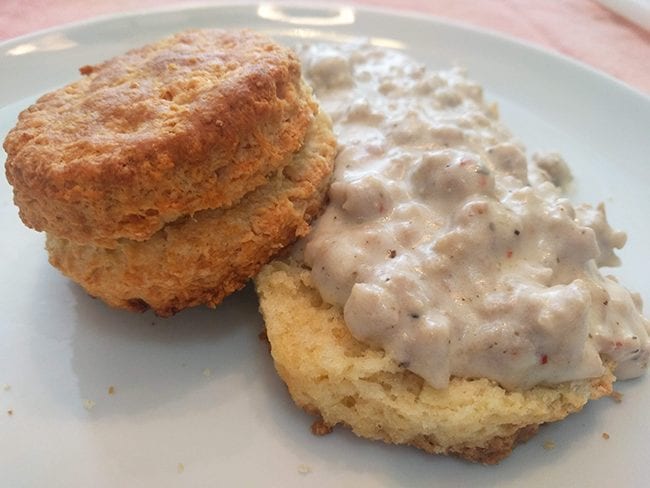
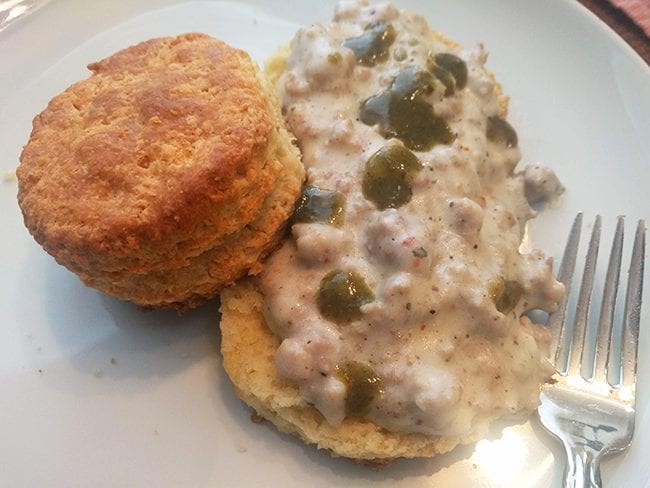
The cure for wet, wintery blues: Buttery Buttermilk Biscuits and Creamy Sausage Gravy!
We’re still having some lingering wet winter weather here in central-Indiana even after Punxsutawney Phil did not see his shadow this year which forecasts an early Spring. Officially, Spring is just 11 days off and 10 days until the official vernal equinox on March 20th. FYI: Did you know that the Vernal Equinox always falls on March 19, 20, and 21? I did not – thanks Old Farmer’s Almanac.
This is a roundabout way of saying that I enjoy making and eating biscuits and sausage gravy when it’s chilly outside. There’s nothing like the smell of freshly baked biscuits coming out of the oven on a cold morning just waiting to be smothered with creamy sausage gravy. It’s a fabulous way to start a wintery day. Or any other day, for that matter. Biscuits and sausage gravy is also a great hangover food. Served with crispy hash brown potatoes and/or fried or scrambled eggs, you’ll have your mojo back in a hurry. And don’t forget the hot sauce. I like the Tobasco® brand’s green jalapeno sauce. It’s milder than their other sauces and I enjoy its flavor on this dish, an omelet, or plain old scrambled eggs with cheese.
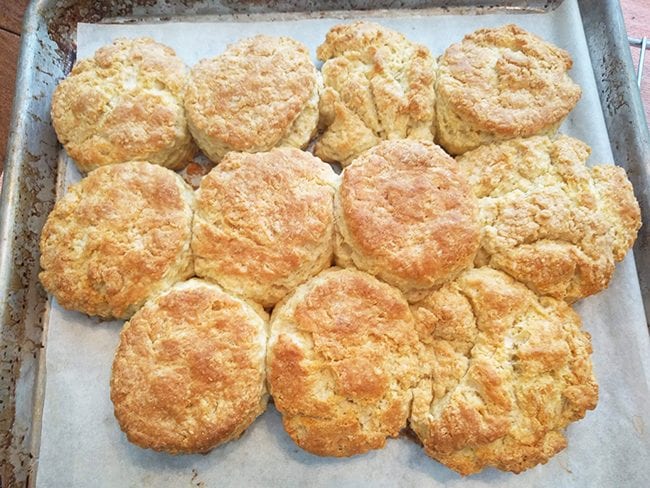
Recently on Pinterest, I noticed several posts for Joanna Gaines’ biscuit recipe from her new cookbook “Magnolia Table, A Collection of Recipes for Gathering.” One blogger testified that these were the highest rising, tenderest, fluffiest, and buttery biscuits she’s ever made. No wonder – the recipe calls for self-rising flour, and baking powder, and baking soda. And eggs – have not seen that before. Ever in search of a biscuit that rivals my tried-and-true Fannie Farmer’s recipe, I just had to try it out.
The Result
Right off the bat, I halved the recipe. The original makes 20 or so. Breakfast was just the two of us and I figured we could wolf down six and nibble on the rest throughout the day. Auggie, our beloved four-legged biscuit eater, loves the leftovers, too.
My biscuits didn’t rise evenly. I had one that towered above the rest. I figured this was the anticipated rise. They are large biscuits. I cut them with a 2 3/4″ biscuit cutter. I’ll probably use a smaller one in the future. (Hint: If you need to stretch the recipe to serve one or two more guests, a smaller cutter will add 2-4 more biscuits to the yield.)
Instructions said to place the unbaked rounds next to each other. I think if I’d spread them apart they would have risen better. Other than that, the finished product was as promised. Joanna’s biscuits sported a crispy outside crust and a lovely fluffy inside and a rich buttery flavor. Richard and I were very happy biscuit eaters! Made full-sized, these would be fabulous made into a breakfast sandwich.
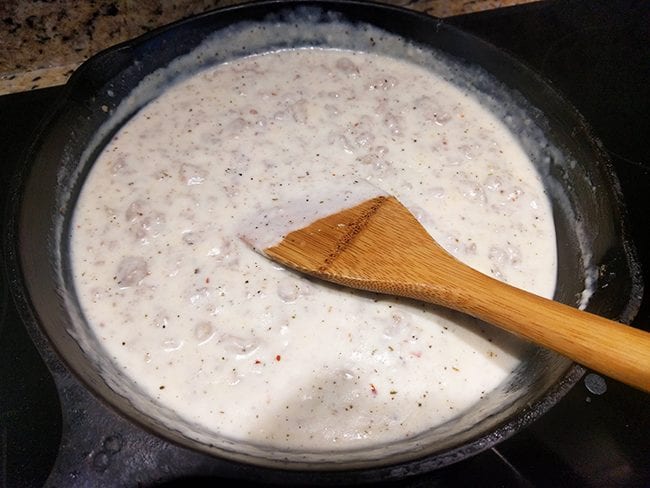
Creamy Sausage Gravy
There are two recipes for sausage gravy on my blog. This one and my first one simply titled simply “Buttermilk Biscuits and Gravy.” Another family favorite but the gravy turned out a little thin. So, this time I bulked up the mixture with one pound of sage seasoned breakfast pork sausage, 1/4 cup flour, and 2 cups whole milk – I halved the gravy recipe. Ah, that’s better. I browned off the sausage, made the biscuits, and finished the sausage gravy while they were baking.
Looks fabulous – RIGHT! Let’s make up a batch, shall we?
Buttery Buttermilk Biscuits and Creamy Sausage Gravy
Biscuit and Gravy fans, gear up for one of the best buttery biscuit and creamy gravy recipes out there. Large buttermilk biscuits hot from the oven perfectly crunchy on the outside and steamy and fluffy on the inside begging to be smothered with perfectly seasoned sausage gravy.
Prep Time50 minutes
Cook Time20 minutes
Total Time1 hour10 minutes
Ingredients
For the Biscuits
4 cups self-rising flour (or make your own with 1 1/2 teaspoon baking powder and 1/2 teaspoon salt per cup)
2 Tablespoons baking powder
1 teaspoon baking soda
2-3 Tablespoons granulated sugar, optional
1 teaspoon salt
3./4 pound (3 sticks) unsalted butter cut into 1/2 inch cubes
2 large eggs, beaten
1 1/2 cups buttermilk (or make your own with 1 Tablespoon vinegar or lemon juice in 1 cup milk-let stand 5 minutes or one cup plain yogurt)
Remember: This recipe a whole lot of breakfast! Don't be afraid to half it for manageable servings. Unless you're feeding an army, then make it all!
Preheat oven to 400F degrees.
In a heavy skillet over medium-high heat, brown sausage until there is no longer any trace of pink. Tilt the pan and spoon off most of the accumulated fat leaving 1-2 Tablespoons. Set aside.
In a large mixing bowl, whisk together self-rising flour, baking powder, sugar, if using, and salt.
Add cubed cold butter to the bowl. Using a pastry blender, incorporate the butter into the flour mix until it is crumbly or resembles small peas. (Or use a food processor - put flour mix into work bowl, add cold butter, and pulse until the butter is incorporated. You should be able to see chunks of butter throughout. Pour into a large bowl and continue with the recipe.)
Measure buttermilk in a 2-cup measure. Add eggs and beat with a fork.
Make a well in the center of the flour in the bowl and add buttermilk/egg mix. Using a fork or a wooden spoon, lightly toss the flour into the liquid scrapping the sides until everything's mixed together.
If the dough is a little dry, add more buttermilk 1 Tablespoon at a time. If the dough is wet, add more flour 1/4 cup at a time.
Cover the bowl with plastic wrap and refrigerate for 30 minutes.
Dump the dough onto a floured work surface. Bring the dough together and knead up to 10 times. A bench scrapper comes in handy!
Pat the dough into a rectangle. Using a bench scrapper, lift and fold 1/3 of the dough onto itself from the short end. Repeat with the other short end. Gently pat or roll the dough into a rectangle and repeat the folding process 2 more times.
Flour a rolling pin and roll into 1/2 inch thickness.
Cut the dough into 2 3/4 inch rounds and place on a half-sheet pan lined with parchment paper 1/4 inch apart - not touching.. (To get a higher yield, use a smaller biscuit cutter.)
Beat an egg with 1 Tablespoon buttermilk and brush over tops.
Bake 15-20 minutes or until the tops are nicely browned.
While the Biscuits are Baking
Return skillet with sausage to the stovetop. Warm sausage over medium-high heat until it begins to sizzle. Sprinkle flour over the sausage and stir until no white is showing.
Lower heat to medium. Slowly add whole milk to the sausage and stir with a wooden spoon or flat whisk. The gravy will thicken as it cooks. If the gravy becomes too thick for your liking, add more milk 1/2 cup at a time until you reach desired consistency.
Notes
This recipe makes a lot of large biscuits - 20 or more. I would half the recipe if serving 4-6. You can also use a smaller biscuit cutter for a bigger yield.
This makes a lot of creamy sausage gravy. Feel free to half it, too!
Serve with alone, with a few shakes of jalapeno hot sauce, scrambled or fried eggs, or golden hash brown potatoes. Enjoy!!
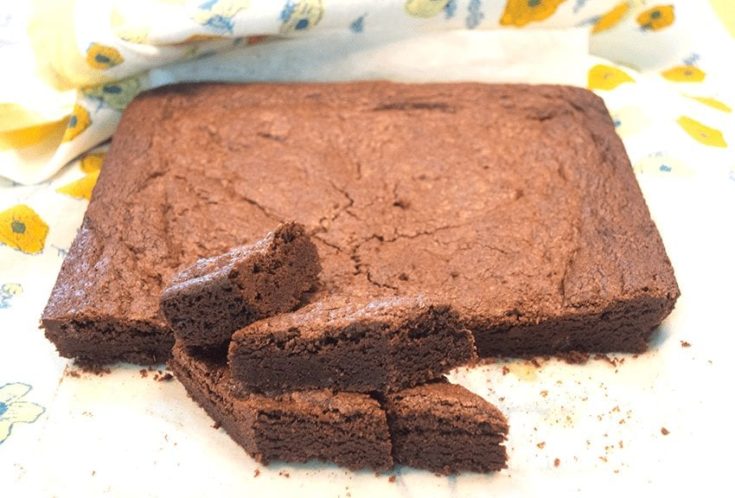
Decadently Rich and Fudgy Chocolate Brownies are guaranteed to satisfy any chocolate-lovers fantasy. WOW! These are the best brownies I’ve ever made.
The best part is that they’re made in one bowl, just as easy as any boxed brownie mix. You can bake the batter in a 9×9 inch or 9×13 inch baking dish. I chose the 9×9 route because I wanted thick chewy brownies. The secret ingredient is the addition of instant coffee. Yep – instant coffee granules are known to intensify chocolaty flavor. And these fudgy brownies are very chocolaty. The recipe calls for chocolate chips and cocoa powder in the batter and more bittersweet chocolate chips mixed into the batter before baking.I have to make a confession . . . As soon as the baking was done and the brownies properly cooled, I wacked off a healthy chunk and kept it on my kitchen counter while I cooked dinner. Every once in a while, I’d have to sample a small bite to make sure the finished product was a good as I remembered. I whittled off little pieces until the whole chunk was gone! And then there were more brownies for dessert! Heavenly!Frosting would be overkill, in my opinion. But if that’s the way you roll, I won’t judge you. Serve with fresh whipped cream or a scoop of vanilla ice cream.(Thanks, Sam! See original recipe at sugarspunrun.com “Brownies from Scratch”)
Let’s whip up a batch, shall we? Be sure to have plenty of cold milk or hot coffee at the ready.
Yield: 12-18
Decadently Rich and Fudgy Chocolate Brownies
Would you describe yourself as a "chocoholic?" If the smell and taste of chocolate makes your heart skip a beat, these fudgy brownies are for you!
Prep Time10 minutes
Cook Time40 minutes
Total Time50 minutes
Ingredients
12 Tablespoons unsalted butte or 1 12/ sticks cut into Tablespoon-size pieces
1/2 cup semisweet chocolate chips
1/2 cup cocoa powder. I used Penzey's Dutch-processed cocoa
1/2 teaspoon instant coffee granules or powder
3/4 cup granulated sugar
3/4 cup light brown sugar, packed
2 large to extra large eggs
1 teaspoon vanilla extract
1 cup flour
1/2 teaspoon salt
3/4 cup semisweet chocolate chips, I used 1/2 cup mini chocolate chips
Instructions
Preheat oven to 350F. Prepare a 9x9" or 9x13" baking pan. Spray with cooking spray and/or line with a piece of parchment paper large enough to come up over the sides of the pan. You can remove the brownies out of the pan by lifting up on the paper.
In a microwave-proof bowl, combine butter and 1/2 cup chocolate chips. Microwave for 30 seconds. Stir well and microwave for another 15 seconds. Stir well.
Add cocoa powder and instant coffee and stir.
Add granulated and brown sugars and stir until completely combined.
Add eggs, one at a time beating well after each addition. (You'll notice the batter will lighten and thicken the more the eggs and batter are mixed together.)
Add vanilla. Stir
Sprinkle salt over batter. Add flour. Stir again.
Spread batter into prepared pan. Refrigerate for 15-30 minutes. Remove and bake for 30-40 minutes until a toothpick inserted in the center comes out fudgy, but not wet.
Allow to cool before serving.
Notes
Using a 9x9" baking pan? Bake 35-40 minutes. Using a 9x13" pan? Bake 16-18 minutes. My 9x9" batch took a little longer to bake - 45 minutes or so. Keep an eye on yours close to the end of baking time. If you have to bake a little longer, no problem. But there's nothing worse than a burnt batch of lovely brownies! Yield depends on the size you cut your brownies.
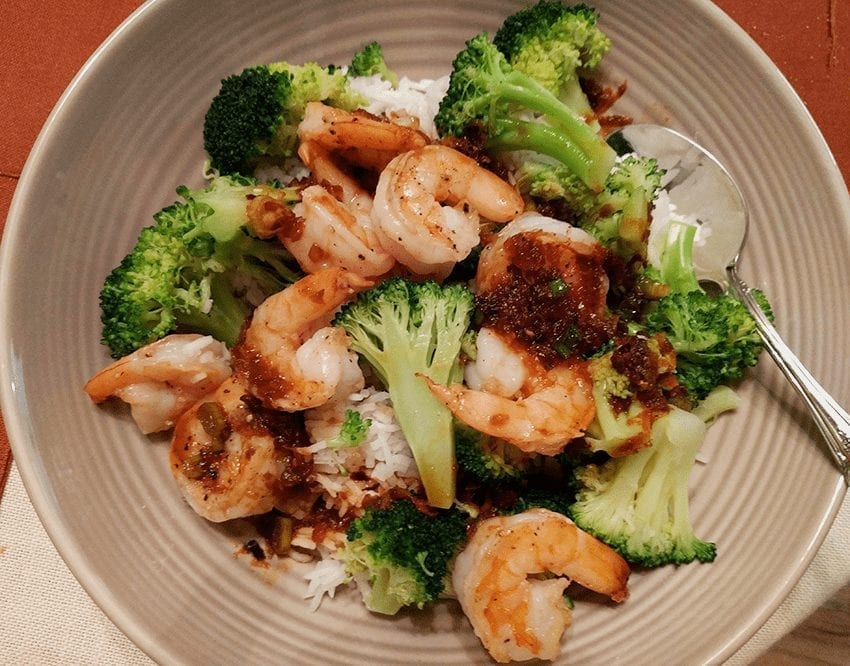
Orange Shrimp with Broccoli and Garlic is one of my favorite types of dishes. Crushed red pepper, orange zest, and garlic lend the simple sauce a bright delicious bite. And it’s so quick and easy! Orange Shrimp any time of the year but is a fabulous dish when your schedule is tight and fast food is not an option. You know, like during the holidays!
I always have a pound or two of raw shrimp (21-25 count) in the freezer. It’s handy for lots of quick meals like Shrimp Tacosor Shrimp Scampior Shrimp and Grits. Frozen shrimp don’t take long to defrost, either. Measure out what you need for your recipe. I use a scale for an accurate amount. Then I put them in a colander in the sink and run cool water over them until the shrimp are ready. I also use raw shrimp rather than cooked frozen ones, because raw shrimp will absorb all the lovely flavors either as they’re marinated or as you cook them. Garlic and lemon are two of my favorites, but you could use coriander, red pepper flakes, cumin or curry. Seriously delicious!
Here are a couple of things to remember when cooking raw shrimp:
Rinse shrimp after the shells and tails are removed. Remove the black vein at the top. Most frozen packed shrimp come deveined, but it’s a good idea to check anyway.
Once rinsed, place shrimp on a baking sheet lined with paper toweling. Use another layer to pat dry the top. Shrimp should be dried off to get a proper sear.
Don’t overcook your shrimp! It’s easy to do. Place shrimp in a hot pan with a little olive oil. As soon as they become translucent, turn them over to cook the other side. Really, 2-3 minutes per side is more than enough. You want a nice crunchy bite, not a rubbery one. It’s a texture thing.
Yield: 4
Orange Shrimp with Broccoli and Garlic
Quick and light, Orange Shrimp with Broccoli and Garlic is perfect for an easy and informal dinner with a little citrus and spice. Yummy!
Ingredients
1 1/2 pound shrimp (21-25 count) peeled, deveined, and rinsed under cool water
3-4 cups fresh broccoli, separated into florets
2-3 Tablespoons olive oil
1-2 garlic cloves, peeled and minced
1 cup orange juice, freshly squeezed
2 Tablespoons soy sauce
1 1/2 Tablespoon granulated sugar
Zest of one orange
1/2 - 1 teaspoon crushed red pepper flakes, depending on how much spice you want, or leave it out
1 teaspoon cornstarch
Sliced green onion for garnish
Sesame seeds for garnish
3 cups Jasmine rice, cooked according to package directions
Instructions
Line a sheet pan with a couple of layers of paper toweling. Place shrimp on the toweling in a single layer. Take another sheet of paper toweling and pat the shrimp dry. Sprinkle with salt and pepper. Set aside
Heat a large skillet over medium-high heat. Add 1 Tablespoon olive oil into the skillet. Add broccoli florets for 3-5 minutes until broccoli is tender. Remove broccoli from the skillet into a bowl or plate and set aside.
Use the same skillet and heat over medium-high heat. Add 1 Tablespoon olive oil. Add minced garlic and let sizzle for 30 seconds or until garlic becomes fragrant. Add red pepper flakes, if using. Place shrimp in the skillet in a single layer. (You may have to cook in 2 batches.)
As soon as the shrimp becomes translucent, flip over the cook the other side. Total cooking time is 2-3 minutes per side, at most. Remove cooked shrimp and garlic, pepper flakes to bowl/plate with the broccoli.
Return the skillet to the stove. Add orange juice, sugar, and soy sauce. Bring to a boil and reduce until slightly thickened.
Mix 1 teaspoon cornstarch with 2 teaspoons cold water. Add to skillet and continue to cook for 1-2 minutes until the sauce becomes shiny. Add orange zest.
Pour finished sauce over shrimp and broccoli. Garnish with sliced green onions and sprinkle with sesame seeds. Serve over cooked hot rice.
Do you love apple pie? Do you love cheesecake?
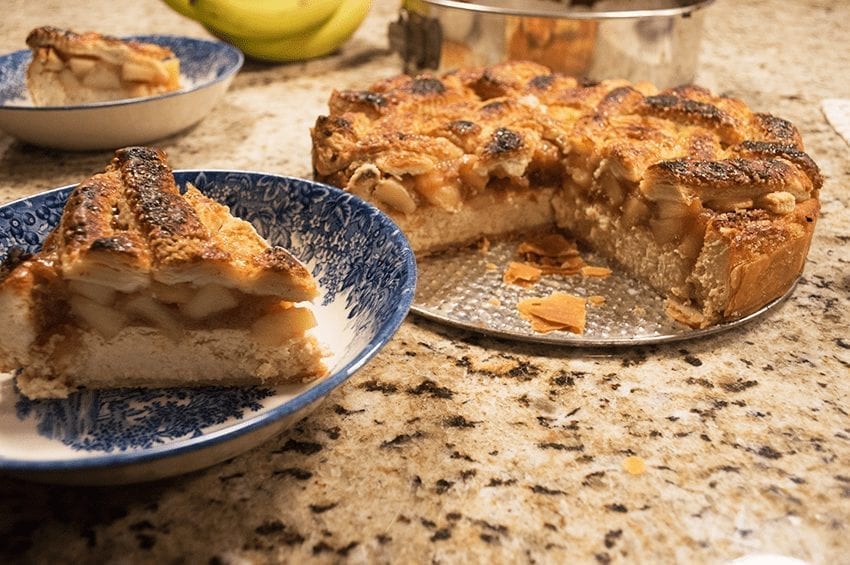
Planning holiday dessert menus and want a little of both? Looking for an alternative to pumpkin pie? Problem solved! Combine your two favorites into one Apple Pie Cheesecake!
I found this brilliant recipe for Apple Pie Cheesecake at Tasty in Kathryn Aubin’s feature 4 Pies to Bake With Your BFF. Just like any cheesecake, this takes some time to bake, but that’s it. The remainder of the process is easy, easy, easy. Seriously – a no-brainer easy. Apple Pie Cheesecake can be made the day before serving and kept cold in the refrigerator. In fact, it should be made the day before to allow the cheesecake to cool and set.
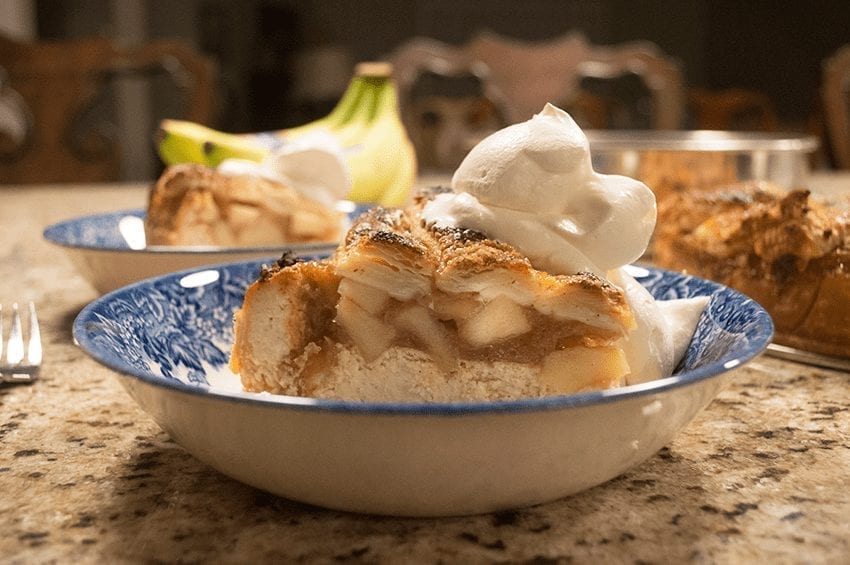
I strayed from Kathryn’s recipe only by omitting the nutmeg in the apple topping and using puff pastry for the top lattice rather than pie crust. I mean, who doesn’t love the puffy, buttery, lightness of puff pastry? I did sprinkle demerara sugar on top of the puff pastry after the egg wash. Demerara has big crystals and gives the crust a nice little crunch. I get lots of compliments every time I use demerara on pies, cookies or bars, If you play your cards right and your family insists on tradition, make the cheesecake with puff pastry topping and use the other pie crust for a pumpkin pie or any other single crust pie.
Oh, did I mention the crust is made from one refrigerated pie crust you will find in any grocery store’s refrigerator section? One of my college roommates bakes professionally. She makes lots of pies and uses refrigerated store-bought pie crust because it’s made with lard, not shortening or butter. Anyone who’s baked pies for a while understands the value of lard in pie crust dough. Lard makes the pastry tender, lighter and flakier. My mother and grandmother could whip up a lard pie crust in the blink of an eye. I’ve done that, too, not as fast as my predecessors I might add, but I prefer using 1/2 lard and 1/2 vegetable shortening. I find the dough to be more manageable that way.
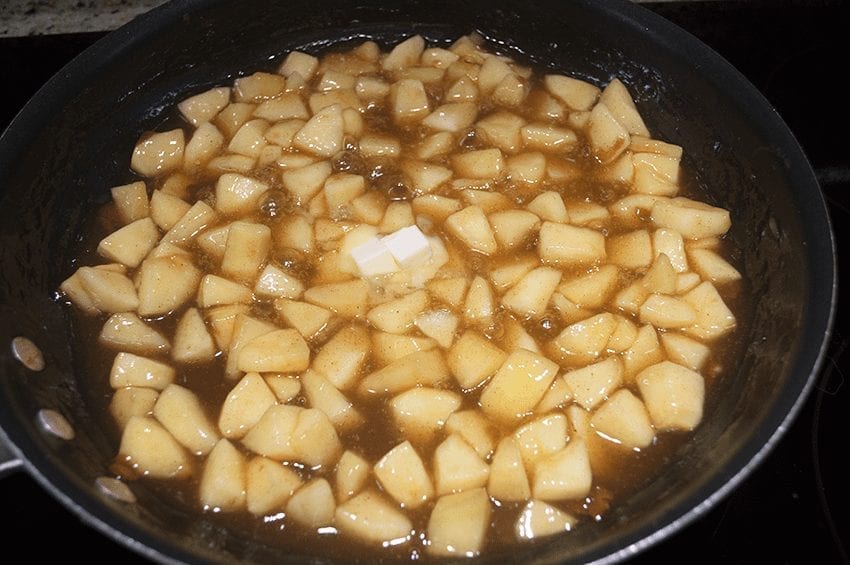
Forgive me, I did not take pictures of the springform pan or of mixing the cream cheese, sugar, eggs, etc. But here’s a pic of the apples simmering in water, sugar, cinnamon, and butter. Can it get any better than that? Wait – read the recipe.
Shall we bake an Apple Pie Cheesecake? YES!
Yield: 8 servings
Easy Apple Pie Cheesecake
I found this brilliant recipe for Apple Pie Cheesecake at Tasty in Kathryn Aubin's feature 4 Pies to Bake With Your BFF. Just like any cheesecake, this takes some time to bake, but that's it. The remainder of the process is easy, easy, easy. Seriously - a no-brainer easy. Apple Pie Cheesecake can be made the day before serving and kept cold in the refrigerator. In fact, it should be made the day before to allow the cheesecake to cool and set.
Prep Time20 minutes
Cook Time2 hours45 minutes
Total Time3 hours5 minutes
Ingredients
1 pie crust, premade refrigerated or homemade for a 9" pan
1 sheet frozen puff pastry
3-8oz bars cream cheese, room temperature
1 cup granulated sugar
1 cup sour cream or Greek yogurt
1 teaspoon vanilla extract
1/2 teaspoon ground cinnamon
1/2 teaspoon nutmeg, freshly grated (It's so much better! Get whole nutmegs and a Microplane)
Zest and juice of 1/2 lemon, if desired
1/4 teaspoon salt
3 eggs, large to jumbo, room temperature
3-4 medium sized apples, peeled and chopped into 1/2" pieces
2 Tablespoons corn starch
1 Tablespoon butter
1 egg for eggs wash plus 1 Tablespoon water
1 teaspoon demerara sugar, optional
Instructions
Preheat oven to 300F degrees.
Line a 10" springform pan with one pie crust. Press along the bottom and sides. Halfway up the sides of the pan is fine.
In the large bowl of a mixer with a paddle attachment, mix all the cream cheese and sugar until smooth.
Add sour cream, vanilla extract, lemon zest if using, cinnamon, and nutmeg. Mix until well blended.
Add eggs one at a time until well blended.
Pour cheese mixture into springform pan and bake for 1 hour 15 minutes. Afterward, turn oven off but let cheesecake sit in oven in the oven for another hour.
Apple Topping
While the cheesecake is baking, prepare the apple topping.
Peel and dice 3-4 medium size apples.into a medium only-ins replaceWithoutSep" id="125" data-gr-id="125">bowl I used gala apples. Dribble lemon juice from half a lemon over apples. Set aside.
In a large skillet over medium heat, add sugar, cinnamon, cornstarch and water over medium-low heat. Stir to incorporate.
Once simmering, add apples. Stir until apples are soft, about 10 minutes. Remove from heat, add 1 Tablespoon butter and let cool.
Once the cheesecake has baked, remove to a cooling rack. Increase oven temperature to 425F degrees.
Pour apple mixture over the cheesecake.
Cut thawed puff pastry into strips and weave over the top of the apple mixture.
Brush with egg wash (1 egg + 1 Tablespoon water)
Sprinkle with 1-2 teaspoons demerara sugar, if using.
Bake for 25-30 minutes until the crust is golden brown
Chill and serve
Notes
This is a great holiday cheesecake! Bake the day before serving and chill well in your refrigerator. Top with whipped cream or a scoop of vanilla ice cream or how about cinnamon ice cream.
Variations: Add 1/2 cup minced pecans to the cheesecake batter before baking. Or top with salted caramel sauce. YUM!
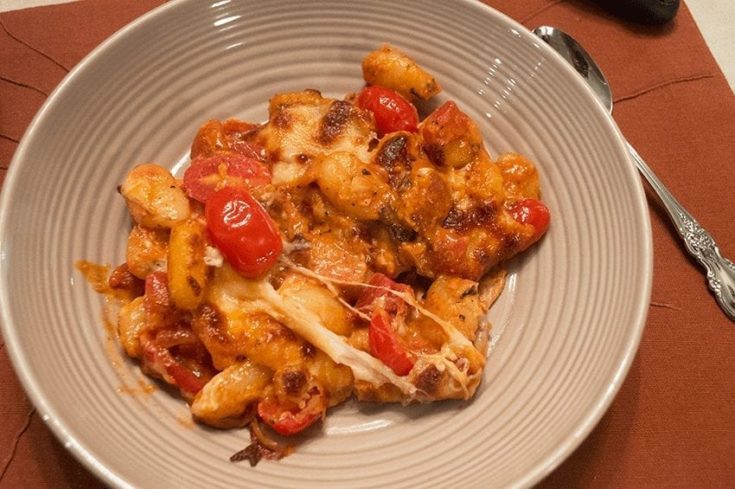
It’s that time of year! Cold, rainy, and windy here in Indiana. We’re expecting snow in a few days – Baked Gnocchi with Bacon, Tomatoes, and Mozzarella is the perfect yummy bite. You’ll be all warm and cozy in no time, guaranteed. And it’s a very quick dish – 35-40 minutes.
Serve with a green salad and a warm loaf of crusty Italian bread. Heavenly!
I just love to eat gnocchi. The first time I ate them was in eastern Pennsylvania just outside Philadelphia in the 1980’s. The Philly area is populated with lots of Italian Americans, and you can find very good Italian restaurants everywhere. The corporation I worked for at the time had their eastern headquarters there. Every time I attended a meeting or training session, I had to have gnocchi. Pillowy soft warm little dumplings served in a divine tomato sauce – just wonderful. I don’t know if the gnocchi were homemade or not, but they sure tasted like they were. So light, and delicious with the satisfying mouth feel of a lovely petite dumpling. Who could resist? Not me.
Gnocchi was not available in Indianapolis in restaurants or groceries when I returned home. But over the next few years, packaged ones began to pop up at places like World Market, where they sell a nice variety of international foods. Now, you can find premade gnocchi anywhere. The potato gnocchi I used here I found at Trader Joe’s. And they were perfect for my casserole. Probably not as light as homemade, but not gummy either like other brands I’ve tried.
Homemade gnocchi is on my Foodie Bucket List. Anne Burrell has a nice recipe on Food Network from her series Secrets of a Restaurant Chef. Here’s a link to her instructional video about how and why of basic potato gnocchi. Obviously, this dish is a quick dish with premade gnocchi. But I wouldn’t discourage anyone from making their own. It will take a little longer though. Anne Burrell suggests making a double batch, cooking half and freezing the rest for another use. Brilliant!
What do I love about this recipe? I found Baked Gnocchi at Simply Delicious Food through Pinterest. When I decided to bring my little dumplings to life, it was late in the evening. But I had all the ingredients in my larder – potato gnocchi from TJ’s, canned tomatoes, fresh cherry tomatoes, bacon, and everything else including crusty bread and salad. Lucky me! I like the addition of halved fresh cherry tomatoes in the sauce. They lend fresh texture and just look pretty in the finished dish. And a little fresh or dried basil in the sauce as it’s cooking wouldn’t be a bad idea – I adore basil in any tomato dish, but it’s not essential. Bacon, how interesting? It adds a hint of deep smoky flavor. I would not have thought of that.
Let’s whip up a warm and tasty casserole, shall we? You will be well loved.
First on the list is to heat your oven to 400F degrees. Fill a 4-5 quart pot 2/3 full of water. Bring to a full boil. This will take a while as you know. Don’t watch it – make the delicious tomato-based sauce for the casserole in the meantime. It can sit at the ready after cooking is finished to receive your lovely gnocchi when they’re done.
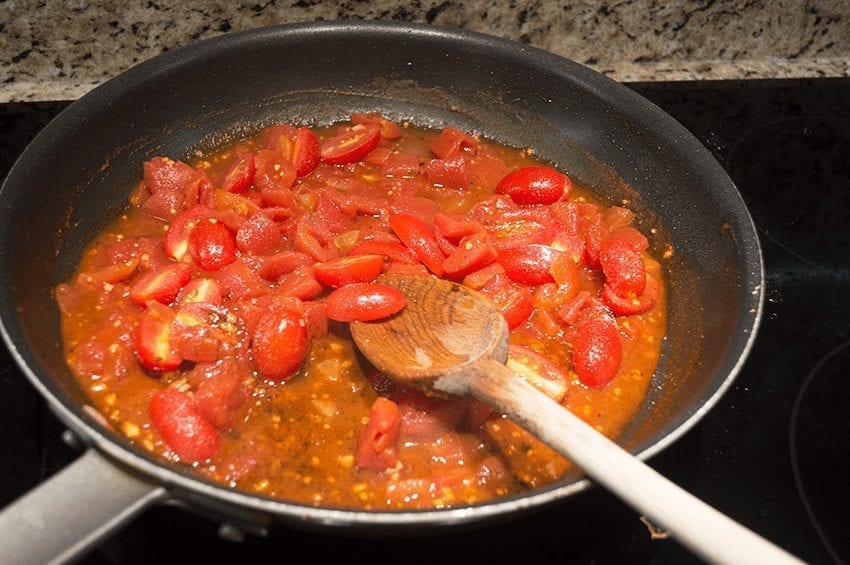
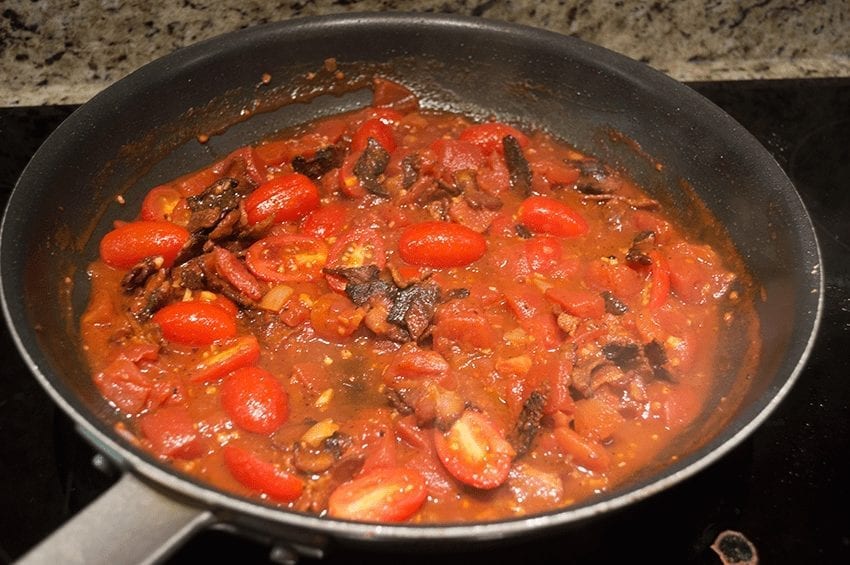
Heat a 12″ nonstick skillet over medium heat. Add 1 Tablespoon olive oil and the chopped bacon and cook until the bacon browns and releases most of its fat. Use a slotted spoon to remove the bacon from the pan onto a plate lined with a paper towel. Pour off most of the remaining liquefied bacon fat, and return the skillet to the stovetop. Add the minced garlic, paprika, and crushed red pepper flakes – cook for 30 seconds – don’t let the garlic brown or burn – this all goes very quickly. Add the canned and fresh tomatoes and the sugar. Simmer for 5 minutes.
Throw in the crispy bacon and dried basil (if using). Stir and remove from heat.
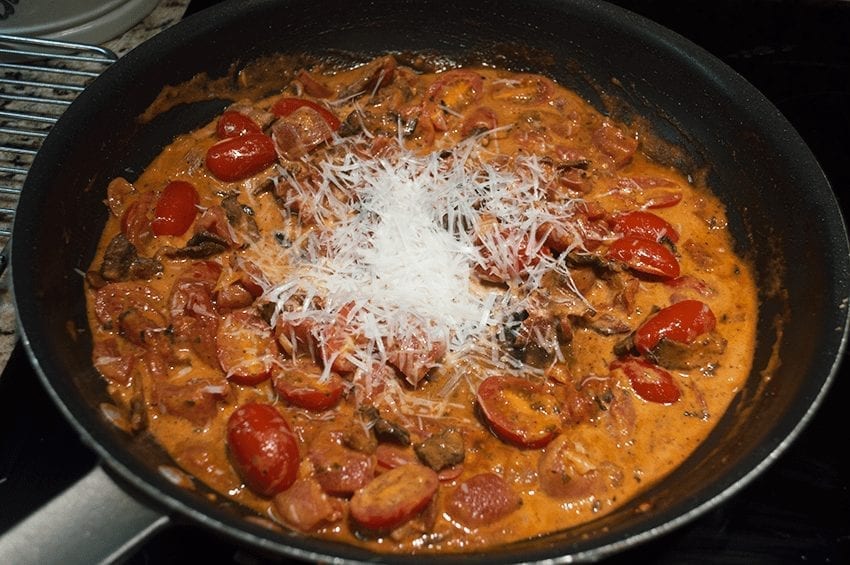
Add heavy cream or yogurt. Sprinkle some freshly grated Parmesan cheese. Check seasoning. Set aside off the heat while you boil your gnocchi.
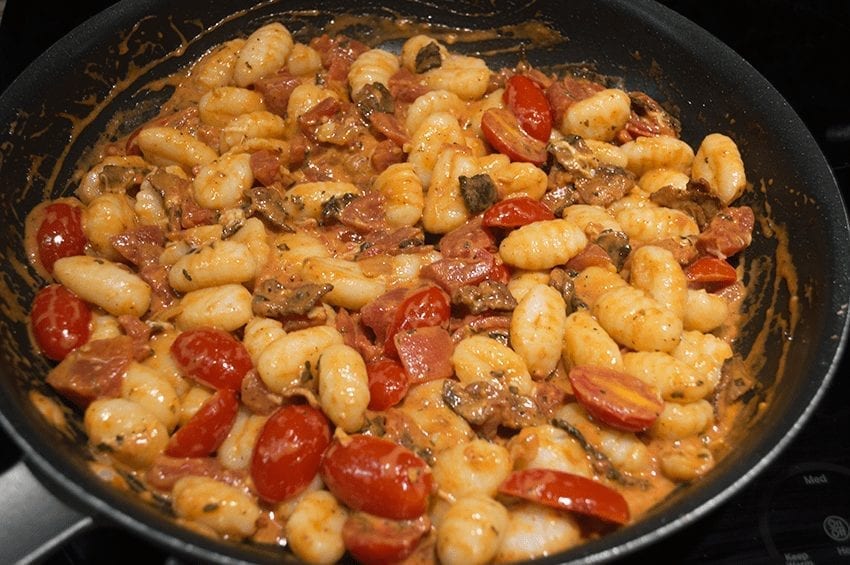
As they’re cooking, the gnocchi will float to the top. That’s when they’re finished. Using a slotted spoon, gently lift your gnocchi out of the boiling water and directly into the skillet with your sauce.
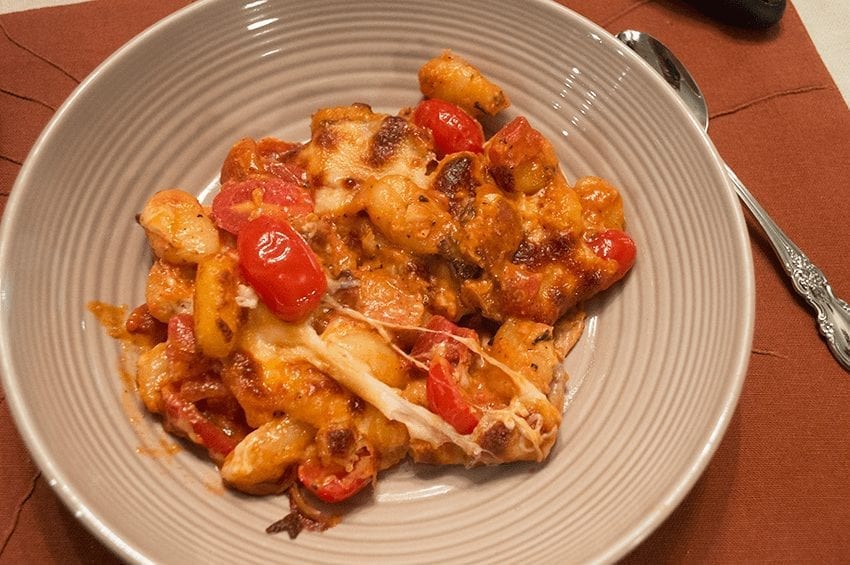
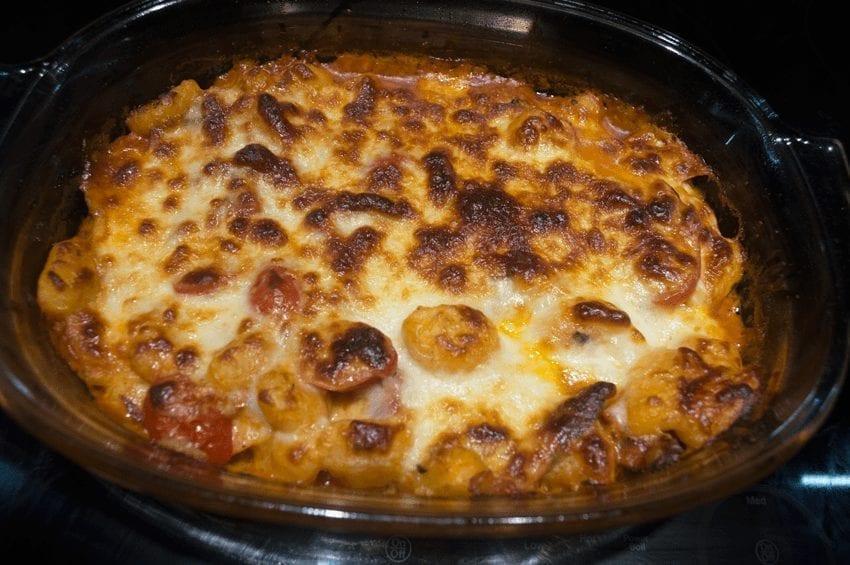
Gently mix everything and pour into a 3-quart ovenproof baking dish that’s been sprayed with cooking spray. Sprinkle the top with shredded mozzarella cheese. Pop the casserole into the oven for 10-15 minutes or until the cheese is melted and beginning to brown like this:
Remove from oven to a cooling rack. Let your casserole rest for 5 minutes before serving.
And there you have it! Sprinkle with extra grated Parm and/or fresh chopped parsley and serve! Theoretically, you’ll end up with 2-3 plentiful servings. Richard and I ate half the first night for dinner and reheated the leftovers for lunch the next day.
Mamma Mia! This is sooooo delicious!
Yield: 2-3 servings
Baked Gnocchi with Bacon, Tomato & Mozzarella
It's that time of year! Cold, rainy, and windy here in Indiana. We're expecting snow in a few days - Baked Gnocchi with Bacon, Tomatoes, and Mozzarella is the perfect yummy bite. You'll be all warm and cozy in no time, guaranteed. And it's a very quick dish - 35 minutes. Serve with a green salad and a warm loaf of crusty Italian bread. Heavenly!
Prep Time10 minutes
Cook Time35 minutes
Total Time45 minutes
Ingredients
1 pound potato gnocchi
4-6 strips bacon, chopped
2 garlic cloves, minced
1 teaspoon paprika
1/4 teaspoon crushed red pepper flakes
1 - 150z can petite diced tomatoes
1 Tablespoon tomato paste
12-16 cherry tomatoes sliced in half
1 teaspoon sugar
2-3 Tablespoons heavy cream or yogurt
Salt & Pepper
8 oz mozzarella cheese, shredded
Instructions
Preheat oven to 400F degrees.
While you're waiting for the water to boil for the gnocchi, make the sauce. Fry bacon in a large skillet over medium-high heat.
Pour off the bacon grease. Return the skillet to the heat. Add garlic, crushed red pepper flakes, and paprika. Stir and cook for 30 seconds. Be sure not to let the garlic burn.
Add all tomatoes and sugar. Continue to simmer for 5 minutes.
Remove pan from the heat. Add heavy cream or yogurt, salt, and pepper. Sprinkle with 1/4 - 1/2 cup grated Parmesan cheese. Stir until combined.
Cook the gnocchi according to package directions.
When they're done, use a slotted spoon to lift dumplings from the water and directly into the skillet with your sauce. Mix it all together. transfer to an ovenproof casserole lightly sprayed with cooking spray.
Sprinkle shredded mozzarella cheese on top. Place in oven and bake for 10-15 minutes, or until the cheese is nicely browned.
Remove casserole from oven and allow to cool for 5 minutes before serving.
Notes
Serve with a warm crusty loaf of bread and a green salad. Garnish with chopped fresh parsley &/or grated Parmesan cheese. You could use fresh, sliced mozzarella in place of shredded, if desired.
If you’re like me, we scour the internet looking for delicious recipes that take us out of our comfort zone. Sometimes I get stuck in a rut of making the same dishes over and over again. It’s not like the meals aren’t delicious. But sometimes we just need to rock the boat a bit. I just love Pinterest and visit every day looking for inspiration. Pinterest is a great resource for me where I find great food bloggers and recipes of all sorts like this one:
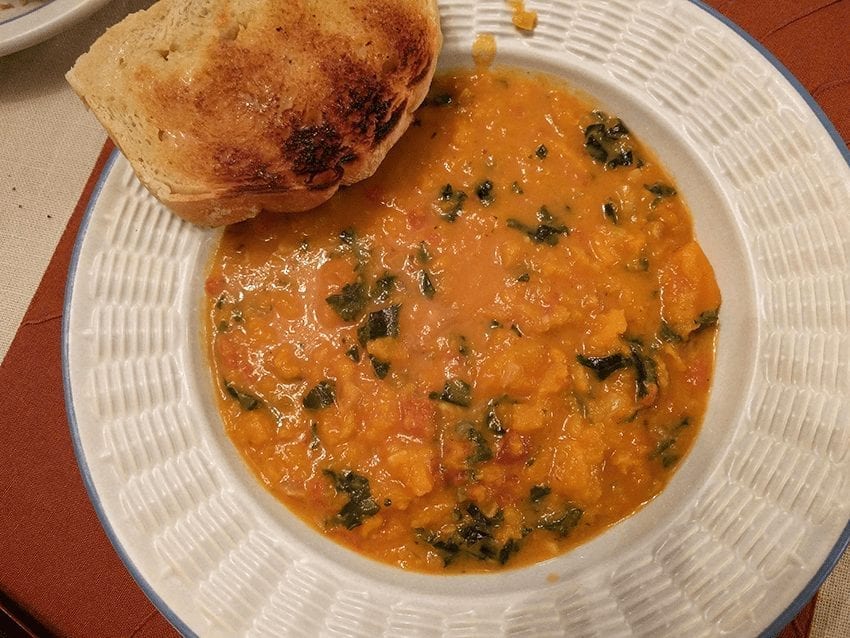
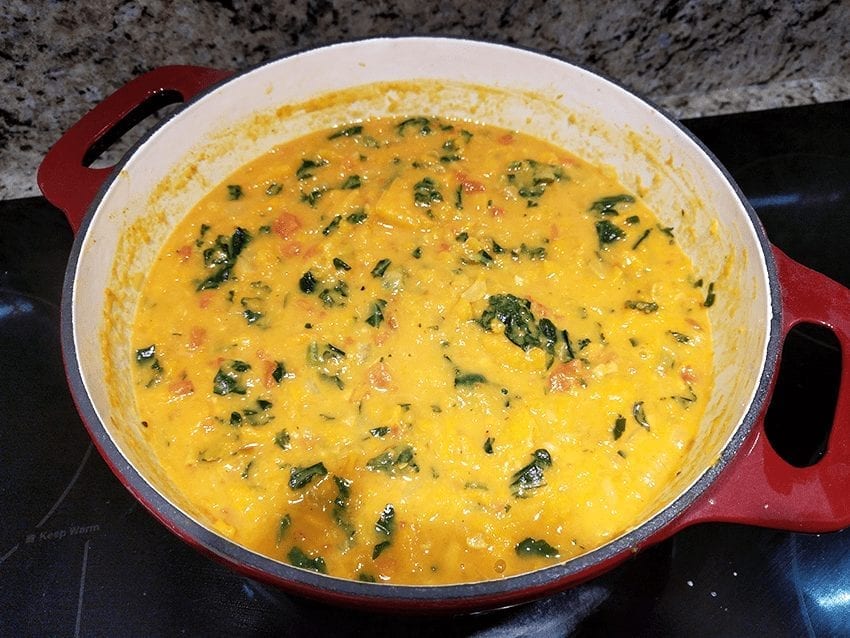
I was looking around one afternoon and my eyes lit up when I landed onA Pinch of Yum and this wonderful recipe for Spicy Peanut Soup with Sweet Potato & Kale. Why don’t I ever think about combinations like this? I’m in the Midwest. I don’t think this way. Sweet potato simmered with sweet curry and turmeric in coconut milk and broth finished with kale – seriously flavorful. There are even chopped peanuts in the recipe that gives this soup a little crunch – awesome!
And healthy! Look at all the good stuff it’s made from. Lindsay’s soup is thickened with creamy peanut butter instead of the usual roux of butter, flour, and milk. I didn’t miss it a bit. Many of us serve soup as a first course to a holiday meal and Spicy Sweet Potato Soup with Peanuts and Kale would be a stellar beginning.
And quick! Forty minutes from cutting board to table. I always have sweet potatoes on hand during fall and winter, so that was a cinch. I bought a package of frozen, chopped kale at the grocery to make prep even easier.
I didn’t have jalapeno, so I substituted crushed red pepper flakes. Lindsay calls for two cups of water. I used chicken stock instead. She likes to leave her sweet potatoes in bite-sized chunks, and I mashed mine up a bit to make the soup thicker. Try it. You’ll love it!
This dish is a warm and comforting, healthy, gluten-free, bowl of happiness. Lindsay at a Pinch of Yum says she was inspired to make this soup based on a West African recipe for groundnut soup. It would be fabulous as a first course for a holiday meal.
Author: A Pinch of Yum, Lindsay
Recipe type: Soups & Stews
Cuisine: American
Serves: 6
Ingredients
2 Tablespoons olive oil
1 small to medium onion, diced
½ teaspoon crushed red pepper flakes
2 cloves garlic, minced
3 large sweet potatoes, peeled and cubed
1-14 oz can fire roasted or petite diced tomatoes
1-14oz can light coconut milk
2 cups chicken stock
1 teaspoon salt
1 teaspoon sweet curry powder (I use Penzey's)
½ teaspoon turmeric
½ cup unsalted peanuts, chopped
¼ cup creamy peanut butter
1-10oz bag frozen chopped kale
Instructions
Put olive oil in a heavy soup pot over medium-high heat. Add onion and cook until lightly browned.
Add sweet potato cubes and stir until they become lightly browned - 3-5 minutes.
Add garlic, stir and cook until the garlic becomes fragrant - 1 minute.
Add the curry powder and turmeric to the sweet potatoes. Stir and cook until the spices are fragrant, a minute or so.
Add the tomatoes, coconut milk, chicken stock, salt, and chopped peanuts. Stir everything together.
Bring the soup to a simmer and continue to cook uncovered for 20 minutes or until the sweet potatoes are tender.
Add peanut butter and kale. Stir and continue to simmer until the soup is thick and creamy.
Starting with this recipe for Ina Garten’s Beef Bourguignon, I decided to create a new category I call Bucketlist. Mimi’s Bucketlist is a place for all the wonderful recipes I’ve collected over the years but never had the time or courage to try. This Mimi is retired so little time is no excuse. Now, I have to muster up the courage.
“This is my invariable advice to people: Learn how to cook- try new recipes, learn from your mistakes, be fearless, and above all have fun!” Julia Child, “My Life in France”
Boeuf Bourguignon If you’ve ever watched the Nora Ephron film “Julie & Julia” you’ll remember the classic French stew that inspired Julie Powell to author her successful blog “The Julie/Julia Project: Nobody here but us servantless American cooks…”
I remember attempting this recipe once when I was in high school. I was a member of the French Club and our sponsors took us to the Chez Paul restaurant in Chicago. Tres chic. I ordered Duck L’Orange. Turtle soup sounded disgusting. I don’t remember what prompted me to try Beef Bourguignon in my mother’s humble kitchen or who’s recipe I used, but I do remember desperately wanting to try a dish that would reflect my newly acquired sophisticated side. And to cook with wine! It’s beef stew, right? How hard could it be? Well, my father liked it. He loved me. My early dish was an early failure, but I grew to learn to appreciate technique and to follow a recipe. There’s so much to learn from really good cooks. I know and have known several.
I carefully reviewed several recipes over time comparing them with Julia Child’s recipe in Mastering the Art of French Cooking. I settled on Ina Garten’s because it was easier. OMG, it was delicious! According to Julia, the stew only gets better a day later as the flavors mellow. Yep!
Ina flames her cooked vegetables with cognac before adding the meat. I’m sure it lends a great rich flavor. But when a pint of cognac was $35 at the grocery, I decided to skip that part.
I’ve thought about doing this in a crockpot but am voting against it. I don’t think the liquid will cook down and thicken as well. And I’m not sure about an Instsapot because I’m not an Instapot fan. But, if any of you try it and decide otherwise, I’d love to hear from you with your results.
Get out your Dutch oven and let’s make some!
“Carefully done and perfectly flavored, it is certainly one of the most delicious beef dishes concocted by man.” Julia Child, Mastering the Art of French Cooking. Couldn’t agree more.
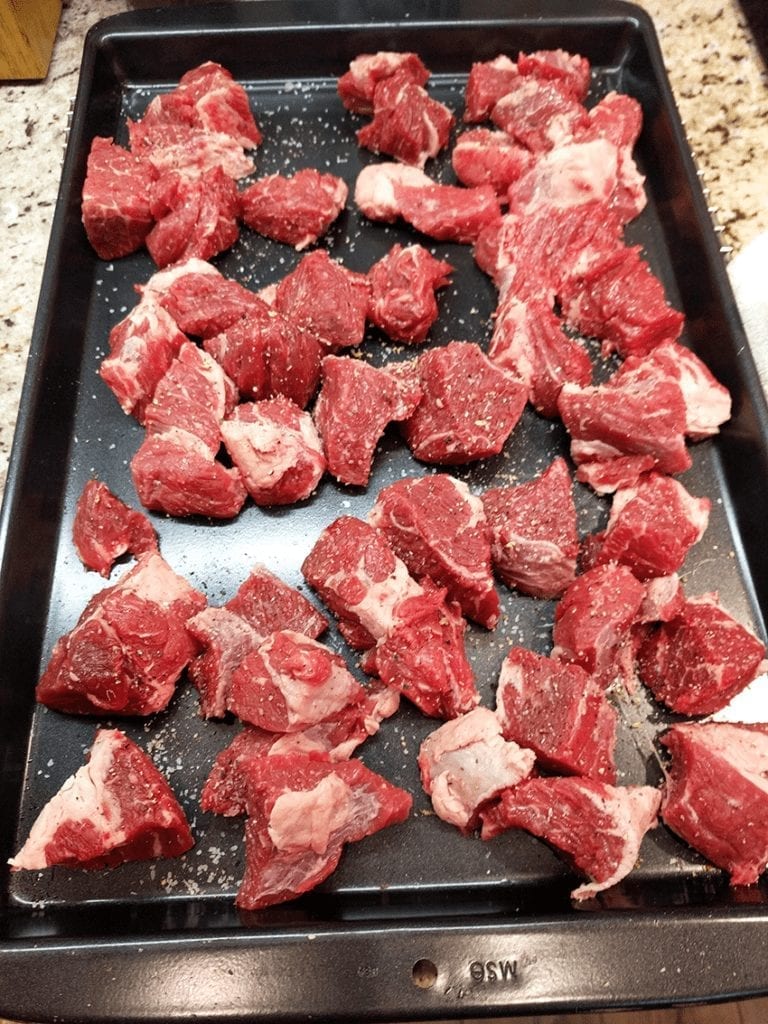
I bought a 2.5 lb chuck roast and cut it into cubes. I imagine you could use stew meat, but the chuck roast has more fat and renders down to tasty tender chunks while cooking in the oven. Pat the meat dry with paper towels and sprinkle with salt and pepper. Set aside.
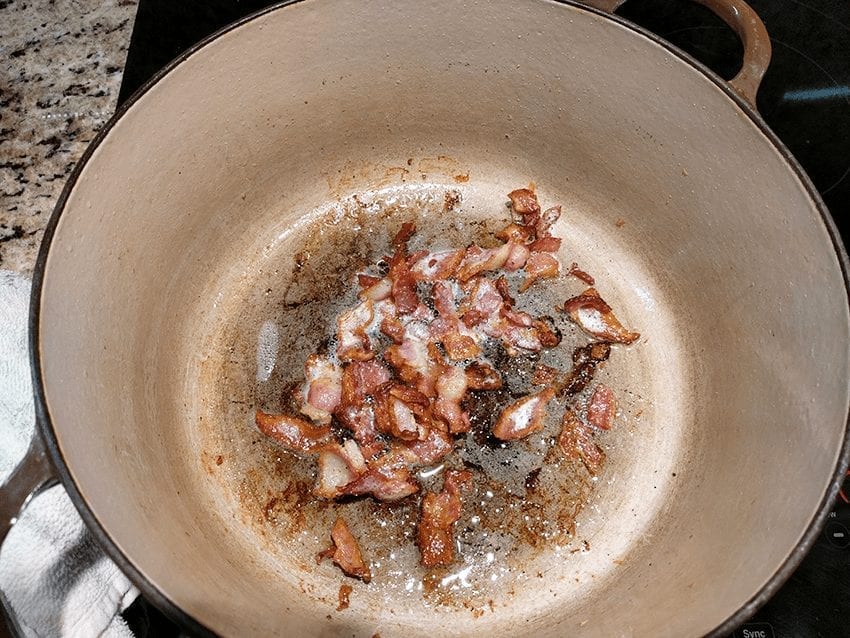
In a heavy 5-6 quart dutch oven over medium heat, brown the bacon until the fat renders and the bits are nicely browned. Remove with a slotted spoon to a plate. Set aside. I used three slices of bacon and added 2 Tablespoons olive oil to make sure there was enough fat to brown the beef. (Ina calls for 1/2 pound of bacon. Julia used a 6-ounce chunk of bacon that she cut into lardons and boiled. Hmmm) Add the beef cubes in a single layer to the pot. Once the cubes are browned on all sides, remove them to the plate with the bacon. Repeat with another batch of meat until it’s all browned.
See all the beautiful brown bits in the bottom of the pot? Wow – that’s serious flavor!
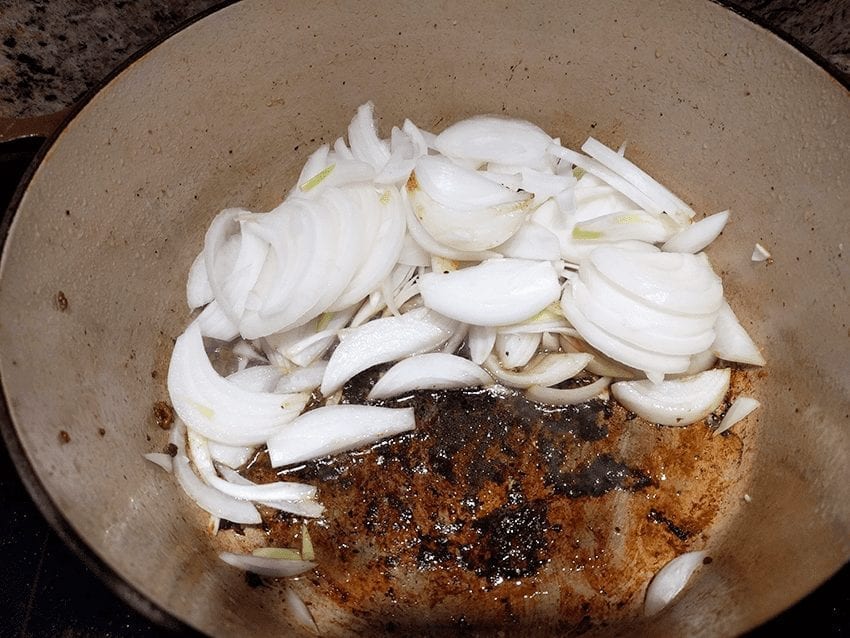
Add onions to the pot. Toss so they’re covered with fat.
Add the carrots, 2 teaspoons salt and 1-2 teaspoons black pepper. Toss to distribute.
Cook over medium heat for 10-15 minutes until the onions are just browned.
Add garlic, stir, and cook for one minute longer or until the garlic becomes fragrant.
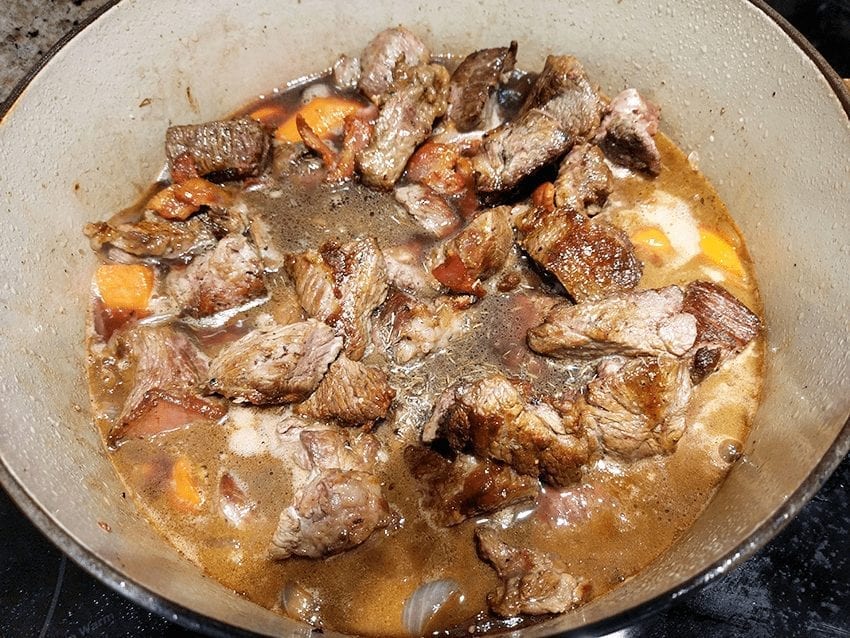
Add the meat, bacon and all the juices into the pot.
Add one bottle of red wine. I used pinot noir.
Add enough beef stock to just cover the meat.
Add thyme and/or a bay leaf.
Add 2 Tablespoons tomato paste.
Stir everything together and bring to a simmer.
Put on a tight-fitting lid. Place covered Dutch oven in a 250°F oven for 1 1/2 hours.
Enjoy the smells coming from the oven!
In the meantime . . . make a Beurre manié
Beurre manié is a fancy French name for butter kneaded with flour to be used as a soup or stew thickener. I’ve used this for years in soups, stews, even sauerkraut, and it works pretty well. Mash room temperature butter with flour, one Tablespoon at a time, until you have this lovely paste. When the beef bourguignon comes out of the oven, add the beurre manié and stir to incorporate.
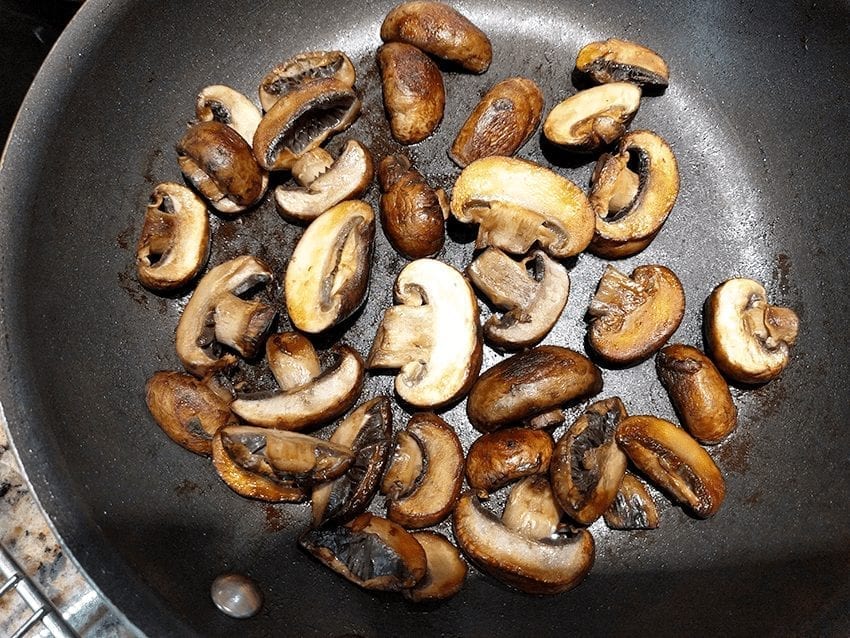
Also – brown mushrooms in butter. Set aside.
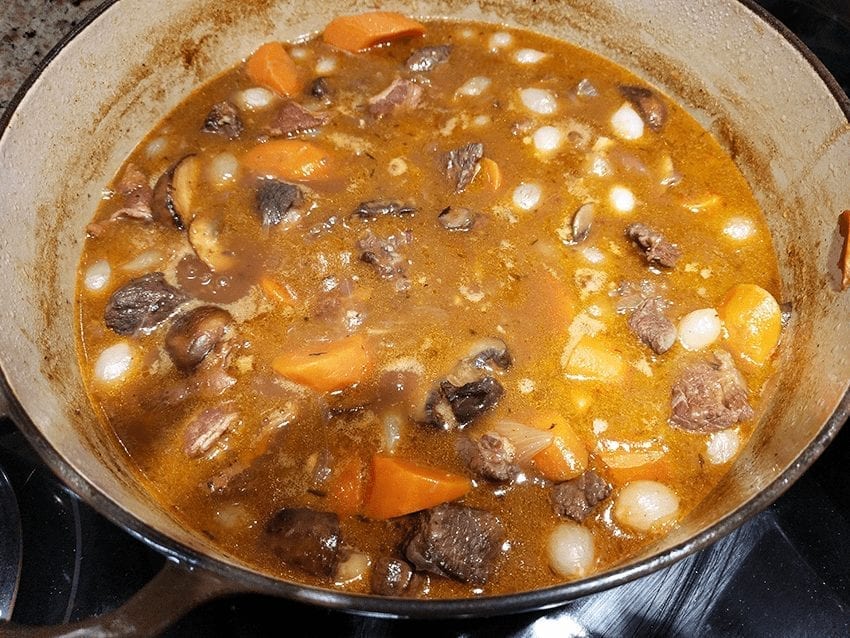
To Finish: Remove the pot from the oven to the stovetop. Take off the lid.
Add beurre manié. Stir to incorporate.
Add pearl onions and mushrooms to the pot. Stir.
Bring to a boil, reduce to simmer for 15 minutes. Serve!
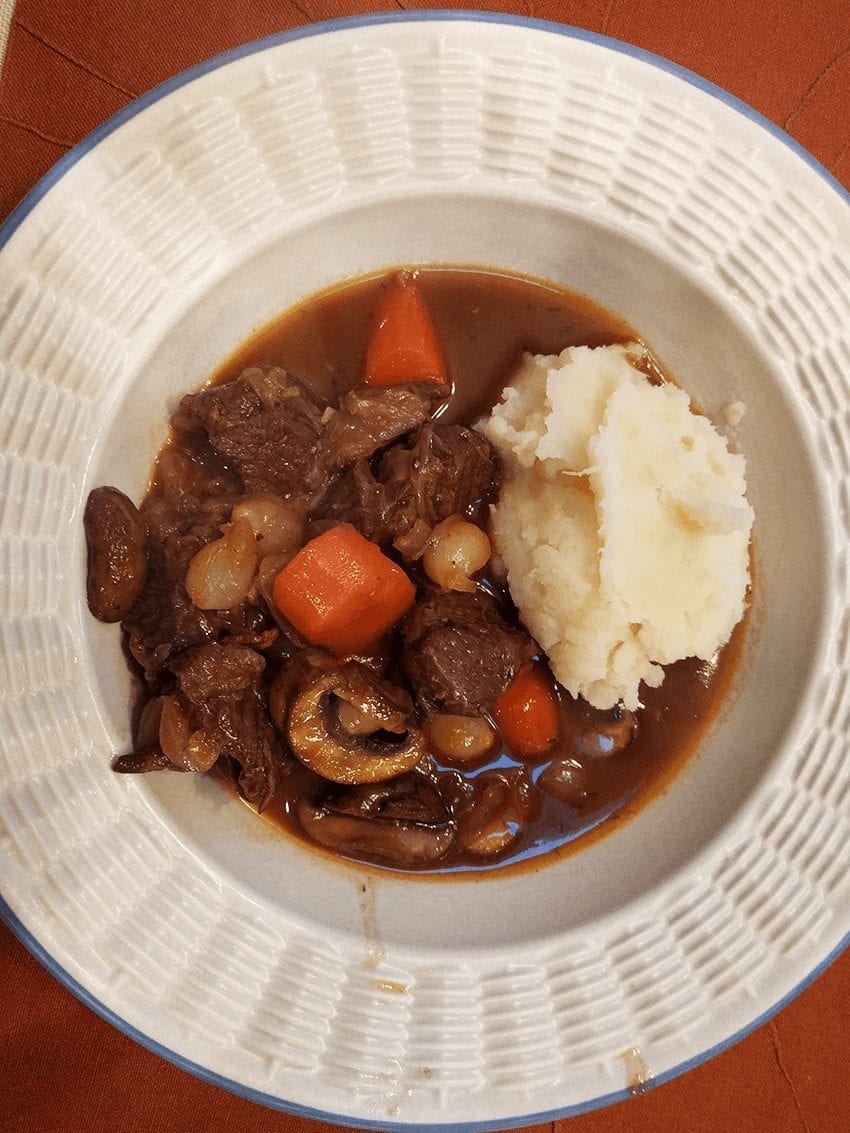
I served mine alongside mashed potatoes, but you could substitute egg noodles or rice. Julia suggests boiled potatoes, buttered peas, or a green salad.
Ina serves hers on larges slices of toasted country or sourdough bread smeared with a fresh garlic clove. Kind of like a bruschetta.
I served warm thick slices of French bread for dunking. The sauce invites it.
"Carefully done and perfectly flavored, it is one of the most delicious beef dishes concocted by man." Julia Child, Mastering the Art of French Cooking I agree!
Author: Ina Garten
Recipe type: Main Dish
Cuisine: French
Serves: 6 servings
Ingredients
¼ lb sliced bacon cut into strips
2 Tablespoons olive oil
2½ - 3 pounds chuck roast, but into 2" cubes
1 pound carrots, cut diagonally into 1-inch chunks
2 onions, sliced
2 cloves garlic, minced
1 750ml bottle full-bodied red wine, pinot noir or burgundy
2 cups beef broth
1 Tablespoon tomato paste
½ teaspoon dried thyme leaves
1 bay leaf (optional)
4 Tablespoons butter, room temperature
3 Tablespoons flour
12 oz package frozen onions
1 pound mushrooms thickly sliced or quartered
Instructions
Preheat oven to 250F degrees
Cut chuck roast into 2" chunks. Place on baking sheet, pat dry with paper towels, and sprinkle with salt and pepper. Set aside.
In a heavy 5-6 quart Dutch oven over medium heat, add 2 Tablespoons olive oil and bacon. Cook until fat is rendered and bacon is browned. Use a slotted spoon to remove crisp bacon to a plate.
Add 2 Tablespoons olive oil to the pot. In a single layer, add the beef cubes. Brown the meat on all sides. Cook in 2-3 batches until all the beef is cooked. Remove meat to the plate with bacon.
Add carrots and onions, one Tablespoon salt, and two teaspoons of black pepper to the pot. Stir and cook for 10-15 minutes until the onions are lightly browned.
Add garlic. Cook for one minute or until the garlic becomes fragrant
Put the beef, bacon and juices into the pot.
Add the bottle of red wine and beef stock.
Add the tomato paste and thyme and/or bay leaf.
Stir. Bring to a simmer. Place in oven for 1½ hours or until the meat and carrots are tender.
While the stew is cooking, mash 2 Tablespoons of butter together with 3 Tablespoons of flour - one Tablespoon at a time - to form a paste. Saute mushrooms in two Tablespoons butter until browned.
Remove stew from oven. Add butter/flour paste and mushrooms. Stir. Bring to a boil. Reduce to a simmer and continue to cook, uncovered, on the stovetop for 15 minutes.
Ladle into bowls. Sprinkle with chopped parsley, if desired.
Notes
Serve with mashed potatoes, buttered noodles, boiled potatoes, buttered peas or a green salad. Warm crusty Frech bread is also great to soak up all the stew juices. Ina Garten toasts country or sourdough bread, rubs a garlic clove over the warm toasts, and serves the stew ladled over the bread.
This scrumptious cheesy and melty Quick & Easy Burrito Pie is guaranteed to become one of your family’s favorites. It’s everything I love in quick Mexican casserole dishes. Perfectly seasoned and loaded with ground beef, beans, and cheese. You can’t go wrong.
I used 10″ burrito-sized flour tortillas and a 10″ springform pan to build the pie. And you can make it vegetarian by omitting the ground beef and adding black and pinto beans. Or use ground turkey for a healthier meat option.
Serve in pie slices topped with guacamole, sour cream, shredded lettuce, diced tomato, diced onion, sliced jalapenos and/or salsa. Maybe some sliced black olives and sliced green onions? How about some crumbled queso fresco? You know, all the yummy things you’d put on top of a burrito or taco.
Let’s make a burrito pie! Your people will love you. Guaranteed!?
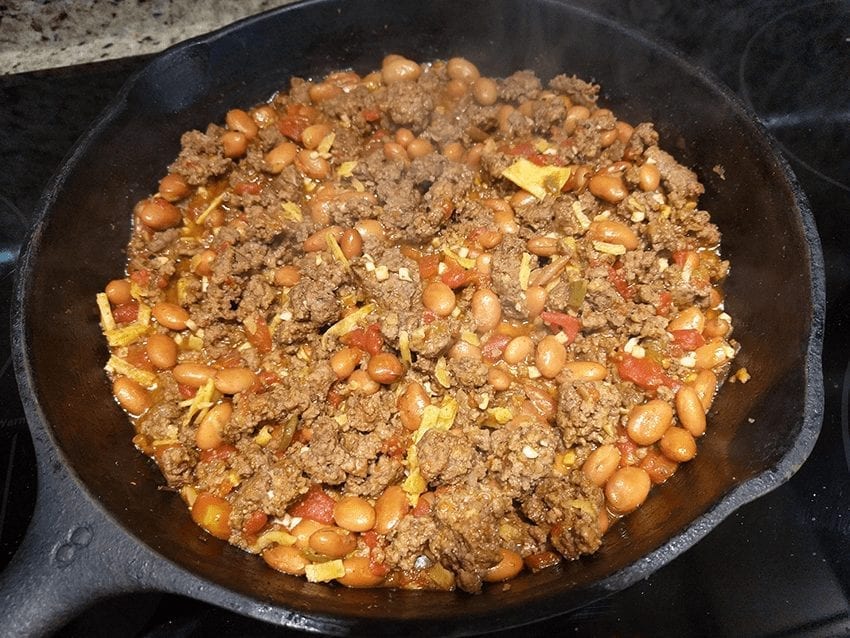
Heat a 10-12″ skillet over medium-high heat. Add one Tablespoon olive oil and the ground meat. Brown the meat and drain off fat. Return the meat to the skillet. Add chopped onion and saute until just wilted. Add one thinly sliced (slivered) or diced jalapeno pepper. You can substitute diced green or red bell pepper to make the dish less spicy. Add 1-2 cloves of minced garlic. Continue to saute just until the garlic becomes fragrant – 1 minute or so.
Add one can of petite diced tomatoes liquid and all and one package taco seasoning. Stir and simmer until the mixture is slightly thickened – 2-3 minutes. (I added one corn tortilla sliced into slivers to help thicken things up, but you don’t have to.)
Add one can of drained and rinsed beans – any beans you like – pinto, black, light red kidney beans. (If you’re going vegetarian, I’d use two cans of beans and skip the meat.) Stir and continue to heat through. Remove the meat mixture from the heat and set aside.
In a small bowl, stir together one can cream of mushroom soup and 1/2 cup of sour cream. Set aside.
In another bowl, mix together the cheeses. I like using half shredded Mexican quesadilla cheese or Monterey Jack and half shredded sharp cheddar cheese.
Let’s put our burrito pie together! Shall we?
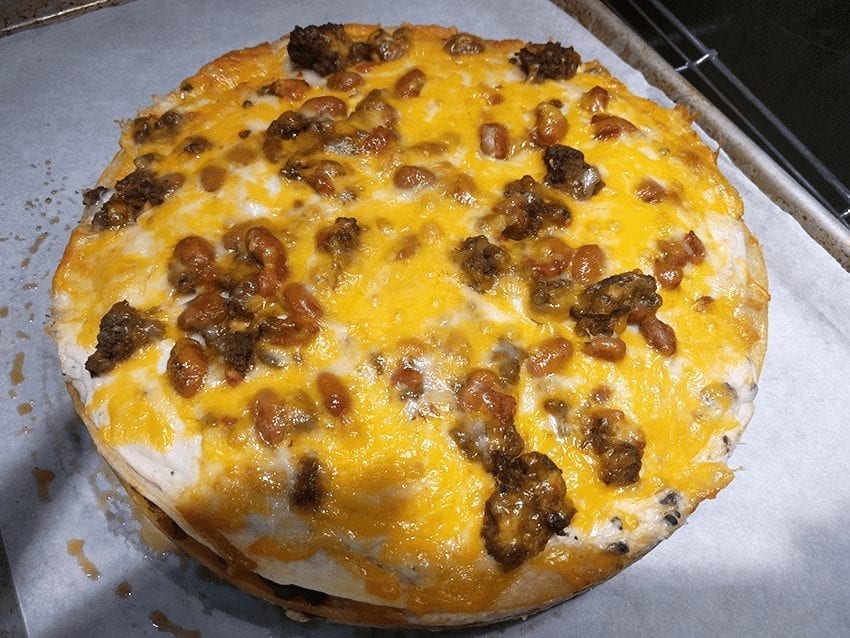
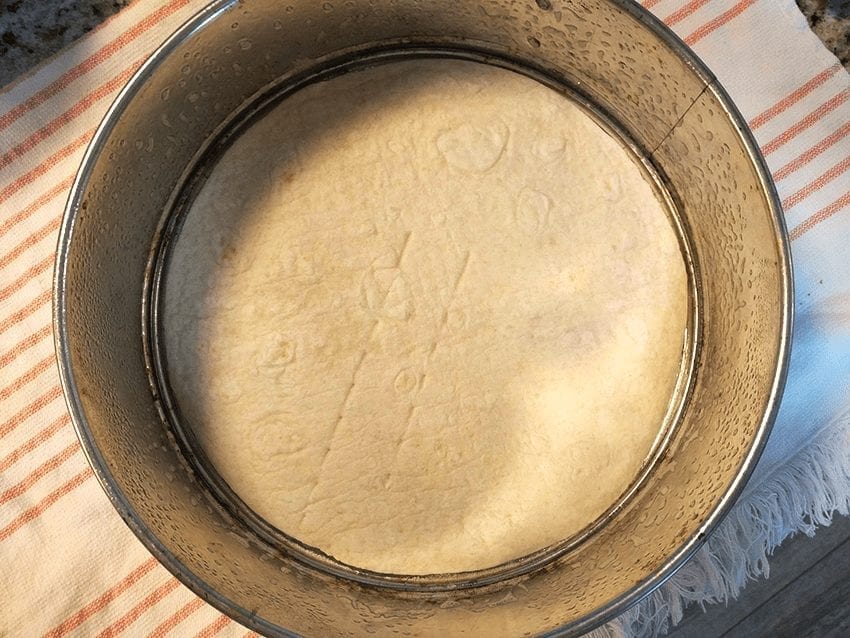
I used a 10″ springform pan and 10″ burrito-sized flour tortillas. The springform pan makes for easy assembly and serving once the pie is baked.
If you don’t have a springform pan, you can use a high-sided souffle dish or a 10″ pie pan.
Spray the bottom and sides of the pan with vegetable spray. Place a tortilla on the bottom. Top with 1/4 of the mushroom soup/sour cream mixture. Top that with 1/4 of the meat/bean mixture. Sprinkle with 1/4 of the shredded cheese.
Repeat the layers three more times finishing with soup, meat, and cheese.
Place the springform pan on a baking sheet. I line my baking sheets with parchment paper or aluminum foil for easy cleanup.
Bake your burrito pie in a 350°F oven for 30 minutes or until the pie is hot and heated through. Remove pie from the oven onto a cooling rack.
Let it sit for 10 minutes to make it easier to slice.
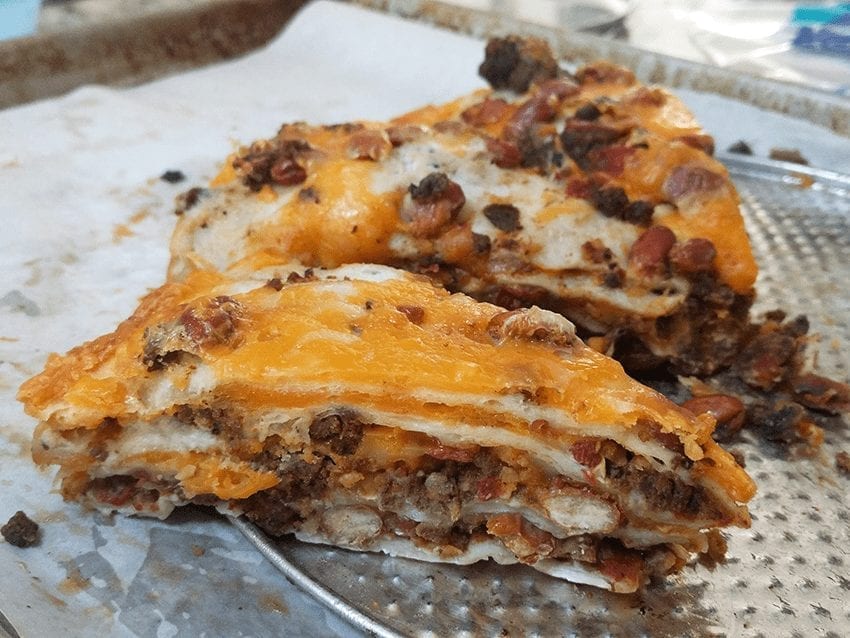
And there you have it!
Cut into pie-shaped wedges and serve with the toppings you choose.
Once cooled to room temperature, your pie can be frozen then thawed and reheated.
I can’t wait to dig in!
Hot, melty, cheesy, and scrumptious Quick & Easy Burrito Pie. Serve with toppings like guacamole, sour cream, shredded lettuce, diced tomato, diced onion, sliced jalapenos and/or salsa.
Author: Mimi
Recipe type: Main Dish, Quick Dish
Cuisine: Mexican
Serves: 4-6 servings
Ingredients
4 - 10" burrito-sized flour tortillas
1 Tablespoon olive oil
1lb ground beef or turkey
½ - 1 onion, diced
1 jalapeno pepper, slivered or diced (May substitute diced green or red bell pepper.)
1-2 cloves garlic, minced
1 - 15½ oz can petite diced tomatoes
1 package taco seasoning
1 - 15½ oz can pinto, black or light red kidney beans, drained and rinsed
1 can cream of mushroom soup
½ cup sour cream
3 cups total Mexican quesadilla cheese and sharp cheddar cheese, shredded
Instructions
Preheat oven to 350 degrees F.
In a 10-12" skillet over medium-high heat add olive oil and ground meat. Brown and drain. Return meat to skillet.
Over medium heat, add onion, Cook until just wilted. Add peppers and cook for another 1-2 minutes. Add garlic. Cook until garlic is fragrant - 1-2 minutes.
Add undrained canned tomatoes and taco seasoning. Stir and simmer until slightly thickened.
Add drained and rinsed beans. Simmer for another 2-3 minutes until mixture is thickened and heated through. Remove from heat and set aside.
In a small bowl, combine cream of mushroom soup and sour cream. Set aside.
In another bowl, combine shredded cheeses. Set aside.
Spray a 10" springform pan with cooking spray.
Line the bottom with one tortilla. Top the tortilla with ¼ soup/sour cream mixture. Top that with ¼ meat/bean mixture. Top that with ¼ shredded cheese.
Repeat layers three times ending with shredded cheese.
Place springform pan on a baking sheet lined with parchment paper or aluminum foil. Place in oven and bake for 30 minutes or until the pie is bubbling and heated through.
Remove from oven onto a cooling rack and let sit for 10 minutes.
Remove the outer collar of the pan and cut into pie-shaped wedges.
Serve with any variety of toppings: guacamole, sour cream, extra shredded cheese, shredded lettuce, diced tomatoes, sliced jalapenos or salsa, sliced black olives or green onions.
Notes
Feel free to make your burrito pie vegetarian by omitting the meat and adding another can of drained and rinsed beans. The springform pan makes this easy to assemble and to serve, but you could use a straight-sided souffle dish or a 10" pie pan.
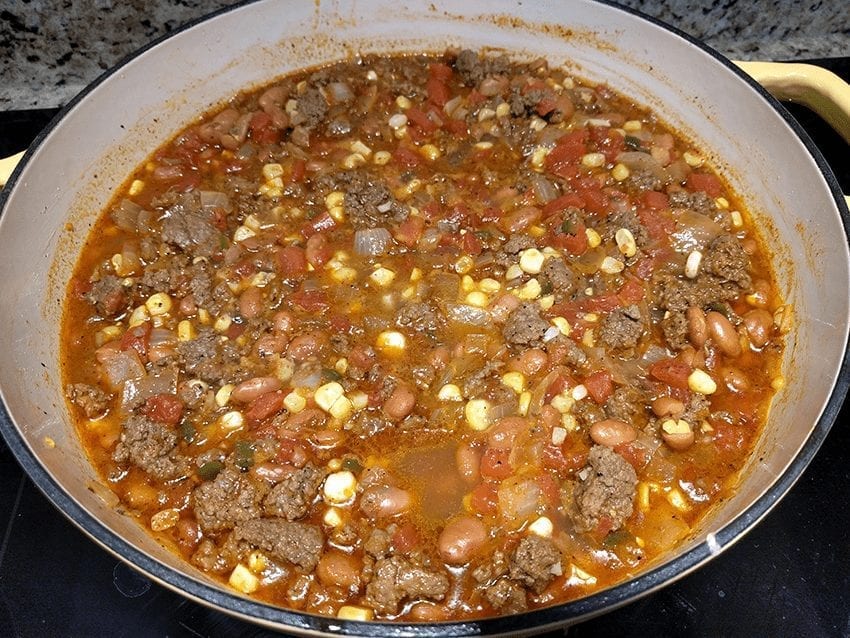
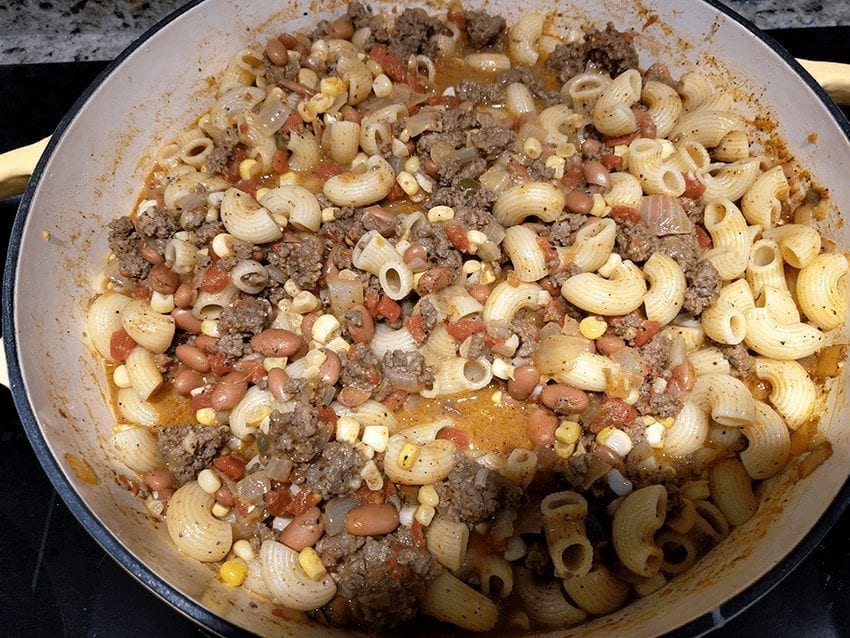
Ultimate comfort food. Perfect fall/winter dish. Kitchen Sink Chili Mac is chocked full of healthy comfort food ingredients. This is a phenomenal recipe for the end of the season vegetables like corn, tomatoes, and peppers. Many of the ingredients are most likely already in your pantry/refrigerator/garden. Don’t be afraid to include different ingredients you have on hand. This would be equally delicious with fresh mushrooms, hot or sweet peppers, or carrots and celery. Prefer ground turkey? Have at it. Ground bison? Why not. Feel free to improvise. There are no hard and fast rules for this stove-top casserole. And it’s quick – 30 to 40 minutes tops.
I add canned pinto beans, well rinsed and drained to remove sodium. Welcome is the added protein and fiber.
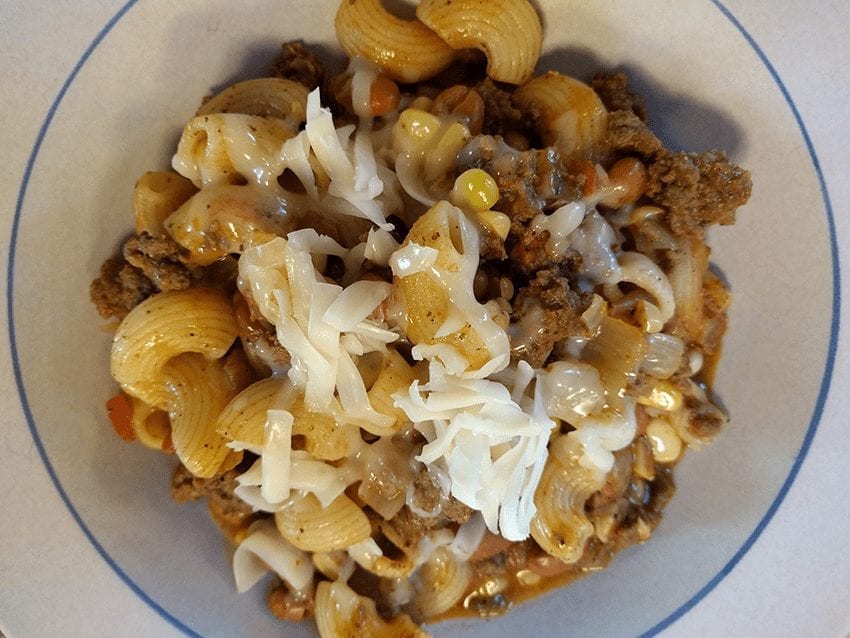
Essentially, you could stop at this step without adding macaroni. Ladle into bowls. You might want to include cornbread as a side. Or you could add cooked pasta AND serve cornbread – I mean, this is cold weather comfort food. Or serve in deep bowls over quinoa or cooked brown rice.
Like your chili mac spicy? Add diced jalapenos and serve with hot sauce. Like a milder version? Substitute diced sweet red bell peppers. And what is it about a dish with corn and tomatoes in a one-pot meal? I love the fresh vegetable flavors. Corn adds a nice crunch, too.
I under-cook the pasta for 60-90 seconds. I find that pasta quickly absorbs liquid in the skillet and changes the consistency of my chili mac. Instead of being soupy, it’s more like a stove-top casserole. That’s okay. If you’d like a more mushy pasta, cook it according to the directions for the full cooking time. This is large elbow macaroni from Trader Joe’s. I absolutely love it. Look at the groves in the noodles. Just right to capture flavorful liquid, meat and veggies.
I can’t wait for another steamy, delicious bowlful. Can you?
Let’s make a potful.
Ultimate comfort food. Perfect fall/winter dish. Kitchen Sink Chili Mac is chocked full of healthy comfort food ingredients. This is a phenomenal recipe for the end of the season vegetables like corn, tomatoes, and peppers. Many of the ingredients are most likely already in your pantry/refrigerator/garden. Don't be afraid to include different ingredients you have on hand.
Author: Mimi
Recipe type: Main Dishes, Casseroles
Cuisine: American
Serves: 4-6 servings
Ingredients
1 pound ground beef (85/15), or turkey, or bison
¼ cup olive oil, divided
1 large onion, diced
2-3 cloves fresh garlic, diced or put through a garlic press ( Hint: get a garlic press)
1-2 jalapenos, diced, membrane, and seeds removed for a less spicy dish OR 1 large red bell pepper diced for a milder dish
15 oz canned pinto beans, rinsed and drained
1 pound fresh Roma tomatoes or other fresh tomatoes, diced OR 1-15oz cans of petite diced tomatoes
1 cup fresh corn cut from the cob or 1 cup frozen corn
½ - 1 cup beef or chicken stock, or water
1 Tablespoon chili powder
1 teaspoon cumin
Pinch ground cayenne pepper, if desired
1 cup macaroni, cooked according to manufacturers' directions
Instructions
In a 3-4 quart pan, boil water. Add 1 cup of macaroni or the pasta you prefer. Cook according to package directions. For a firmer pasta, under-cook 60-90 seconds.
Add 2 Tablespoons olive oil in a 12" skillet over medium-high heat.
Add one pound of ground meat: beef, turkey, or bison, and browned until all the pinkness is gone. Remove the meat to drain on a plate covered with a paper toweling or in a fine meshed colander in the sink.
Return the skillet to the stove over medium-high heat. Add the remaining 2 Tablsepoons olive oil, onion and cook until just wilted, 2-3 minutes.
Add peppers to the onions. Either finely diced jalapenos or one diced red bell pepper. Stir and cook for 2-3 minutes.
Add chili powder and cumin.
Add garlic. Stir and cook until just fragrant.
Add the cooked meat.
Add tomatoes, beans, stock and corn.
Add 1 teaspoonful salt and ½ teaspoonful black pepper.
Simmer until bubbly.
Add macaroni. Stir and continue to cook until the ingredients are heated through.
Check for seasoning.
Divide into deep individual serving bowls. Top with grated Monterrey Jack cheese and serve.
Notes
Kitchen Sink Chili Mac is easy and comes together quickly. You may add diced carrot and/or celery to the vegetables as they saute. Feel free to substitute diced portobello mushrooms for the meat. Instead of pasta, you can serve chili mac over cooked quinoa or brown rice.
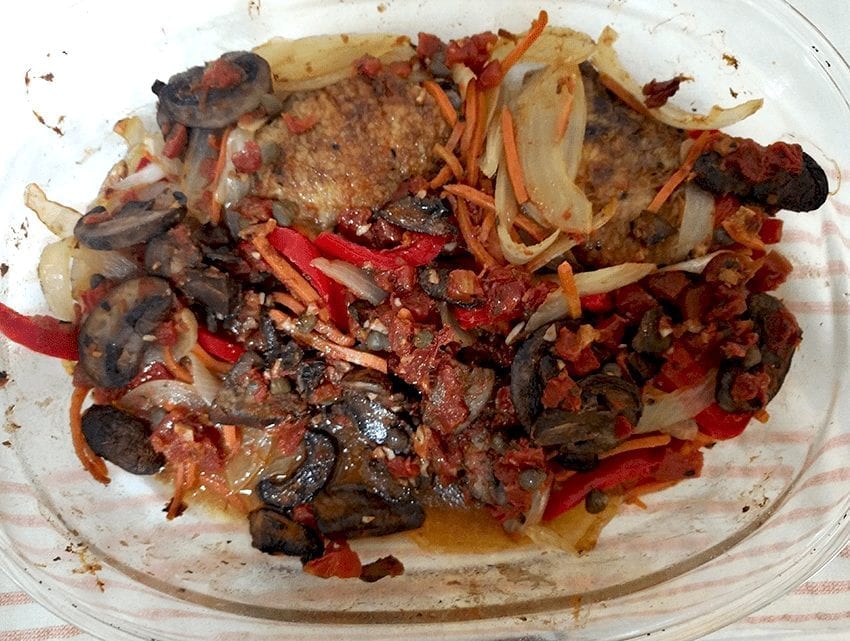
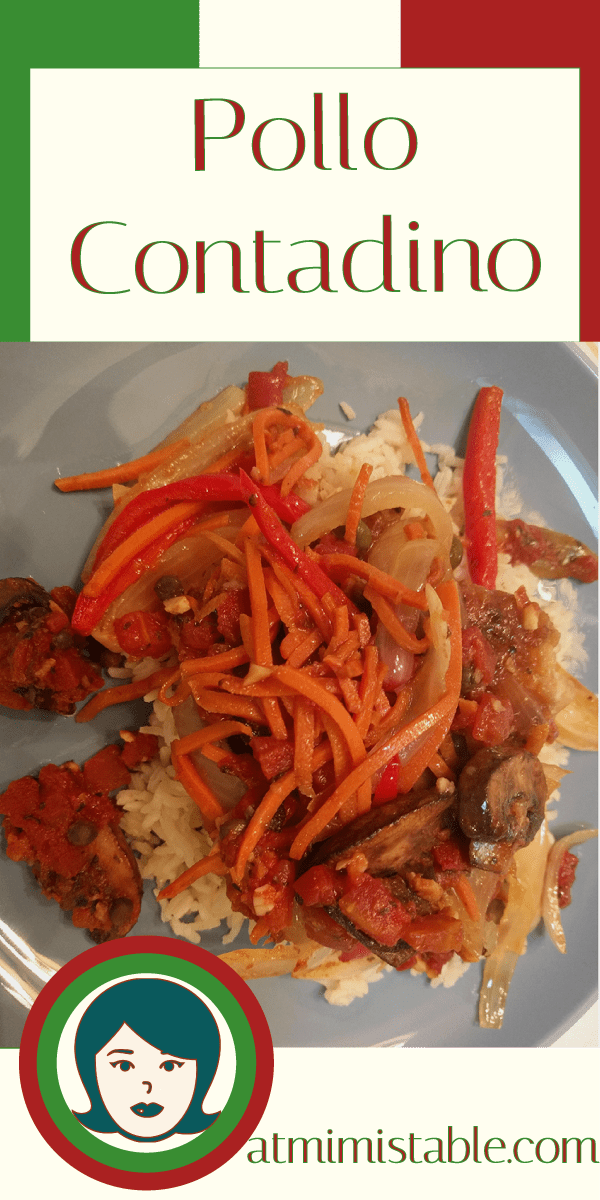
Pollo Contadino is an outstanding casserole of Italian comfort food. I’ve made this dish several times over many years. Each time I lift a forkful to my mouth, I wonder why I don’t make it more often. Such an arousing smell of tender, juicy chicken thighs roasted with onions, carrots, sweet red bell peppers, tomatoes, mushrooms, capers, and rosemary served with its juices over a fluffy bed of hot rice.
Yep, Pollo Contadino is a perfect meal for cozy cold weather days. You know those rainy cold days that make you want to curl up under a blanket to get all snuggly and warm? And if you want to smell the casserole cooking all day, put the ingredients in a crockpot and let it simmer until you can’t stand it anymore.
This recipe was published in “The Frugal Gourmet Cooks Italian” in 1993. I bought Jeff Smith’s cookbook a few weeks ago just for this recipe. ($6 used from Amazon). Money well spent. I can’t wait to sift through the pages for other Italian treats.
Here’s how it works
Pollo Contadino takes a little time to put together but is well worth the effort. I used bone-in, skin-on chicken thighs because we like dark meat and skin helps to keep the meat moist. Drumsticks would be a good substitute. But it can also be made with boneless, skinless chicken breasts if that’s what you prefer. There’s no hard and fast rule.
Don’t leave out any of the vegetables. They all play well together. And be sure to add the capers that add a nice vinegary taste and smell to the finished dish. I can’t imagine the casserole without capers!
The last time I made Pollo Contadino, I didn’t have rosemary in my spice pantry. So, I used a few shakes of pasta sprinkle which is a combination of rosemary, basil, parsley. It worked just fine!
Let’s make some, shall we?
Pollo Contadino, Italian Roasted Chicken Farmer Style
Tender and juicy chicken roasted with onions, carrots, tomatoes, and capers served over a bed of hot fluffy rice. Cibo di comodità - true Italian comfort food.
Author: The Frugal Gourmet, Jeff Smith
Recipe type: Main Dish
Cuisine: Italian
Serves: 4
Ingredients
4 large chicken thighs, skin-on, bone-in 1-1/2 pounds OR 4 boneless, skinless chicken breasts
½ cup all-purpose flour
½ cup extra virgin olive oil
2 medium carrots, peeled and julienned OR use 1 cup of julienned carrots from the store
1 - 2 large sweet red bell peppers, julienned
1 large yellow onion, peeled and julienned
2-3 cloves garlic, minced
6 large baby portobello mushrooms, cut into thick slices OR 1-8oz package of sliced mushrooms from the store
1-2 teaspoons capers
6 ripe plum tomatoes, diced, OR 1-15oz can petite diced tomatoes
1 Tablespoon fresh rosemary OR 1 teaspoon dried rosemary
¼ cup dry white wine
Instructions
Heat oven to 400F degrees.
Remove chicken pieces to paper towels and pat dry. Season lightly with salt and pepper.
Heat ¼ cup olive oil in a large skillet over medium-high heat.
Put flour in a medium-sized bowl. Dredge the chicken pieces one-at-a-time, shake off any excess flour and place in the oil in the skillet.
Brown the chicken on all sides. Remove to a 2-3 quart roasting pan, like Pyrex, a cast iron skillet, or an enameled cast iron pan or pot
Drain off the oil in the frying pan. Return to the stove. Add the remaining ¼ cup olive oil over medium-high heat.
Add the carrots and sautee for 3 minutes.
Add the red pepper and onion. Sautee until the onions are barely translucent.
Add the garlic, stir. Sautee just until you can smell garlic. Be sure not to let it burn.
Place the vegetables over the chicken in the roasting pan.
Return the frying pan to the stove. Over medium-high heat, add the mushrooms, capers and tomatoes, rosemary and wine. Bring to a simmer and cook gently for 5 minutes. Pour over the chicken and vegetables in the roasting pan.
Cover roasting pan with aluminum foil. Roast in the oven for 20 minutes.
Remove the foil and return to oven for 15 minutes.
Serve over fluffy hot cooked rice or spaghetti.
Notes
Pollo Contadino is a comfort food best served on colder days. You can also put ingredients, in order on the recipe, in a crockpot on low for 3-4 hours or high for 2-3 hours. You can use boneless, skinless chicken breasts, or drumsticks or any combination of chicken pieces.
Jeff Smith included 12 medium black Italian or Greek olives, and one green pepper and one red pepper to compliment the colors of the Italian flag. I changed it up just a wee bit.
3.5.3251
Here’s an image to PIN!
Copyright, At Mimi’s Table 2013-2018, All Rights Reserved

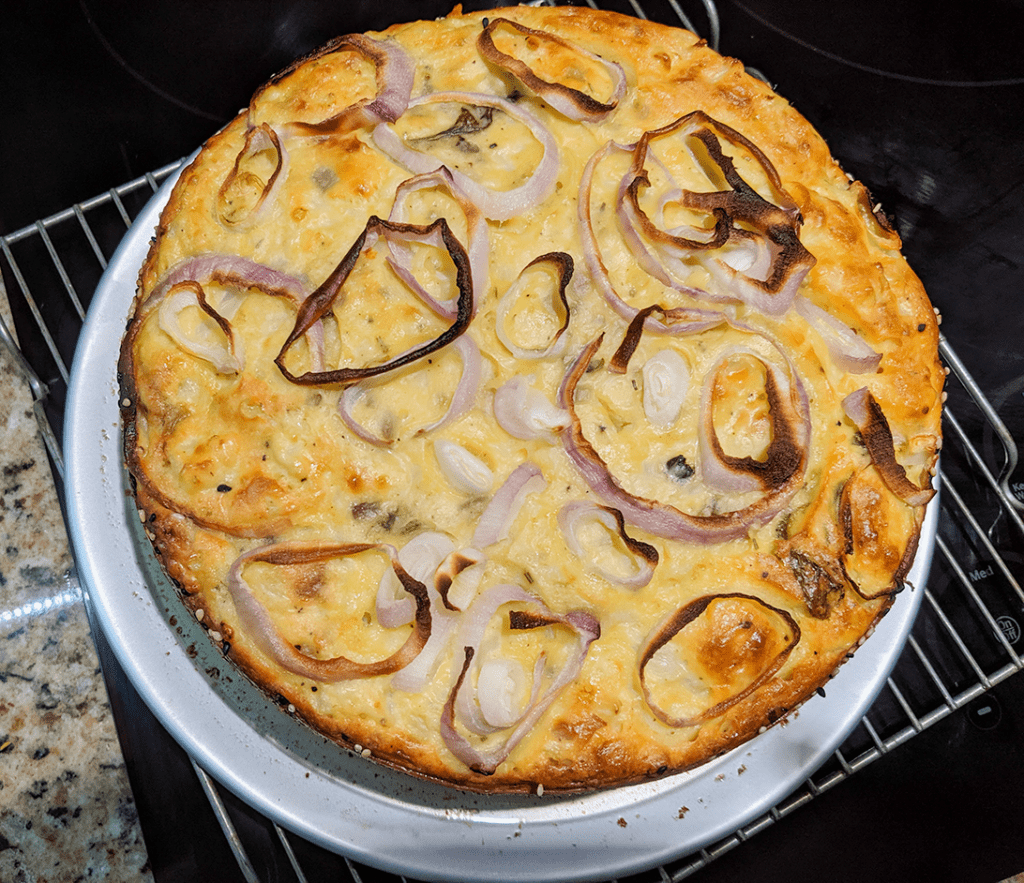
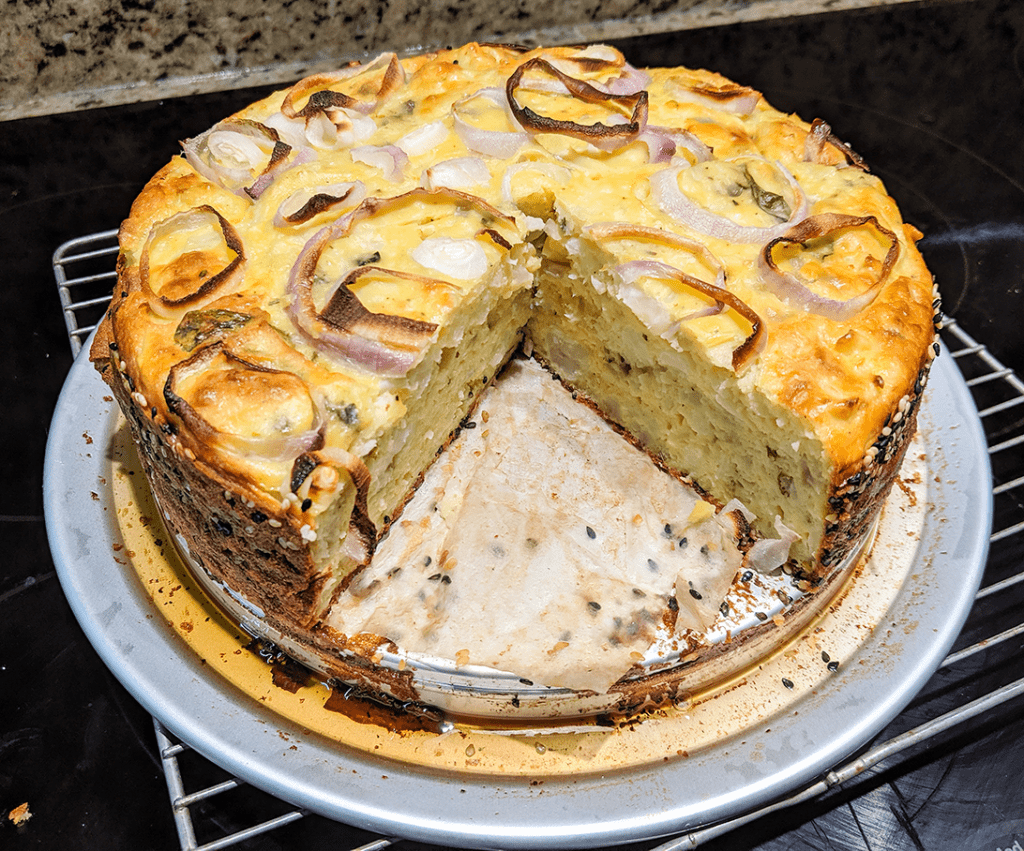


 Spaghetti squash is the perfect side or main for children and grandchildren. (Heck, I think it’s fun!) Wouldn’t you love to watch them drag their forks across the flesh and watch the magic happen? It’s fun! Besides, spaghetti squash is filled with

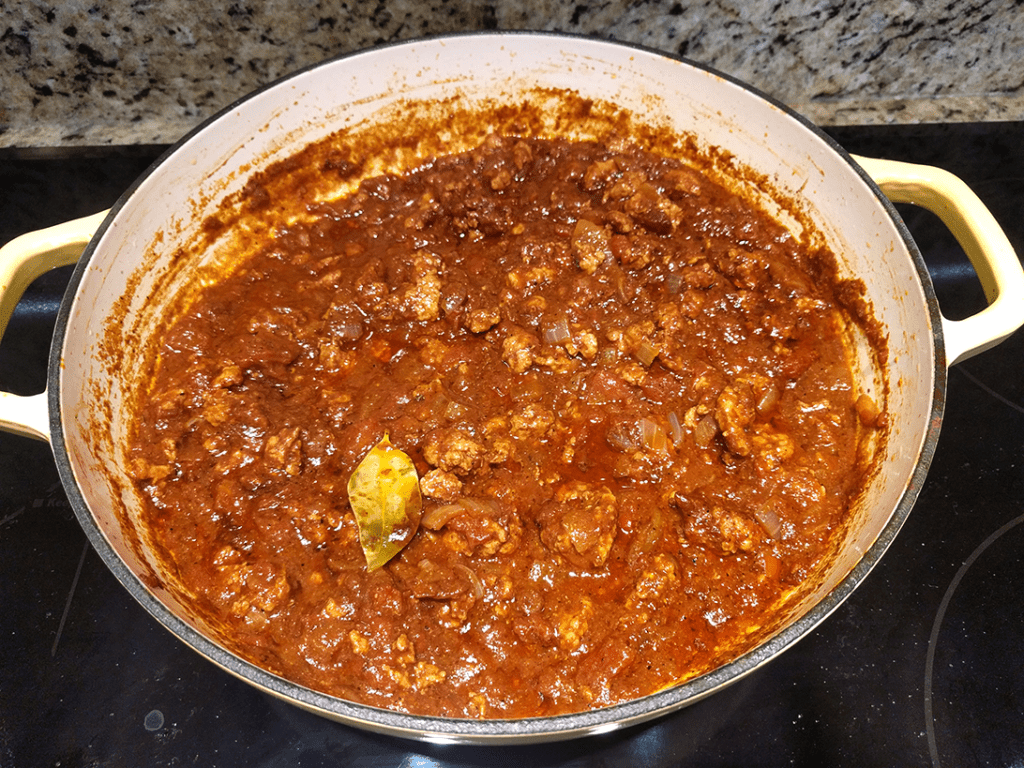
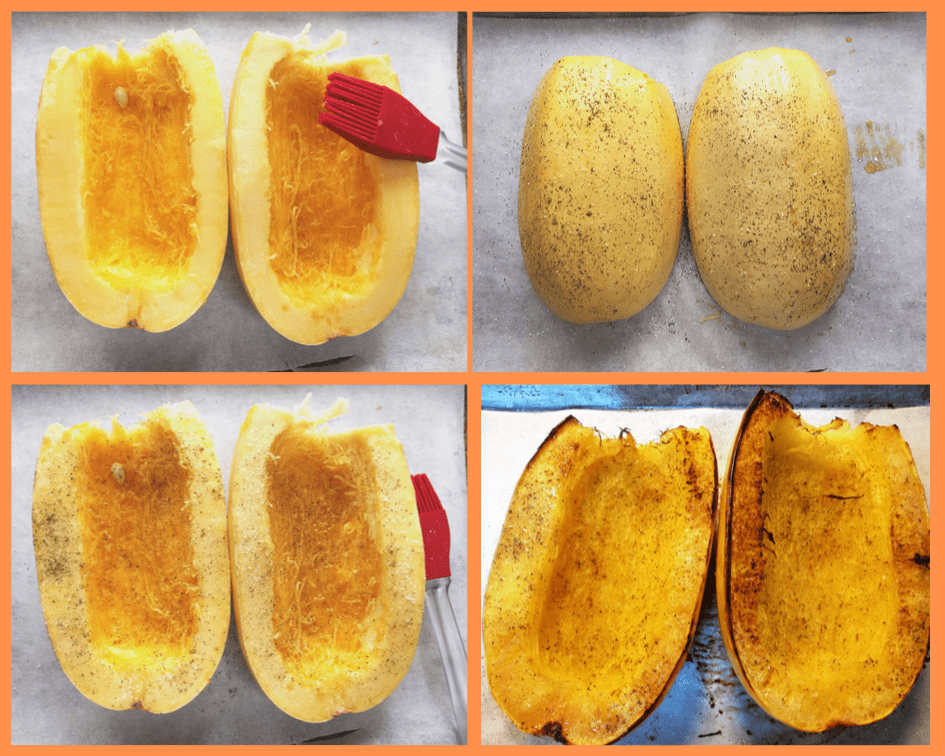

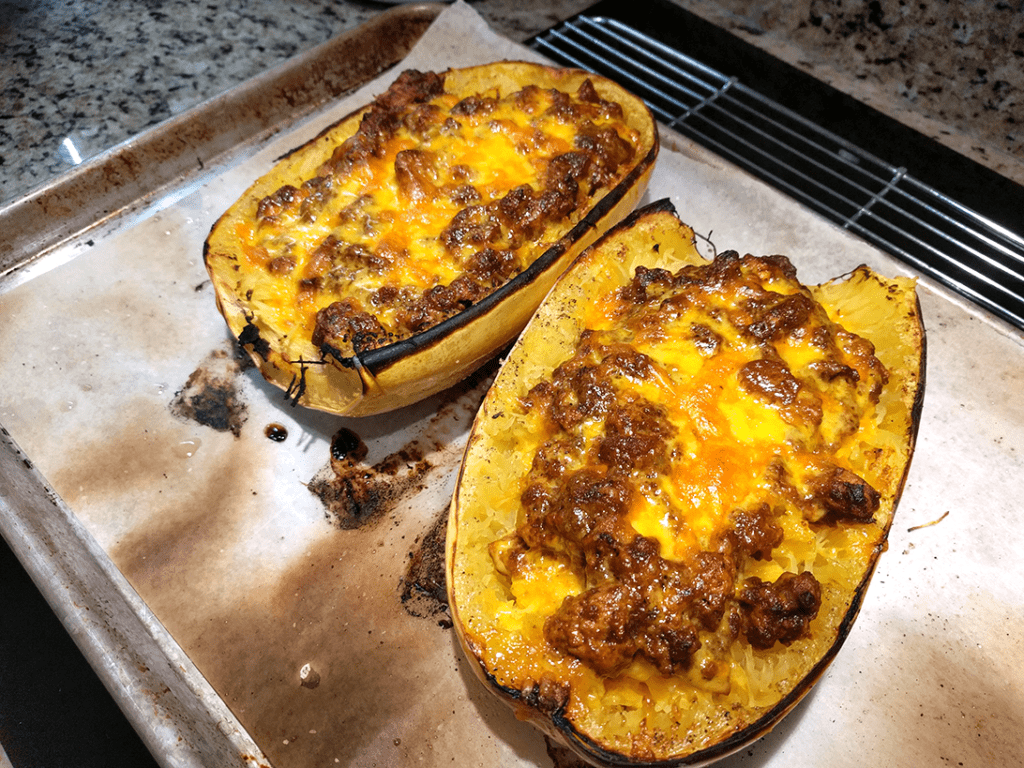


 away with one of the best culinary smells of summer. Some like to use oregano or rosemary or thyme – my go-to is always basil. I prefer the distinctive almost anise-like taste and smell – fresh or dried – to just about any other herb. Personally, I think thyme is over-rated. Parsley is just so, well, bland. I can’t imagine making any pesto with parsley – not my thing. Of course, basil in spaghetti sauce is a must. And my mother used to roast a rump roast in an oven-baking baking bag simply seasoned with salt, pepper, and dried basil mixed with a can of tomato soup – out-of-this-world gravy to pour over mashed potatoes! Basil simply makes me happy.